Few subjects in woodcarving offer the same blend of grace and simplicity as the feather. For beginners, feather carving is a perfect way to practice fine detail work, as the repetitive nature of the barbs and the elegant curve of the quill allow for rhythmic, meditative progress. Because feathers come in endless varieties—from the sturdy flight feathers of a hawk to the soft down of a swan—you can adapt your carving style to match your skill level, whether you prefer bold silhouettes or delicate textures.
In this article, we will explore several ways to transform small pieces of wood into airy keepsakes. We will start by looking at designs that use negative space and piercing techniques to create striking, lightweight pendants that capture the true essence of a plume.
The Textured Relief Feather

This project is a fantastic entry point for beginners because it focuses on rhythmic surface detailing. By carving a series of fine, parallel lines into a slender piece of wood, you can create a highly realistic texture that mimics the soft barbs of a real feather.
- Design Style: A slender, tapered wooden pendant featuring a prominent central quill (rachis) with finely textured barbs branching out to the edges.
- Ease of Entry: Moderate. The most important skill for a beginner here is maintaining consistent spacing and depth while carving the many fine lines that represent the feather’s texture.
- Skill Practice: This piece is a masterclass in line control and grain direction. You will practice making shallow, repetitive cuts that flow outward from the center, helping you understand how wood reacts to a blade when working on a small, narrow canvas.
- Key Detail: The asymmetrical notches. Intentionally carving small gaps or “breaks” in the edge of the feather makes the piece look more natural and less like a rigid, manufactured object.
- Recommended Tooling: A V-gouge or a sharp detail knife is essential for creating the fine grooves, while fine-grit sandpaper can be used to lightly soften the edges of the quill for a more organic feel.
The Layered Detail Plume

This project is an excellent step forward for beginners because it introduces the concept of overlapping forms. By carving two feather shapes that appear to rest against one another, you learn how to create a sense of three-dimensional depth on a relatively small piece of wood.
- Design Style: A compact carving featuring two distinct feathers, one with smooth, broad surfaces and the other with deeply etched, rhythmic texture.
- Ease of Entry: Moderate. The primary challenge for the beginner is “stepping” the wood—lowering the surface of one feather so it appears to sit behind the other.
- Skill Practice: This piece focuses on undercutting and stop-cuts. You will practice using a sharp detail knife to create clean vertical boundaries between the two feathers, which ensures that each element remains distinct and crisp.
- Key Detail: The central quill definition. Carving a prominent, raised ridge for the quill on both feathers provides a strong visual anchor and makes the fine, textured barbs look more realistic by comparison.
- Recommended Tooling: A sharp detail knife with a fine tip is essential for the precision work around the quill and the overlapping edges.
The Quill and Inkwell Display

This project is a perfect milestone for beginners because it moves from flat relief work to three-dimensional sculptural carving. By carving a feather that stands upright in its own wooden base, you learn how to manage structural stability while maintaining a sense of light, organic movement.
- Design Style: A tall, upright wooden feather featuring soft, rounded barbs and a prominent central quill, standing inside a small, square-based “inkwell”.
- Ease of Entry: Moderate. The most important skill for a beginner here is ensuring the base of the quill is carved thick enough to support the height of the feather without snapping.
- Skill Practice: This piece focuses on all-around shaping and joinery. You will practice rounding the edges of the feather on both sides to give it a realistic, 3D profile, and you will learn how to drill a precise hole in the base to create a snug “friction fit” for the quill.
- Key Detail: The notched edges. Deep, clean V-notches along the lower half of the feather break up the silhouette, giving the wood a more authentic, “weathered” look that suggests individual barbs separating naturally.
- Recommended Tooling: A straight carving knife for the primary shaping of the plume and a small gouge for hollowing the top of the inkwell base.
The Deep-Vanes Relief Feather

This project is an excellent exercise for beginners who want to move beyond surface scratching and practice deep relief carving. By using strong, decisive cuts to define the feather’s barbs, you create a piece that plays beautifully with light and shadow.
- Design Style: A long, curved wooden feather featuring deep, sweeping grooves that represent thick clumps of barbs flowing away from a prominent central quill.
- Ease of Entry: Moderate. While the pattern is repetitive, the beginner must focus on maintaining a consistent angle with their tool to ensure the “valleys” between the barbs are uniform in depth.
- Skill Practice: This piece focuses on curved line carving and depth control. You will practice following an “S” curve for each barb, which helps develop the muscle memory needed for more complex organic shapes in future projects.
- Key Detail: The staggered edge profile. Rather than a smooth outer border, the edges of this feather are deeply notched to match the internal grooves, giving the carving a more rustic and handcrafted appearance.
- Recommended Tooling: A V-gouge is the primary tool for creating the deep vanes, while a small flat chisel can be used to clean up the transitions where the barbs meet the central quill.
The Filigree Stylized Feather

This project is a fantastic challenge for beginners who have mastered basic lines and want to explore complex surface patterns. By dividing the feather into two distinct halves—one with traditional rhythmic barbs and the other with intricate scrolls—you can showcase a wide range of carving techniques in a single piece.
- Design Style: A long, elegant white-toned feather featuring deep, wavy ridges on one side and a series of delicate, carved “S” scrolls and paisley-like patterns on the other.
- Ease of Entry: Moderate to Advanced. The difficulty lies in the precision required for the filigree side, as the beginner must carefully carve around the tiny raised “islands” of wood that form the swirling pattern.
- Skill Practice: This piece is a masterclass in relief depth and negative space management. You will practice using a micro-tool to lower the background around your pattern, making the scrolls appear to “float” on the surface of the feather.
- Key Detail: The curled quill tip. Ending the quill with a small, graceful loop instead of a straight point adds a sophisticated touch that elevates the carving from a simple study to a finished piece of jewelry or decor.
- Recommended Tooling: A micro-V-gouge or pfeil-style detail tools are necessary for the tiny scrollwork, while a small round gouge can create the deep, rhythmic waves on the opposite side.
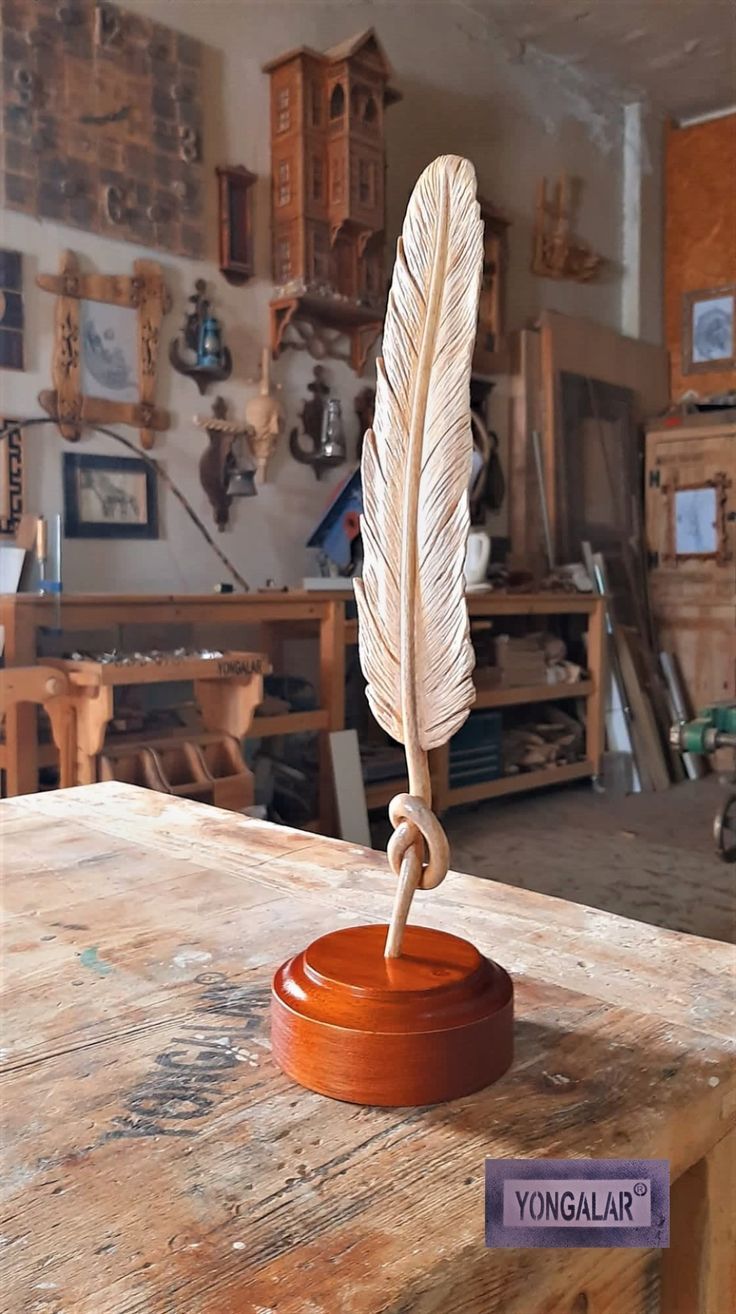
The Knotted Quill Sculpture

This project is an advanced milestone for beginners because it introduces interlocking sculptural forms. By carving a feather whose quill appears to be tied in a physical knot, you move beyond flat relief and learn how to visualize and execute complex 3D shapes that wrap around each other.
- Design Style: A tall, vertically standing wooden feather with a highly textured surface and a prominent central quill that features a literal overhand knot tied near the base.
- Ease of Entry: Advanced. This requires a solid understanding of spatial relationships, as the “knot” must be carved from a single, solid block of wood to maintain its structural integrity.
- Skill Practice: This piece focuses on complex grain management and spatial visualization. You will practice carving “under and over” to create the illusion of a flexible quill, requiring careful tool work to ensure the wood doesn’t split along the grain at the tightest curves of the knot.
- Key Detail: The polished display base. Mounting the textured, raw-wood feather into a dark, highly polished circular base creates a professional contrast between the natural, “unfinished” look of the plume and the refined craftsmanship of the stand.
- Recommended Tooling: A flexible detail knife for navigating the tight interior of the knot and varying grades of sandpaper to smooth the quill’s surface while keeping the feather barbs textured.
The Sculpted Writer’s Plume

This project is a sophisticated capstone for a beginner because it combines anatomical carving with delicate texture work. By carving a realistic hand that appears to be writing with a wooden quill, you learn how to manage the proportions of a complex human form alongside the lighter, more rhythmic patterns of a feather.
- Design Style: A large, dark-toned wooden slab featuring a high-relief carving of a hand holding a long, textured feather quill, which appears to be mid-stroke across the wood’s surface.
- Ease of Entry: Advanced Beginner to Intermediate. The challenge lies in the “hand-to-object” interaction; the beginner must ensure the fingers appear to naturally grip the quill rather than just resting on top of it.
- Skill Practice: This piece focuses on proportional carving and deep texturing. You will practice carving the rounded segments of the fingers and then transition to using long, sweeping strokes to give the feather a dense, fibrous appearance that contrasts with the smooth “skin” of the hand.
- Key Detail: The contrast in wood tones. Using a lighter-colored wood for the feather against a dark, polished base for the hand and paper makes the quill the unmistakable focal point of the carving.
- Recommended Tooling: A large gouge for clearing the background of the slab, a detail knife for the finger joints, and a wire brush or specialized texturing tool to achieve the rough, natural look of the feather barbs.
The Mountain Silhouette Plume

This project is a unique milestone for beginners because it combines fine-line texturing with creative silhouette shaping. By carving a feather that appears to have jagged, mountain-like breaks across its surface, you learn how to balance delicate detail with bold, geometric voids.
- Design Style: A long, curved wooden feather featuring a light natural finish, characterized by fine, rhythmic barbs and a series of sharp, jagged cut-outs that mimic a mountain range silhouette.
- Ease of Entry: Moderate. While the basic feather shape is straightforward, the beginner must be careful when carving the jagged “mountain” edges to ensure the wood remains structurally sound.
- Skill Practice: This piece is excellent for practicing asymmetrical balance and edge refinement. You will practice using a detail knife to create sharp, crisp corners within the feather’s vanes, helping you master precise stop-cuts.
- Key Detail: The split-level texturing. The barbs on one side of the quill are carved at a slightly different angle than those on the other, which creates a realistic sense of movement and allows the “mountain” silhouette to stand out more clearly.
- Recommended Tooling: A V-gouge for the fine barb lines and a narrow chisel or detail knife to carefully remove the wood for the jagged silhouette portions.
The Aged Oak Plume

This project is an excellent study for beginners on how material choice and grain orientation can influence the final look of a carving. By working with a piece of dark, rich wood, you can create a feather that feels historic and substantial, requiring less superficial finishing to look like a professional heirloom.
- Design Style: A long, vertically suspended feather pendant carved from dark wood, featuring a prominent, slightly curved quill and deeply etched, rhythmic barb textures.
- Ease of Entry: Moderate. The primary challenge for a beginner is working with denser, darker woods, which can be harder on your tools but provide a very satisfying, crisp finish.
- Skill Practice: This piece focuses on deep texture and undercut refinement. You will practice carving thin, curved “splits” in the feather’s vanes, which requires a steady hand to ensure these delicate elements don’t snap off during the process.
- Key Detail: The curled barb accents. Intentionally carving a few individual barbs that peel away from the main body of the feather adds a high level of realism and a sense of movement to the stationary wood.
- Recommended Tooling: A sharp detail knife with a thin profile to navigate the narrow splits, and a small V-gouge to maintain consistent depth for the main barb lines.
The Metallic-Sheen Pendant

This project is a perfect capstone for beginners because it emphasizes uniformity and precision. While previous designs focused on organic “breaks” and soft textures, this pendant mimics the sleek, aerodynamic surface of a real feather, requiring a steady hand to maintain perfectly parallel barb lines.
- Design Style: A long, silver-toned pendant featuring a straight central quill and highly dense, fine texture that creates a shimmering, metallic appearance.
- Ease of Entry: Moderate. The challenge here is not the complexity of the shape, but the discipline required to carve dozens of microscopic lines with identical spacing and depth.
- Skill Practice: This piece is an excellent exercise in micro-detailing and edge finishing. You will practice using very shallow cuts to create a texture that catches the light, and you will learn how to thin the outer edges of the wood to a “paper-thin” profile without sacrificing durability.
- Key Detail: The asymmetrical vane widths. By making one side of the feather slightly wider than the other, you mimic the natural anatomy of a primary flight feather, giving the piece an authentic feel despite its stylized, metallic finish.
- Recommended Tooling: A micro-V-tool or a scrimshaw needle for the surface lines, and high-grit sandpaper (up to 2000 grit) to achieve a surface smooth enough to accept metallic paints or silver leaf finishes.
Conclusion: Bringing Organic Grace to Your Workbench
Feather carving offers a unique opportunity to explore the delicate balance between structural strength and soft, flowing detail. Whether you began with the rhythmic surface work of the Textured Relief Feather, practiced overlapping forms with the Layered Detail Plume, or ventured into highly technical finishes like the Metallic-Sheen Pendant, you have developed skills that are fundamental to artistic woodcarving.
Through these feather projects, you have honed several essential techniques:
- Precision Detailing: Mastering the art of repetitive, fine-line texture to represent organic barbs.
- Dimensionality: Learning to create the illusion of depth through relief cuts, interlocking 3D forms, and intentional negative space.
- Structural Planning: Balancing thin, delicate shapes with the strength needed for standalone sculptures or functional jewelry.
- Creative Expression: Integrating symbolic imagery, such as mountain silhouettes or filigree scrolls, into natural forms.