There is a reason the eagle has long been a favorite subject among woodcarvers. With its piercing gaze, powerful talons, and commanding presence, this bird represents freedom, strength, and a wild majesty that few other creatures can match. Whether you are drawn to the iconic bald eagle or the fierce golden eagle, capturing its spirit in wood is a rewarding challenge that can define a carver’s journey.
The beauty of eagle wood carving lies in its versatility. A beginner can find joy in a simple silhouette, while an advanced artist can spend months perfecting the layering of individual feathers on a life-sized bust. To help you find your next project, this guide presents 25 eagle carving ideas thoughtfully organized by skill level. We will also explore how to choose the right project, essential techniques for success, and the finishing touches that bring your majestic creation to life.
How to Choose Your Eagle Project
Before you pick up a gouge or select a block of wood, it pays to take a moment to assess your current skill level and the tools at your disposal. Choosing a project that aligns with your experience is the key to an enjoyable carving experience.
Skill Level
Be honest with yourself about where you stand. Beginners should look for projects with simple, flowing shapes that focus on form rather than intricate detail. A stylized eagle head or a folk-art interpretation allows you to build confidence with basic cuts. Intermediate carvers can begin exploring anatomy, texture, and composition—perhaps a perched eagle with defined feather groups. Advanced carvers can tackle dynamic poses, undercutting, and museum-quality realism that demands patience and precision.
Tools
Your tool kit will also determine which projects are feasible. A beginner with a single carving knife and a small set of gouges can accomplish a great deal with simple in-the-round or whittled projects. As you progress, you may find yourself reaching for specialized tools: veining tools for feather details, micro-gouges for fine texture around the eyes, or power carvers for efficient material removal and realistic feather texturing. Consider what you already own before committing to a complex design.
Wood Type
Wood choice is just as important as the design itself. Basswood remains the gold standard for beginners—it is soft, forgiving, and holds detail well. Butternut offers a beautiful grain and slightly more resistance for intermediate work. For advanced carvers pursuing lifelike detail, tupelo is a favorite among power carvers for its even density and ability to hold crisp textures, while walnut provides a stunning dark contrast for projects left in a natural finish.
1. The Chainsaw Guardian Bench
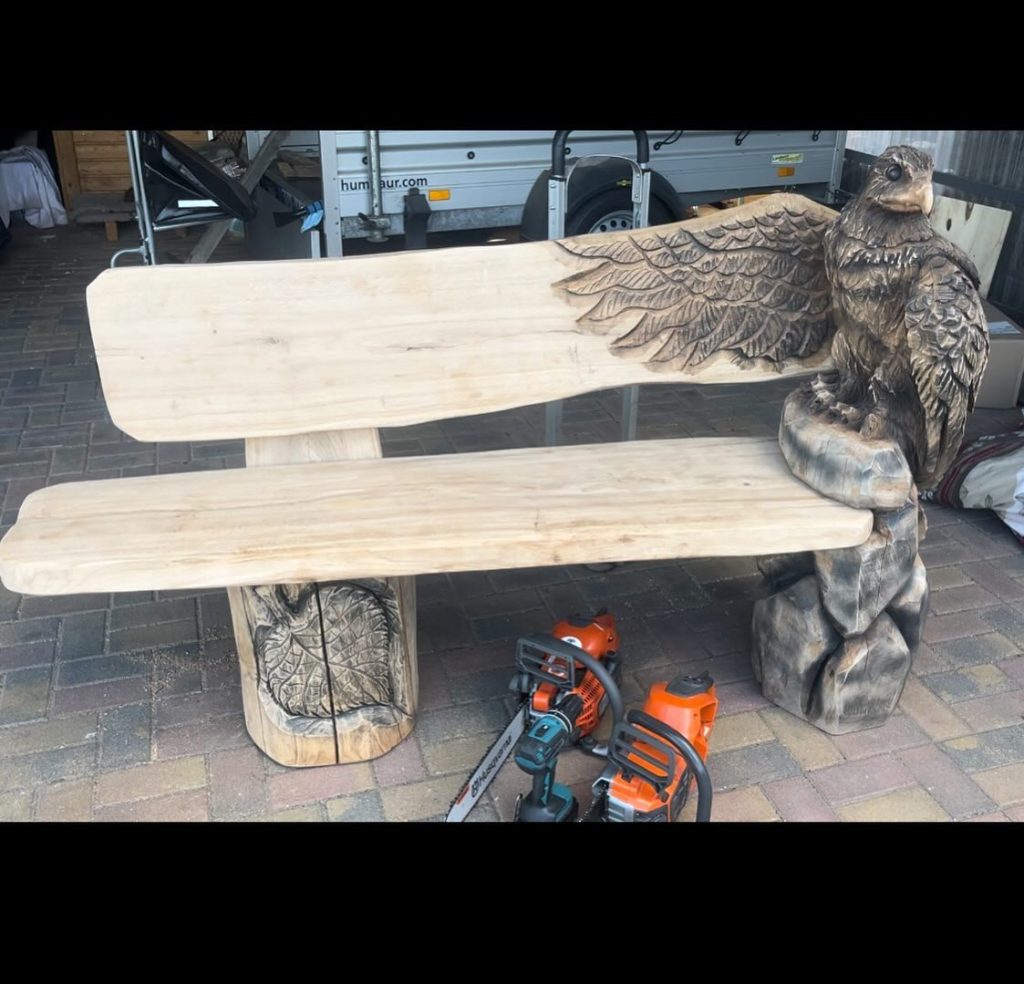
Description: Transform a simple seating area into a gallery-worthy focal point by integrating a massive eagle wood carving into a live-edge bench. This design features a powerful raptor with a sprawling, 3D wing that wraps around the backrest, demonstrating how functional furniture can double as high art. It’s an aspirational project that encourages carvers to think big, using the natural curves of the wood to dictate the bird’s flight path. Whether you are a beginner looking to try relief work or an expert with a chainsaw, this bench proves that eagle carving ideas can be both practical and breathtaking.
- Pro Tip: When carving into a large bench like this, ensure you leave enough “meat” in the wood for structural integrity. Use a deep-penetrating oil finish to protect the intricate feather work from the elements while keeping the seat comfortable for use.
2. The Sunburst Wall Relief
Description: This striking high-relief piece captures an eagle in mid-descent, bursting from a natural log slice with wings fully deployed. The warm, amber tones of the finish highlight the aggressive “shingling” technique used on the feathers, making it a perfect eagle wood carving project for those wanting to practice depth and perspective. By carving the head and talons in higher relief than the wings, you create a 3D effect that feels like the bird is flying right out of the wall.
- Pro Tip: To achieve this “burning” effect in the recesses, try a light torching technique before your final sanding. This adds an authoritative level of contrast that defines every individual feather without the need for multiple stains.
3. The Shadow-Catcher Statue
Description: For the carver who appreciates subtle elegance, this dark-stained, full-bodied sculpture focuses on the quiet power of a perched eagle. This eagle wood carving emphasizes silhouette and form over flashy detail, teaching you how to use a single dark tone to let the light catch the ridges of the wings. It is an inclusive design that shows you don’t need a multi-colored paint job to create a majestic result—sometimes, the wood’s natural grain and a deep espresso finish do all the talking.
- Pro Tip: When working with dark stains, sand your piece to a higher grit (at least 320) than usual. This prevents the pigment from pooling unevenly in the grain, ensuring your eagle carving ideas look professional and polished.
4. The Painted Realistic Bust
Description: Bring your art to life with this realistic, hand-painted eagle head and shoulders. This project is an excellent instructional piece for learning the “layering” of textures, from the fine, hair-like down on the white head to the heavy, overlapping flight feathers on the body. It’s a fantastic way to experiment with mixed media, using acrylic washes to enhance your eagle wood carving. Seeing the transition from raw wood to a lifelike predator is incredibly motivating for carvers of all skill levels.
- Pro Tip: Use “stop cuts” at the base of the white head feathers to create a physical barrier for your paint. This keeps your colors crisp and prevents the dark brown stain of the body from bleeding into the white of the head.
5. The Raw Rough-Out Study
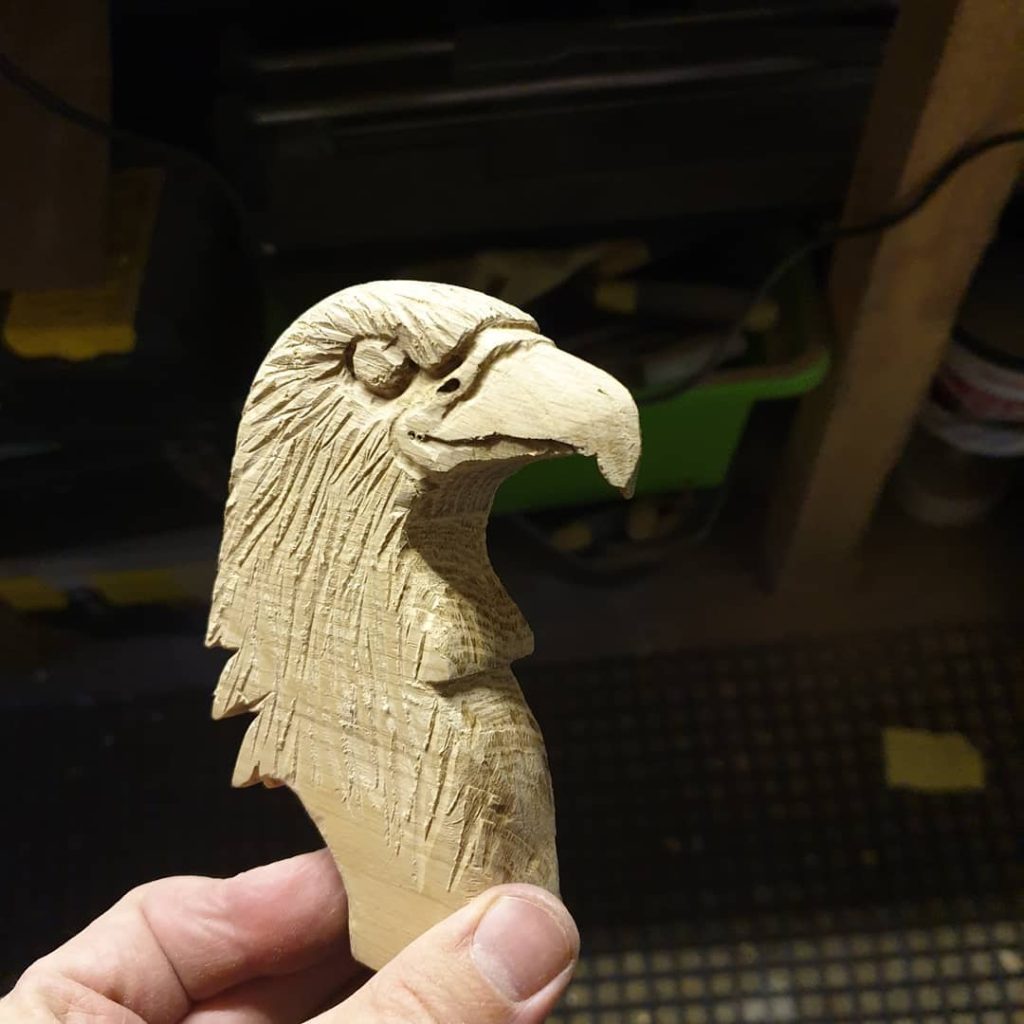
Description: Stripping away the finish and paint reveals the true “skeleton” of a great eagle wood carving. This profile study is an authoritative look at the “rough-out” stage, focusing purely on anatomical proportions and the sharp, clean lines of the beak and brow. It’s an essential project for beginners to learn how to block out shapes before diving into fine detail. Mastering this profile view is the foundation for almost all other eagle carving ideas you’ll encounter.
- Pro Tip: Keep your tools razor-sharp for this stage. On lighter woods like basswood, a dull blade will “crush” the wood fibers rather than slicing them, making it much harder to add fine details later on.
6. The Modern Totem
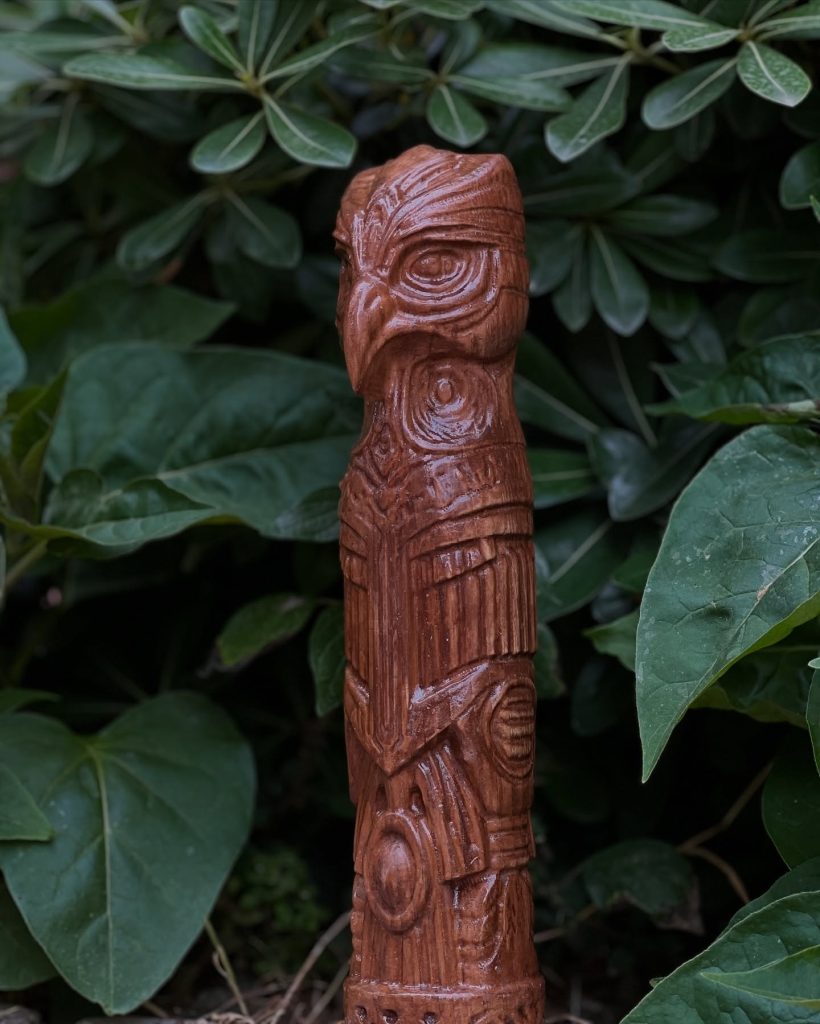
Description: This unique piece reimagines the eagle wood carving through a stylized, contemporary lens. Using deep, geometric grooves and an elongated form, this “eagle totem” is a masterclass in using shadows to create features. It’s a very inclusive project; even if you aren’t confident in realistic anatomy yet, you can create a majestic, authoritative presence by focusing on bold, symmetrical lines and a high-gloss cherry finish.
- Pro Tip: For these deep, rounded grooves, a “U-gouge” is your best friend. Work with the grain to avoid “tear-out,” which is especially visible on smooth, stylized surfaces like this one.
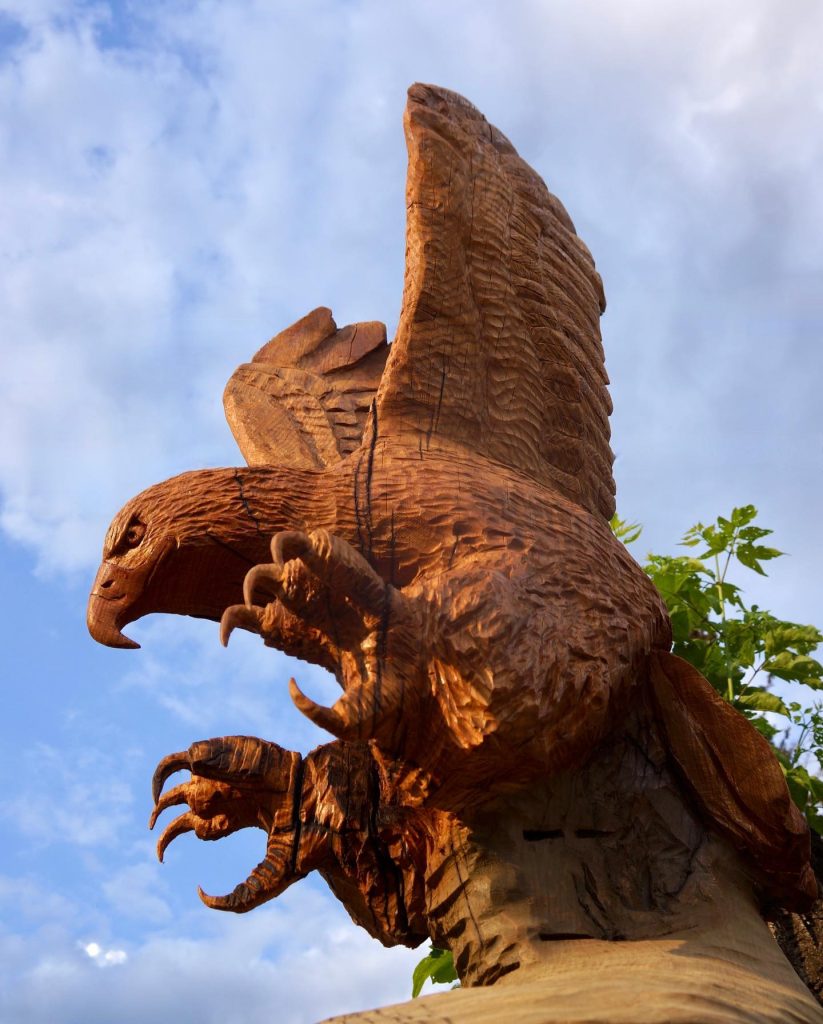
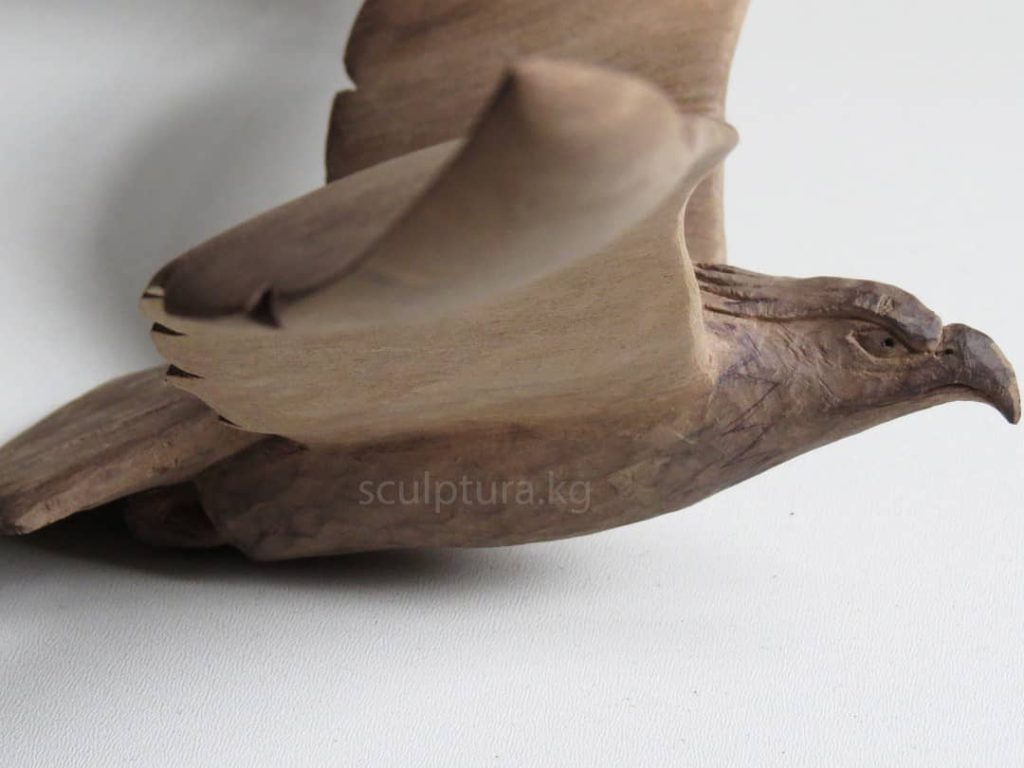
7. The Rising Hunter
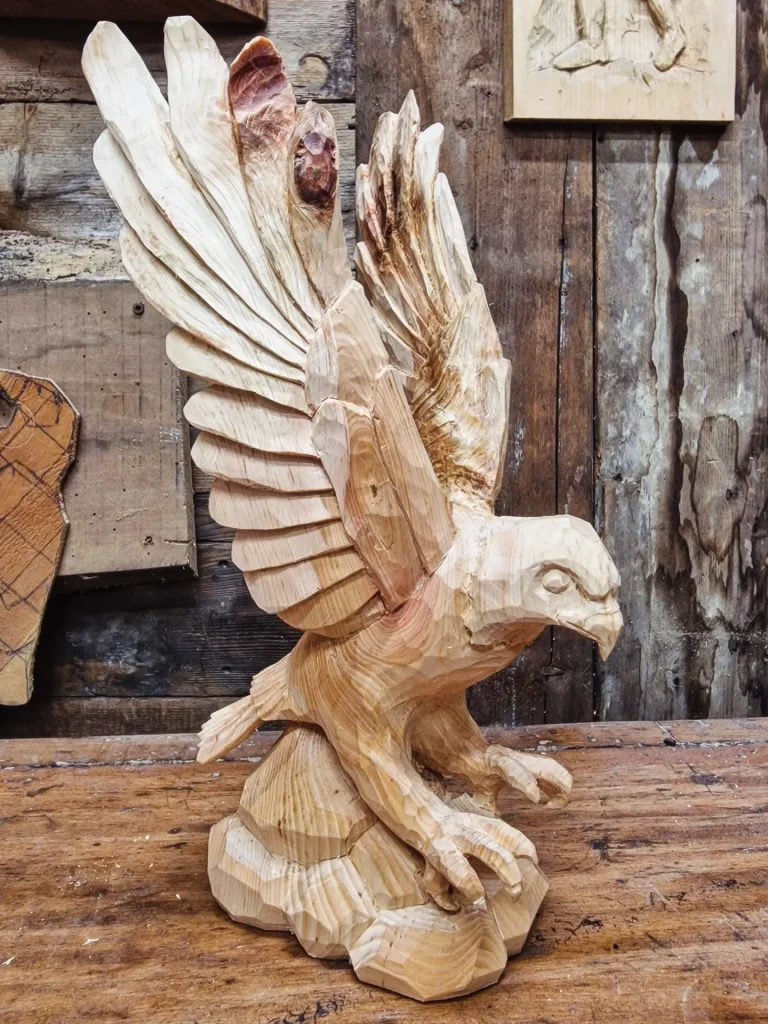
Description: Capture the raw energy of a raptor taking flight with this unpainted, natural wood sculpture. This eagle wood carving focuses on the vertical power of the wings, using deep undercuts to separate the primary feathers. It is an inspirational project for those who want to move away from static poses and explore how to balance a heavy sculpture on a small, rugged base. By leaving the wood in its natural state, the carver’s tool marks become a part of the story, welcoming viewers to appreciate the hand-crafted process.
- Pro Tip: When carving upright wings like these, pay close attention to the grain direction. Carving “down” the grain toward the tips will prevent the delicate feather ends from snapping off during the final stages of detail work.
8. The Backyard Soarer
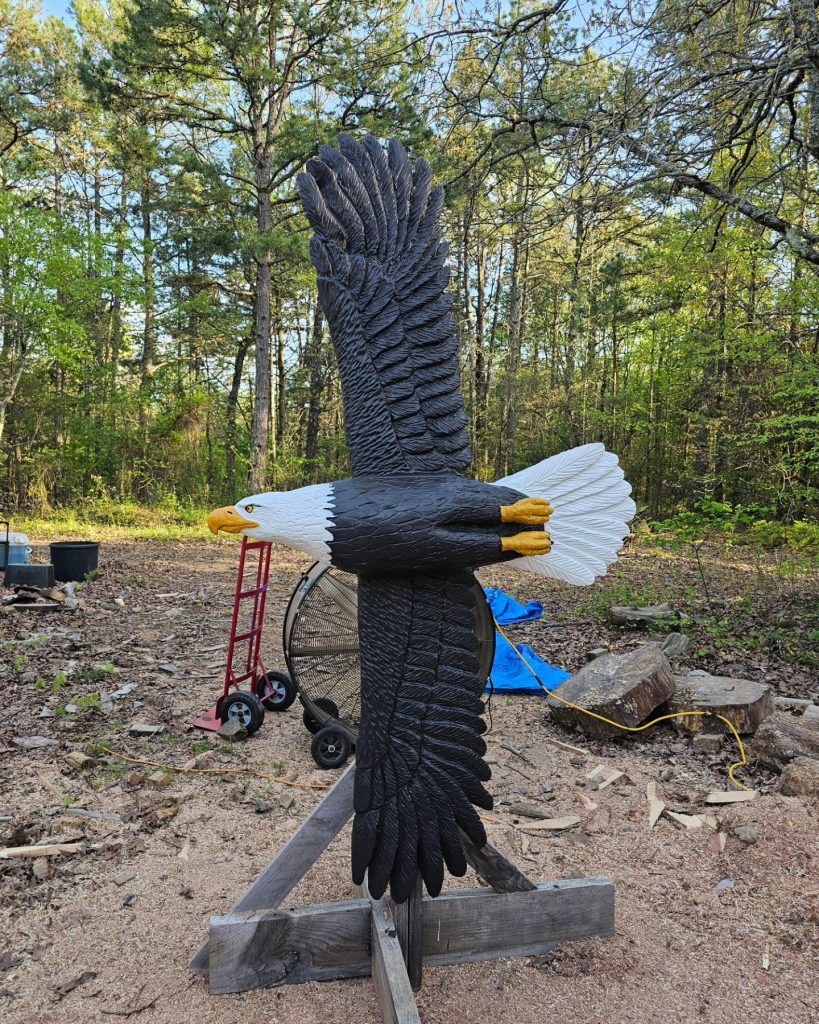
Description: If you are looking for eagle carving ideas that make a bold outdoor statement, this large-scale, painted bald eagle is a perfect guide. Positioned on a simple cross-base, this piece uses high-contrast colors—stark white and deep black—to ensure it’s visible from across a garden. It’s an inclusive project for those transitioning into power carving, where the focus is on the massive silhouette and broad feather patterns rather than microscopic detail.
- Pro Tip: For large outdoor sculptures, an authoritative finish is non-negotiable. Use spar urethane or a high-quality exterior paint to protect your work from UV damage and moisture, ensuring your eagle stays “majestic” through every season.
9. Intricate Wing-Span Relief
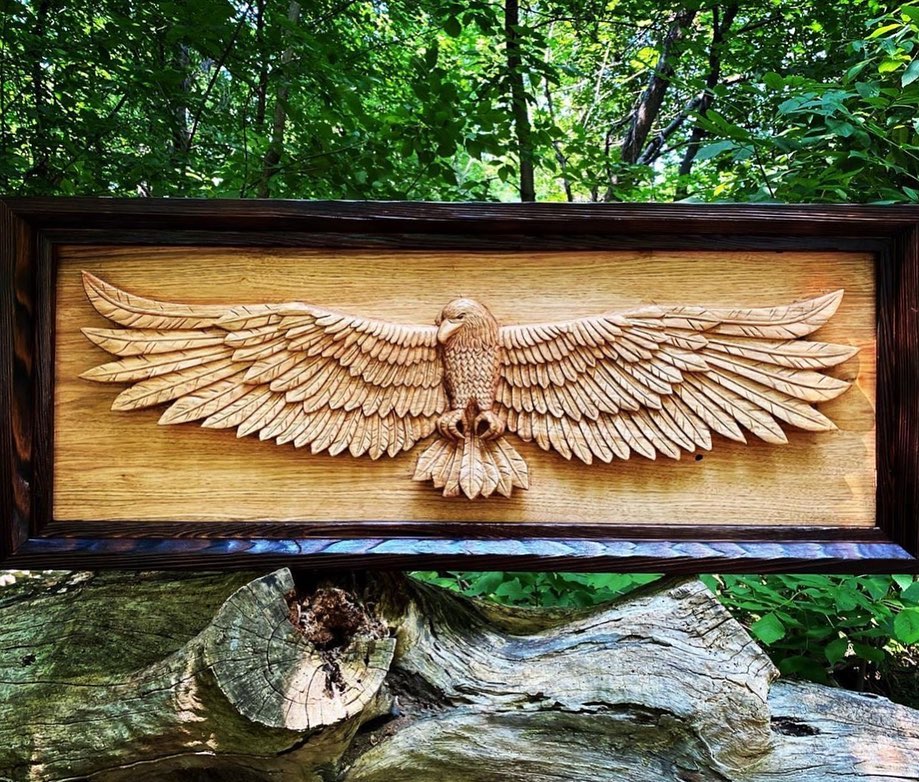
Description: This masterful horizontal relief plaque is an instructional goldmine for learning feather symmetry. The eagle is depicted with wings fully extended, showcasing hundreds of individual, overlapping feathers that require patience and precision. This eagle wood carving is ideal for mounting above a mantle or doorway, proving that even a shallow piece of wood can hold incredible depth when you master the art of “shingling” your cuts.
- Pro Tip: Use a sharp “V-tool” to define the center quill of each feather first. Then, use a small skew chisel to slightly undercut the feather above it; this creates the tiny shadows that make the wings look realistic.
10. The Diving Predator
Description: Nothing says “authoritative” like an eagle with its talons bared, ready to strike. This mid-flight sculpture captures a tense, aggressive moment that will challenge your ability to carve anatomical movement. The focus here is on the powerful “trousers” (the feathered legs) and the curvature of the sharp talons. It serves as incredible motivation for carvers to experiment with perspective, as the bird leans forward into its hunt.
- Pro Tip: Talons are notoriously fragile. To keep them strong while maintaining a sharp look, consider carving the feet from a separate, harder piece of wood (like Oak or Mesquite) and then joining them to the main body with hidden dowels.
11. The Colorful Sentinel
Description: This vibrant, stylized piece is a masterclass in how color can define a eagle wood carving. By using distinct shades of gold, brown, and white, the carver has organized the complex anatomy of the wing into easy-to-digest sections. This is a very inclusive approach for carvers who may find realistic shading difficult; instead, you use bold blocks of color to create a professional, “designer” look that stands out in any home.
- Pro Tip: To prevent different paint colors from bleeding into each other on the wood grain, apply a very thin coat of sanding sealer before you start painting. This “locks” the fibers and keeps your lines perfectly crisp.
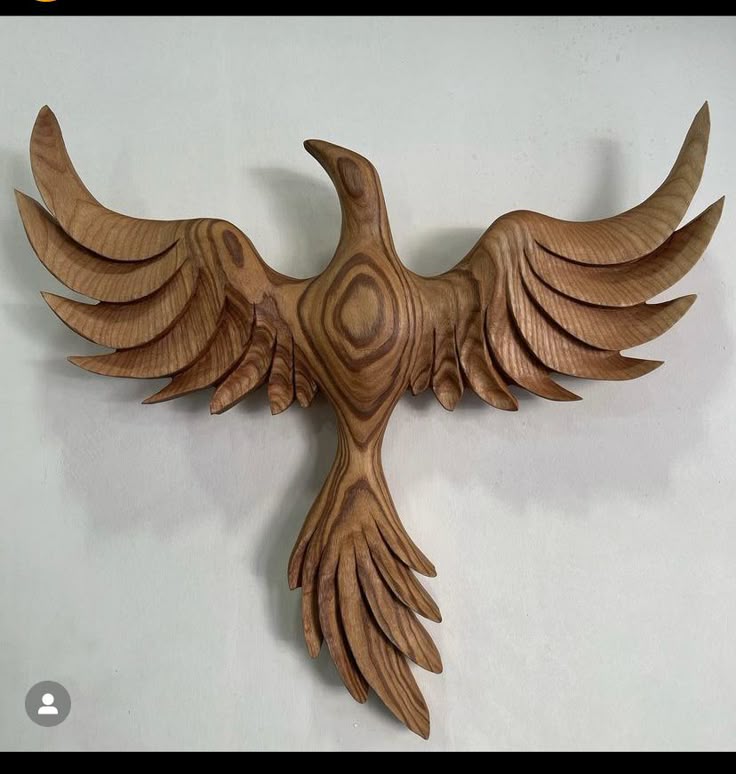
12. The Whirlwind Spirit
Description: For the truly adventurous, this breathtaking piece features an eagle swirling upward from a dark, decorative base. This eagle carving idea pushes the boundaries of wood as a medium, using thin, curved lines to simulate wind and movement. It is a highly inspirational design that encourages you to think of wood not just as a solid block, but as a fluid material that can capture the spirit of flight itself.
- Pro Tip: A project this delicate requires an authoritative understanding of wood “stress points.” Using a wood with interlocking grain, like Birch or Walnut, will give you the structural strength needed to carve those thin, flowing wing tips without them breaking.
13. The Gothic Arch Relief
Description: This masterful deep-relief panel frames a screaming eagle within a classic gothic arch, blending nature with architectural design. The composition is an instructional guide on creating a “window” into nature, using pine cones and textured branches to ground the bird in its environment. It’s an inspirational project for carvers who want to tell a story through a single, cohesive scene. This eagle wood carving is a testament to patience, requiring a systematic approach from the outermost frame to the deepest background.
- Pro Tip: To give your relief work an authoritative sense of depth, use a “grounding” tool to smooth out the background after removing the bulk material. A perfectly flat, clean background makes the textured eagle carving ideas in the foreground appear much more prominent.
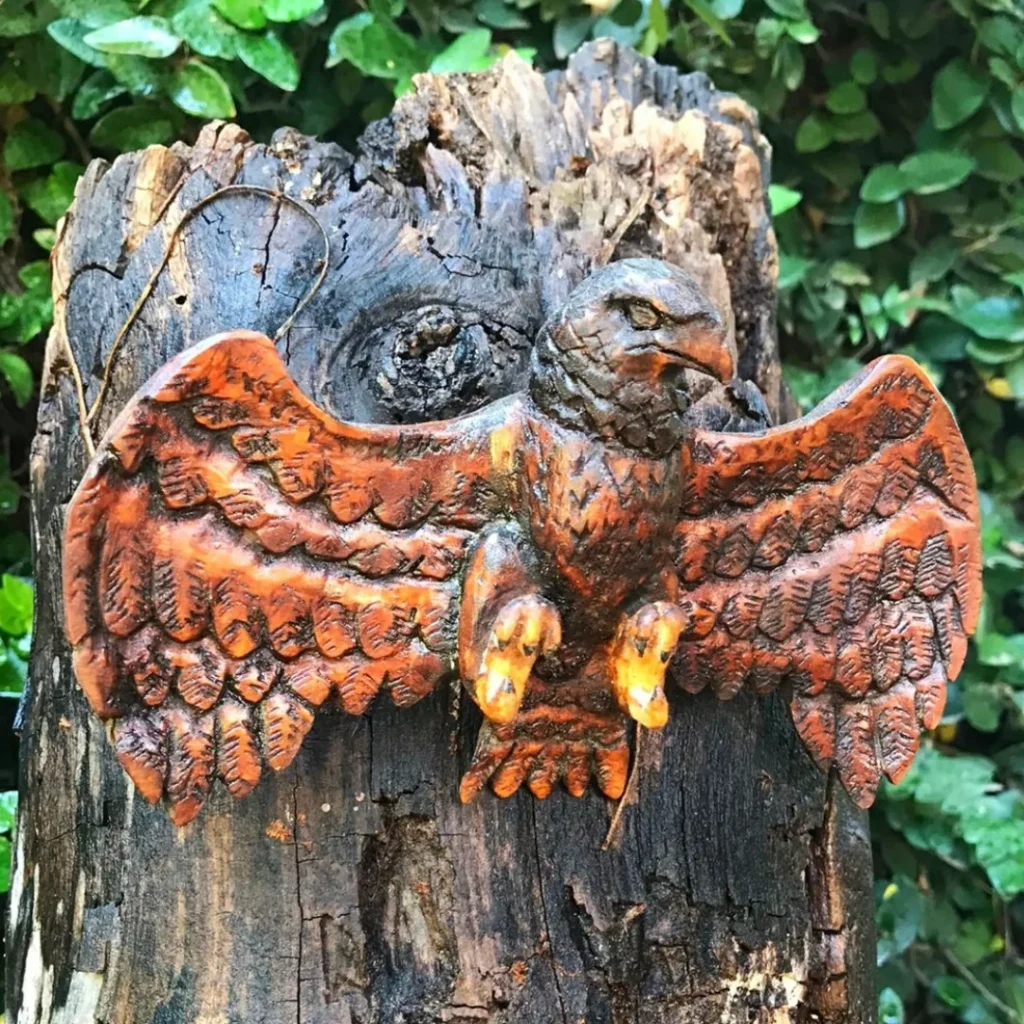
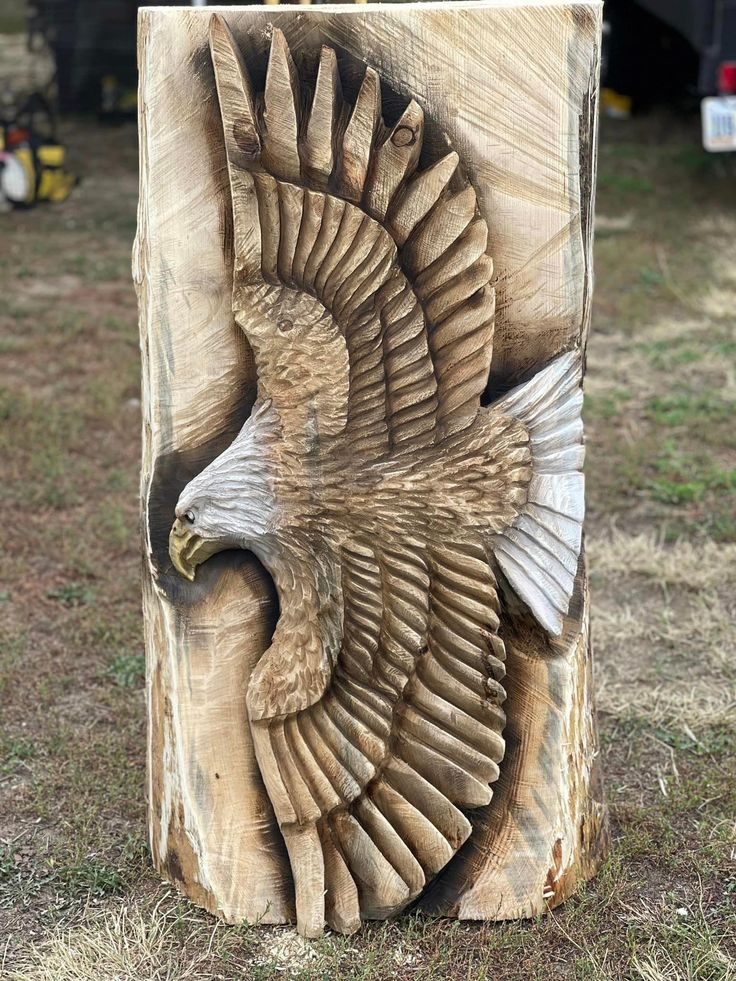
14. The Rustic Log Sentinel (Top Middle)
Description: Embrace the natural texture of a log with this full-bodied, outdoor eagle wood carving. This project is a great inclusive entry point for those wanting to try large-scale sculpture without the pressure of hyper-realism; the “heavy-handed” feather strokes give it a charming, rustic character. It demonstrates how to work with the cylindrical form of a log to create a majestic, upright predator that looks right at home in a garden or wooded backyard.
- Pro Tip: When carving a solid log, the wood will naturally want to “check” (crack) as it dries. To manage this authoritatively, you can cut a deep vertical “relief kerf” in the back of the log; this hidden cut directs the stress to one place, keeping the front of your eagle’s face and chest pristine.
15. The Minimalist Curve
Description: For a more contemporary and inclusive take on eagle carving ideas, look to this smooth, abstract wing study. This piece focuses purely on flow and aerodynamic curves rather than individual feathers, making it a beautiful instructional piece for learning to sand and finish complex surfaces. It’s highly inspirational for carvers who enjoy the tactile nature of wood and want to create art that people can’t help but want to touch.
- Pro Tip: This level of smoothness requires an authoritative sanding progression. Start with 80-grit to shape the curves, but move up to 600-grit for a glass-like finish. A coat of beeswax will protect the surface while maintaining that soft, natural glow.
16. The Wide-Span Glider
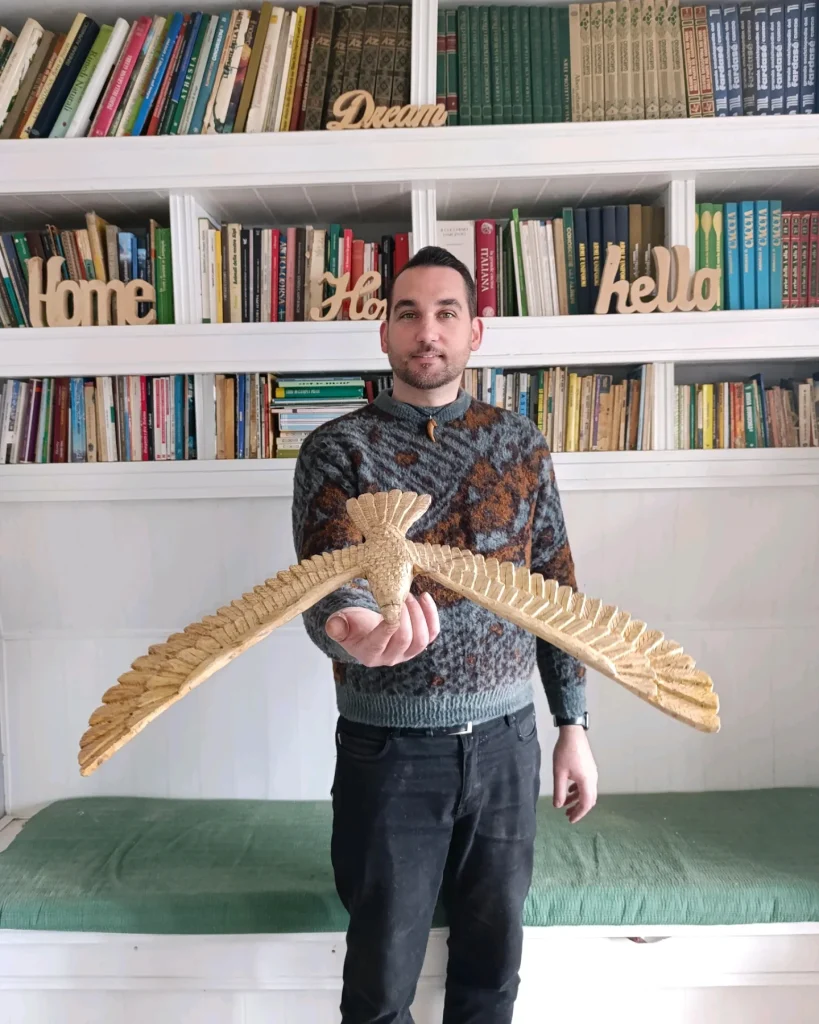
Description: Nothing captures the “majesty” of an eagle like its immense wingspan, and this hand-held sculpture brings that scale to life. This is a brilliant instructional project for learning about structural balance and grain strength—carving thin, wide wings requires a careful touch and a deep respect for the wood’s limits. Seeing the artist hold the finished piece is a great motivator, showing that eagle wood carving can be as lightweight as it is large.
- Pro Tip: For wide, thin wings, consider a “lamination” technique. Glue up three thin layers of wood with the grain of the middle layer running perpendicular to the others. This creates an authoritative “plywood” effect that is incredibly strong, allowing for thinner wing tips than solid wood could handle.
17. The Miniature Scepter

Description: Prove that size isn’t everything with this delicate, micro-scale eagle wood carving. Sculpted onto the end of a slim wooden rod, this piece is an inclusive invitation for carvers with limited space or those who prefer working with fine detail knives and magnifying glasses. It teaches incredible discipline and tool control, as even a millimeter’s mistake can change the bird’s entire expression.
- Pro Tip: When working on miniatures, “work-holding” is your biggest challenge. Instead of holding the piece in your hand, use a small pin vise or a dedicated carving clamp. This gives you the authoritative stability needed to carve those tiny, piercing eyes safely.
18. The Twin Guardians
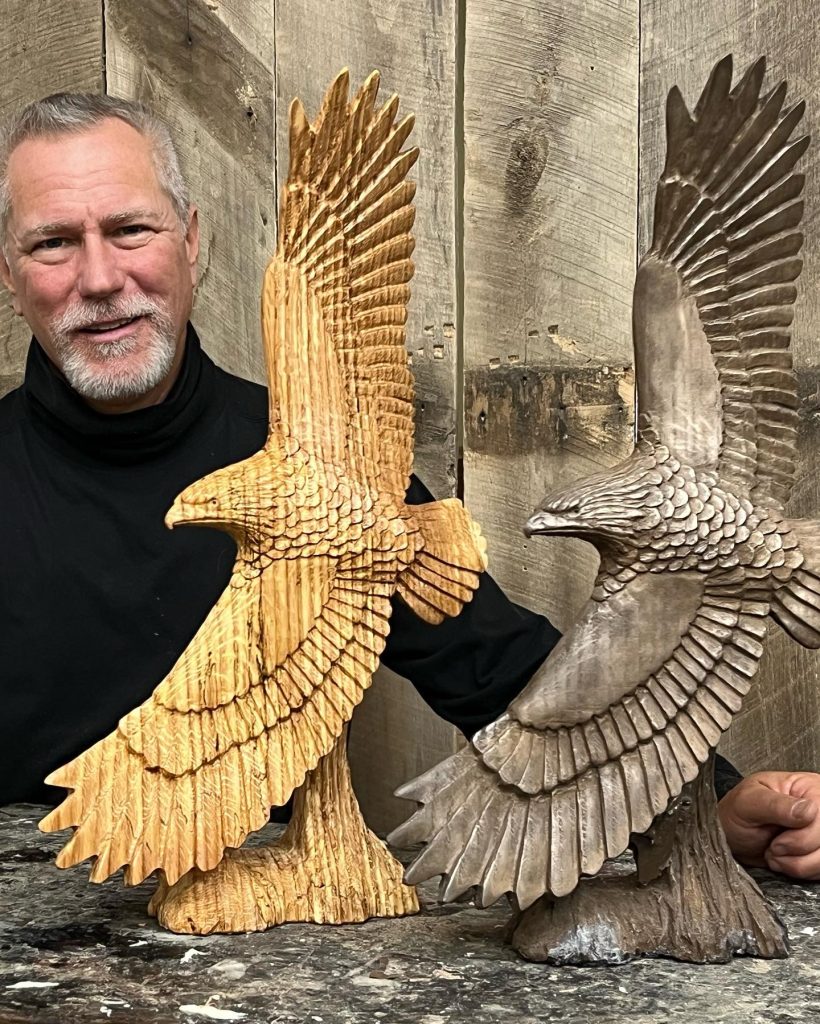
Description: This side-by-side comparison of a raw wood carving and its finished counterpart is a fantastic instructional look at the power of surface treatment. Both eagles feature dynamic, upright wings and intricate feathering, but the different finishes demonstrate how eagle carving ideas can be tailored to match any home decor. Whether you prefer the warmth of natural wood or the cool, stone-like look of a grey wash, these twins offer double the inspiration for your next project.
- Pro Tip: Before committing to a final finish on your hard work, carve a small “test scrap” from the same piece of wood. Apply your stains or paints there first to see exactly how the wood reacts; this authoritative step prevents any heartbreaking surprises on your final eagle wood carving.
19. The Talisman Pendant
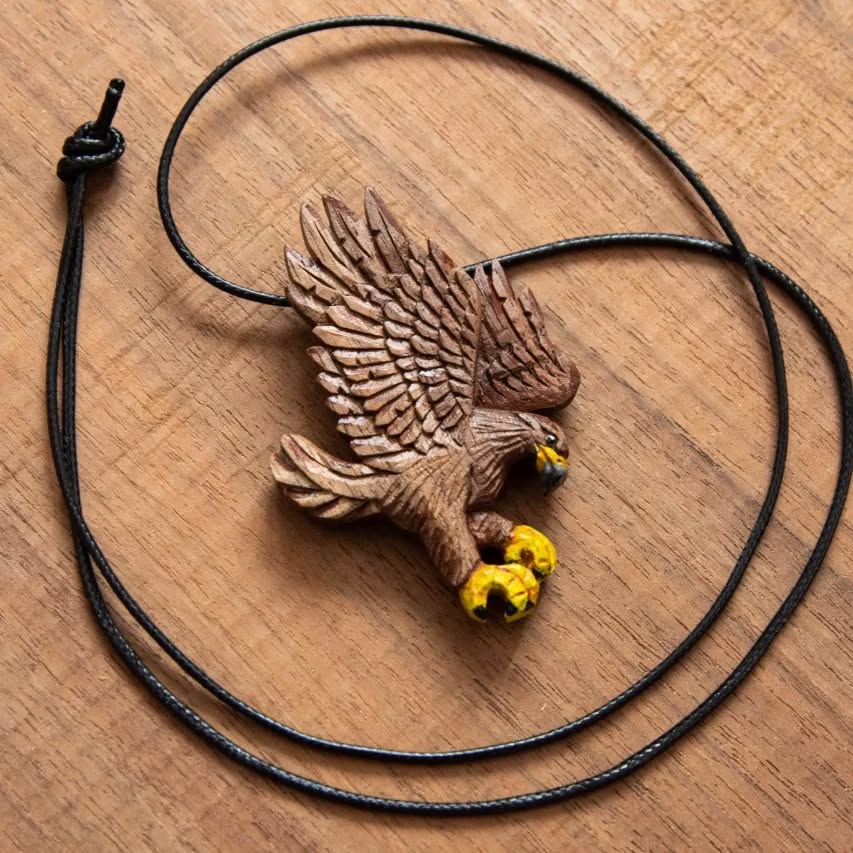
Description: Wear your passion with this intricate, miniature eagle wood carving designed as a pendant. This project is a fantastic instructional exercise in “micro-detailing,” requiring you to pack all the majesty of a soaring raptor into a space no larger than a coin. It’s an inclusive way for carvers to experiment with different hardwoods like Boxwood or Cherry, which hold fine details beautifully. This tiny masterpiece serves as a constant inspiration, showing that great eagle carving ideas don’t always require a large workshop.
- Pro Tip: When carving at this scale, use a “detail knife” with a very thin blade. An authoritative finish with a simple natural oil will bring out the grain without clogging the tiny feather grooves you’ve worked so hard to create.
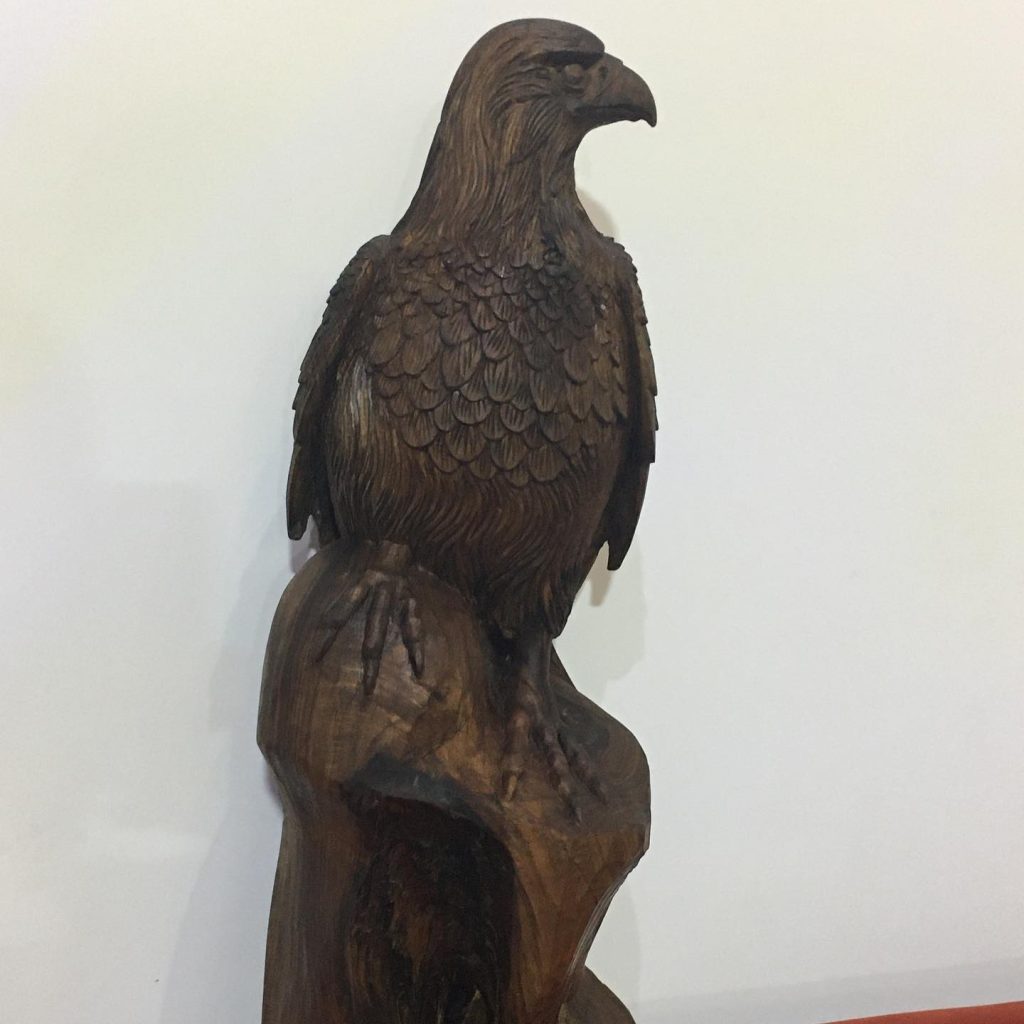
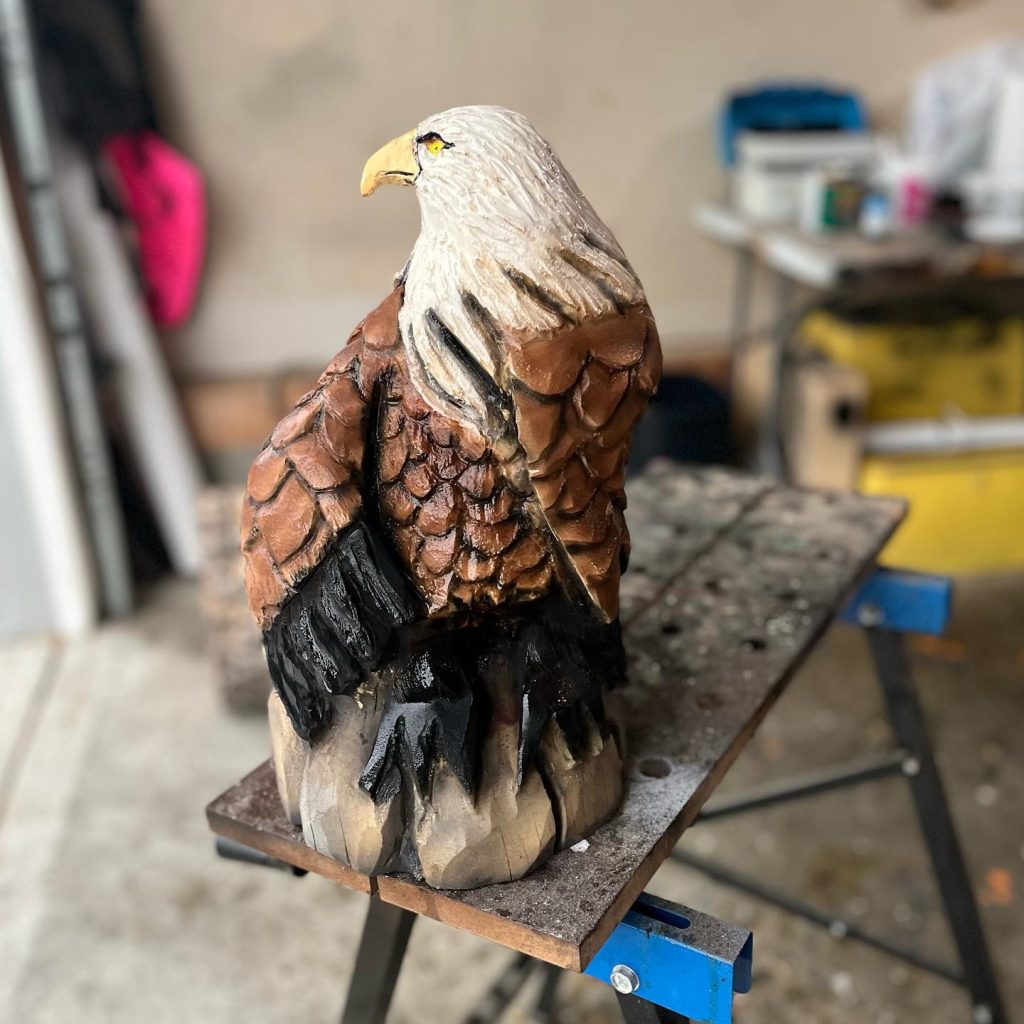
20. The Desktop Sentinel
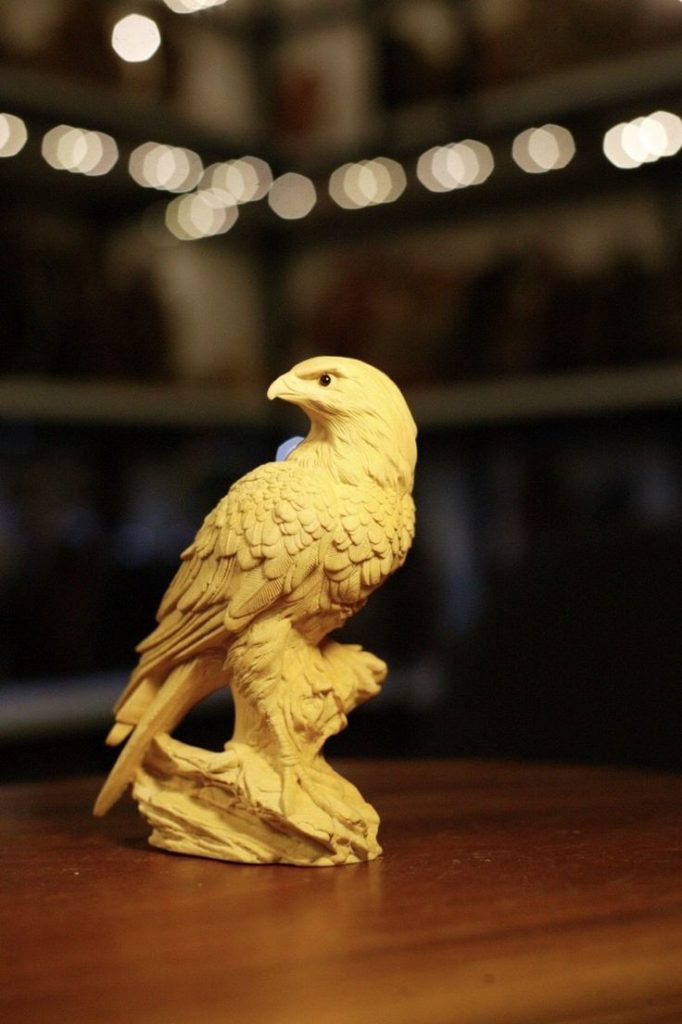
Description: This exquisite eagle wood carving represents the pinnacle of indoor display art. Sculpted in full 3D from a light-colored hardwood like Boxwood or Tupelo, it captures a majestic eagle in a classic, watchful pose atop a rugged perch. This is an instructional gem for carvers wanting to practice “anatomical flow,” as the transition from the smooth, sharp beak to the finely layered wing feathers requires a highly disciplined hand. It serves as powerful inspiration for those who prefer working on a smaller, more intimate scale where every microscopic detail counts.
- Pro Tip: When carving a piece with such high-definition feathers, avoid using heavy stains that might “clog” the delicate lines. Instead, use an authoritative, thin clear-coat or a light wax finish. This protects the wood while allowing the natural shadows created by your tool marks to provide all the depth and character the piece needs.
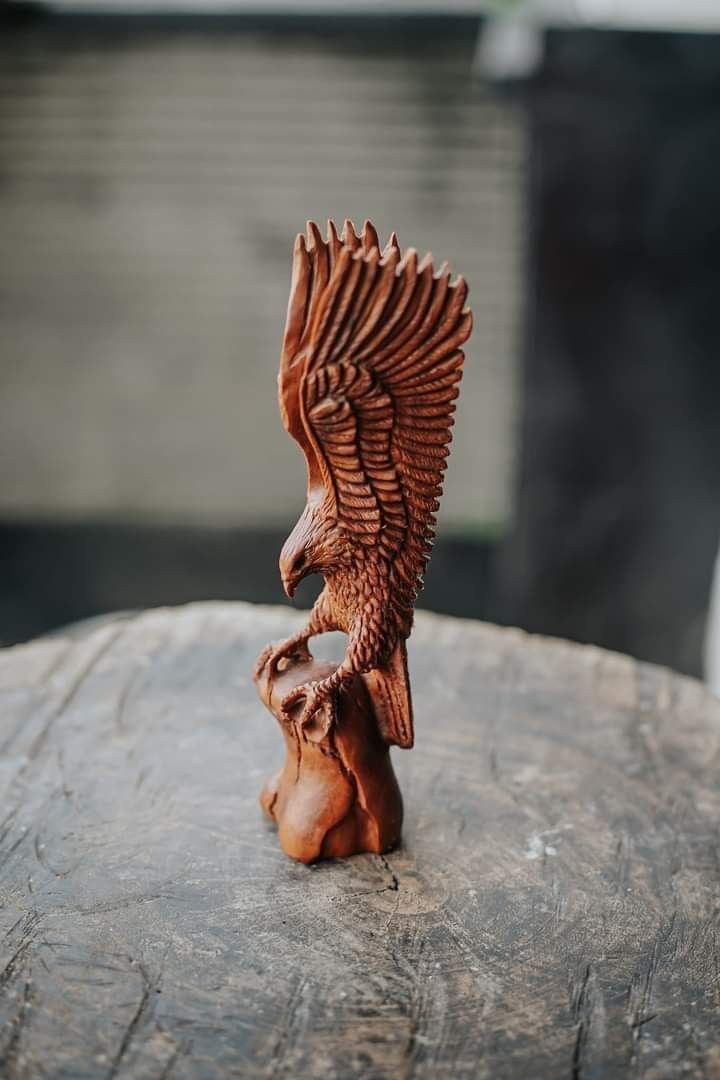
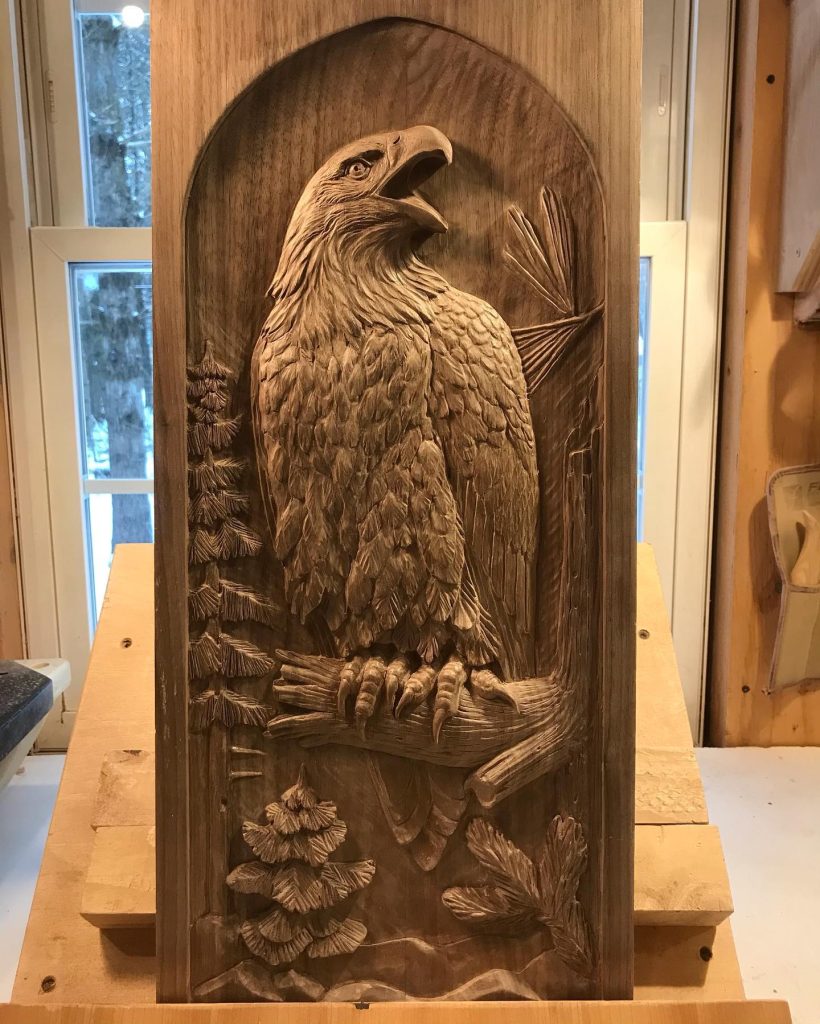
21. The Vertical Hunter

Description: This elegant, vertical eagle wood carving captures a predator in a state of high alert. Standing on a natural wood base, the piece emphasizes the long, powerful lines of the wings and the sharp, downward gaze of the head. It’s an instructional study in balance and silhouette, encouraging carvers of all skill levels to focus on the “weight” of the bird as it perches. The rich, reddish-brown finish gives it a classic, authoritative look that fits perfectly on a desk or mantle.
- Pro Tip: To achieve that high-gloss, professional shine, apply multiple thin layers of spray lacquer, sanding lightly with a very fine grit between each coat. This technique protects the intricate undercuts from dust and moisture.
22. The Grain-Flow Relief
Description: This unique wall-hanging is a masterclass in using the wood’s natural grain to enhance a design. By centering the “heart” of the wood on the eagle’s chest, the carver has created a hypnotic, symmetrical pattern that radiates outward into the wings. It’s an inclusive eagle carving idea that relies on the beauty of the material as much as the skill of the carver. This piece is highly inspirational for those who want to create art that feels truly “organic.”
- Pro Tip: When selecting wood for a project like this, look for “cathedral grain” or pieces with interesting knots. Positioning your pattern authoritatively over these natural features can do 50% of the artistic work for you.
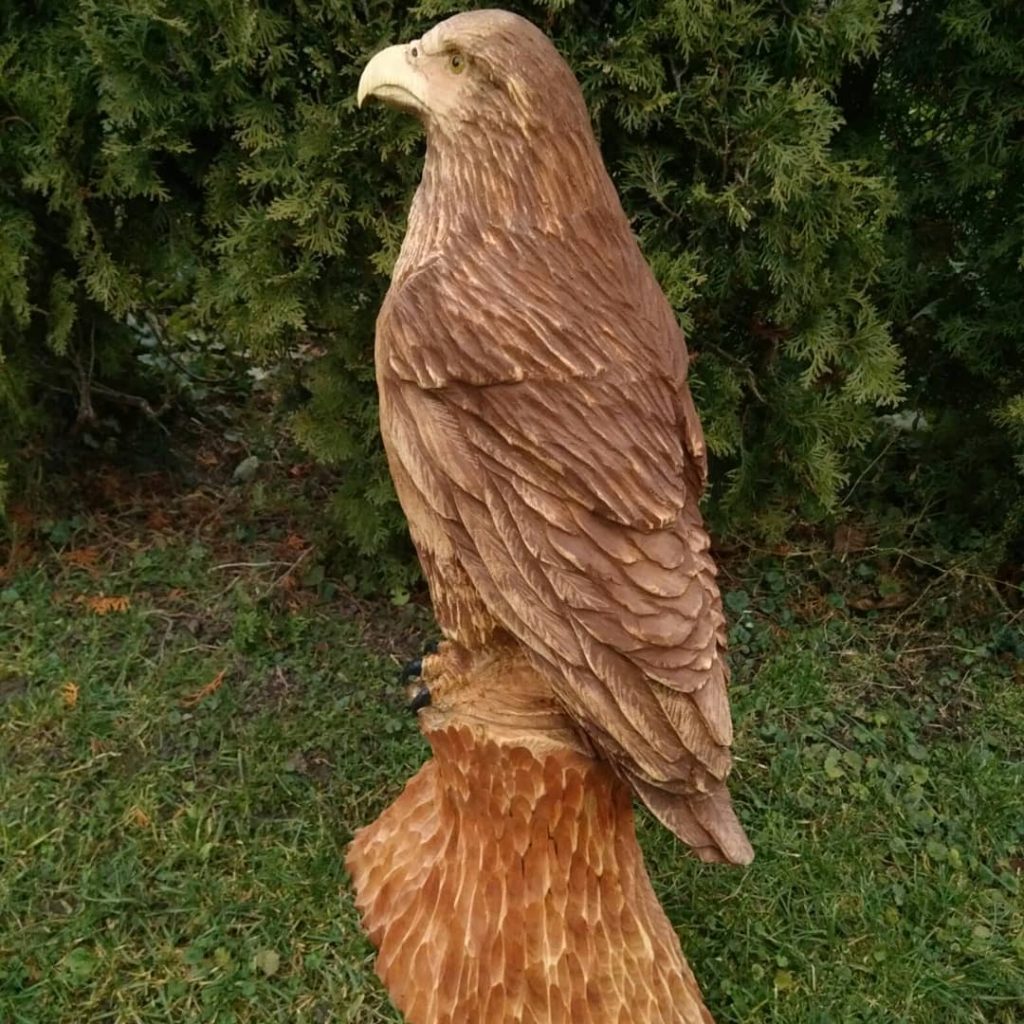
23. The Backyard Sentinel
Description: Standing tall against a garden fence, this pale, natural-finish eagle wood carving acts as a silent guardian for your home. This project is an excellent instructional guide for carvers transitioning from small blocks to full logs, focusing on broad shapes and the iconic “white-headed” look of the bald eagle. It’s a majestic and welcoming addition to any outdoor collection, proving that a simple, well-executed design is often the most powerful.
- Pro Tip: Since this piece is displayed outdoors, leave the “feet” of the log slightly wider than the body. This authoritative base adds stability against wind and prevents the wood from soaking up moisture directly from the ground.
24. The Log-Slice Soarer
Description: This breath-taking eagle wood carving utilizes the full height of a standing log to depict an eagle in a majestic vertical climb. The piece is an instructional masterclass in “negative space,” where the carver has removed the surrounding wood to let the bird emerge with outspread wings. It’s an inspirational project for power carvers who want to test their ability to maintain symmetry over a large surface area. The stark contrast between the white-painted head and the scorched-edge wing tips provides a professional, authoritative finish that commands attention.
- Pro Tip: To achieve those dark, shadowed recesses between the primary feathers without using messy stains, an authoritative carver often uses a detail torch. By lightly charring the deep grooves, you create a natural shadow that makes the lighter wood of the feathers pop with 3D intensity.
25. The Patriotic Portrait
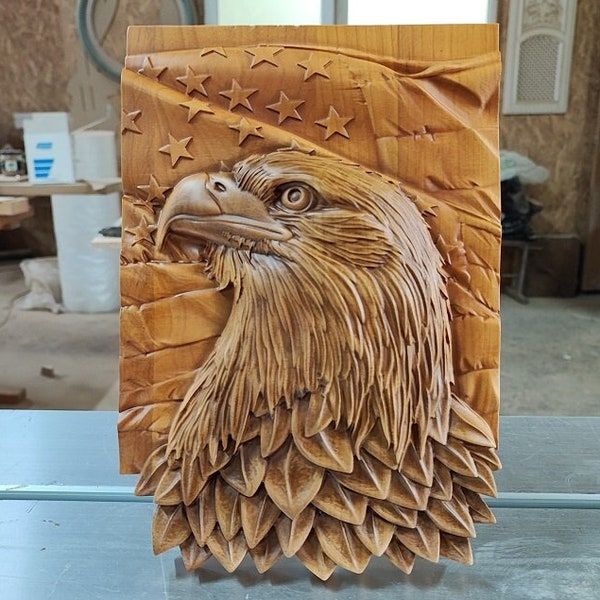
Description: Rounding out our list is this deeply symbolic eagle carving idea that layers a hyper-realistic eagle profile over a waving flag backdrop. This high-relief plaque is an advanced project that teaches you how to balance multiple textures: the smooth fabric of the flag, the sharp geometry of the stars, and the soft, organic flow of the neck feathers. It’s a powerful, authoritative piece that serves as ultimate motivation for any carver looking to blend storytelling with technical skill. This inclusive design can be scaled down for a desk plaque or up for a massive wall installation.
- Pro Tip: When carving the eye of the eagle in a relief piece like this, remember that the “sparkle” or highlight is the most important part. Leave a tiny, raised “bump” of wood in the center of the pupil; when the light hits it, your eagle wood carving will suddenly look alive and watchful.
Essential Techniques for Carving Eagles
Regardless of which design you choose, mastering a few key techniques will elevate your eagle wood carving from a simple shape to a lifelike representation.
Feather Texturing
Feathers are arguably the most defining feature of any eagle carving. The approach you take will depend on your tools and style. A V-tool is excellent for carving the central quill and creating clean separation between feather groups. Veining tools allow you to add delicate barbs along each feather for a natural look. Many advanced carvers turn to power carving with small burrs to create soft, realistic texture in a fraction of the time. Wood burning is another powerful technique—a hot pen can add shadow, depth, and fine lines that mimic the subtle variations in real plumage.
The Beak
The beak is the focal point of any eagle head. Achieving that sharp, hooked profile requires careful attention to proportion. Pay special attention to the cere—the fleshy, waxy area at the base of the upper beak where the nostrils are located. A crisp, well-defined beak can convey aggression and power, while a rounded or clumsy beak will undermine the entire carving.
The Eyes
A lifelike eagle begins with the eyes. These birds possess a fierce, predatory gaze that can bring your carving to life. Whether you choose to carve the eyes directly into the wood or use glass eyes (a common choice for realistic bird carvers), placement is critical. The eyes should sit slightly forward on the head, angled to convey alertness. If painting, use a glossy finish to replicate the wet, reflective quality of a real eagle’s eye.
Claws and Talons
An eagle’s talons are its primary tool for survival, and carving them requires patience. For smaller carvings, you can carve the feet and talons as part of the main block. For larger, realistic pieces, many carvers carve the legs and feet separately from stronger wood (such as maple or holly) before attaching them. The key is to create a sense of tension and grip—talons should appear curled with purpose, not relaxed.
Finishing and Painting Your Eagle Carving
The finishing stage is where your eagle wood carving truly comes to life. The approach you take will depend on whether you prefer a painted, burned, or natural wood finish.
Painting for Realism
For a traditional bald eagle, the color palette is straightforward but requires skillful application. The head and tail should be a clean, bright white, while the body and wings are a rich dark brown—nearly black in shadowed areas. The beak, cere, and feet range from bright yellow to a deeper goldenrod. Use acrylic paints for their opacity and control. Dry-brushing is an invaluable technique: load a brush with a small amount of lighter brown or white, wipe most of it off, and lightly drag it across textured feathers to highlight the raised areas. This creates depth and dimension that flat painting cannot achieve.
Wood Burning for Depth
If you prefer to let the natural wood shine, wood burning is an excellent alternative to paint. A pyrography pen allows you to darken the recesses between feather groups, define individual barbs, and add shadow around the eyes and beak. When combined with a clear oil finish, burning creates a striking contrast that highlights both the carving and the wood grain.
Oils and Waxes
For carvers who want to celebrate the wood itself, a natural finish can be stunning. Danish oil or tung oil penetrates the wood and brings out the grain while providing a subtle sheen. Follow with a buffed coat of paste wax for a soft, tactile finish. This approach works particularly well with dark woods like walnut or cherry, where the natural color can suggest the eagle’s plumage without any paint.
Sealing
Whatever finish you choose, always apply a final sealant to protect your work from moisture, dirt, and UV damage. A spray matte or satin polyurethane provides durable protection without excessive shine, ensuring your carving remains beautiful for years to come.
Finding Inspiration and Resources
No carver works in isolation. Even the most experienced artists continually seek reference and inspiration to refine their work.
Studying Reference Photos
The foundation of any realistic eagle carving is accurate anatomy. Collect a library of high-resolution reference photos showing eagles from multiple angles. Pay attention to how feathers overlap, how the head sits on the shoulders, and the way talons grip a branch. Study images of eagles in flight, at rest, and in aggressive poses to understand the full range of motion.
Recommended Books
Several classic texts can deepen your understanding of bird carving. Carving Realistic Birds by H.D. Green is an excellent starting point, while advanced carvers may turn to The Complete Guide to Bird Carving edited by Ed LeClair. These resources provide patterns, step-by-step instructions, and insights from master carvers.
Pattern Sources
If you prefer to work from a pattern, resources abound. Woodcarving Illustrated regularly features eagle patterns for various skill levels. Many independent pattern makers also offer detailed templates for purchase online, ranging from simple relief designs to full-size in-the-round projects.
Online Communities
One of the best resources available today is the community of fellow carvers. Forums such as the Woodcarving Illustrated Message Board and social media groups dedicated to bird carving are filled with carvers who happily share advice, critique, and encouragement. Do not hesitate to post your work in progress—the feedback you receive can be invaluable.
Conclusion
The journey of eagle wood carving is one of continuous growth. The first eagle you carve might be a simple silhouette or a stylized head, but each project builds upon the last. With each new design, your understanding of anatomy sharpens, your tool control improves, and your ability to capture the spirit of this magnificent bird deepens.
Whether you are reaching for a knife for the very first time or you are an experienced carver planning your next masterpiece, there is an eagle carving idea waiting for you. Choose a project that excites you, gather your tools, and let the wood guide your hands. When you finish, take a moment to admire what you have created—a tribute to one of nature’s most majestic creatures, brought to life through your own skill and patience.
If you found this guide helpful, consider sharing your finished eagle carvings in the comments below. We would love to see your interpretation of these designs. And for more patterns, tips, and inspiration, be sure to explore our other articles on woodcarving techniques and project ideas.