Wood carving animals is one of the most rewarding entry points into the craft. Unlike abstract shapes, animals give you a clear goal — you know when the fox looks like a fox, and that moment of recognition is deeply satisfying. The 30 carvings below were made by carvers at all levels, and each one teaches something different: how to suggest fur with short knife strokes, how to capture the curve of a beak, or how to give a tiny creature weight and personality. Browse through, pick one that excites you, and use it as your starting point.
30 Easy Animal Wood Carvings you can try Next
Birds and birds of prey
Birds are a brilliant starting point for animal carving. Their forms are forgiving — a simple pointed beak, a rounded body, and a suggestion of wing feathers can read clearly even at small scales. For birds, basswood and butternut are ideal choices: both are soft enough to carve cleanly with a basic whittling knife, and they hold fine edge detail well.
1. The Stylized Cardinal
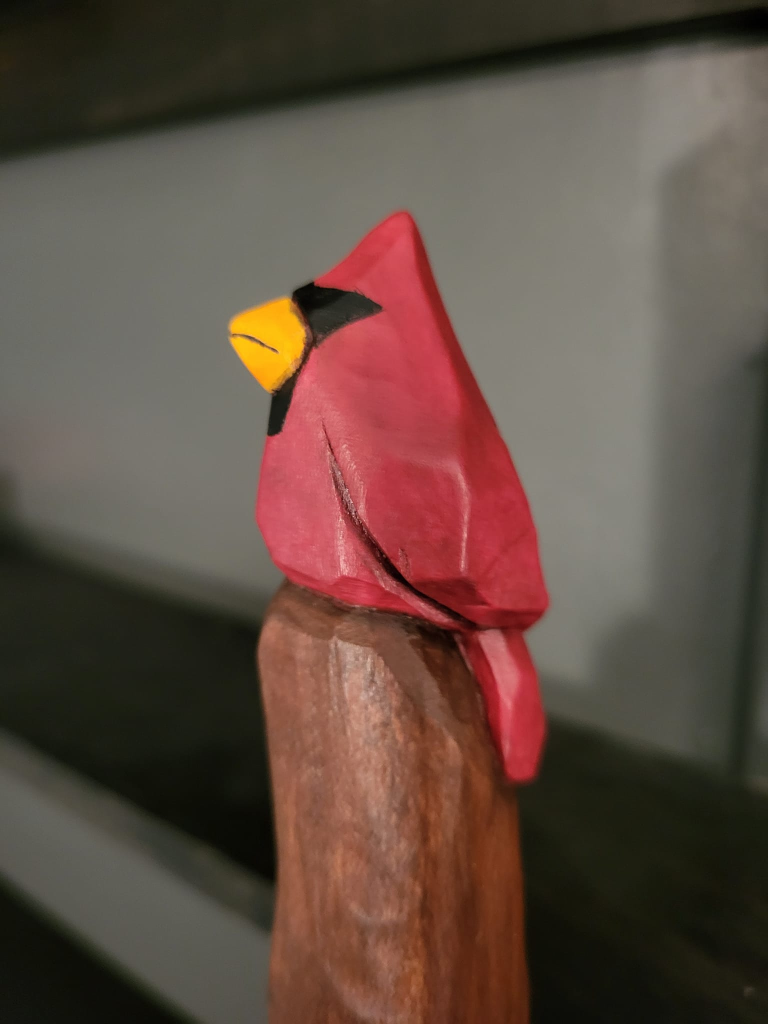
This cardinal proves that you don’t need a degree in biology to create something recognizable. It relies on “Visual Landmarks”—the sharp crest and the pyramidal beak. If you get these two points right, the viewer’s brain will automatically fill in the rest of the bird’s anatomy.
The Paint-Ready Gutter
The challenge with birds is often the paint job. To make this look professional, you need to “plan for the finish.” Before you pick up a brush, carve a deep, narrow stop-cut along the line of the black face mask.
The Pro Move: Implied Detail
By creating that physical “gutter” in the wood, you create a natural dam for your paint. This ensures your red and black stay crisp and never bleed into each other. It’s a lesson in using your knife to make your brush’s job easier.
2. The Chisel-Cut Songbird
This bird isn’t trying to look real; it’s trying to look “carved.” It’s an exercise in repetition. For a beginner, the challenge is often knowing when to stop, but here, the tool marks themselves become the “feathers,” creating a sense of movement without any delicate sanding.
The “Step” Technique
Notice how the wings are created by carving deep, parallel grooves that “step” down. Instead of trying to blend the wing into the body, you create a hard shadow. This is achieved by making a deep vertical stop-cut and then carving into it from an angle.
The Pro Move: Embracing the Gouge
Don’t be afraid of the “chunky” look. Use the natural sweep of your gouge or knife to follow the curve of the bird’s back. It teaches you that rhythm is more important than realism—if your cuts are consistent in size and spacing, the bird will look unified and intentional.
3. The Wide-Eyed Rooster
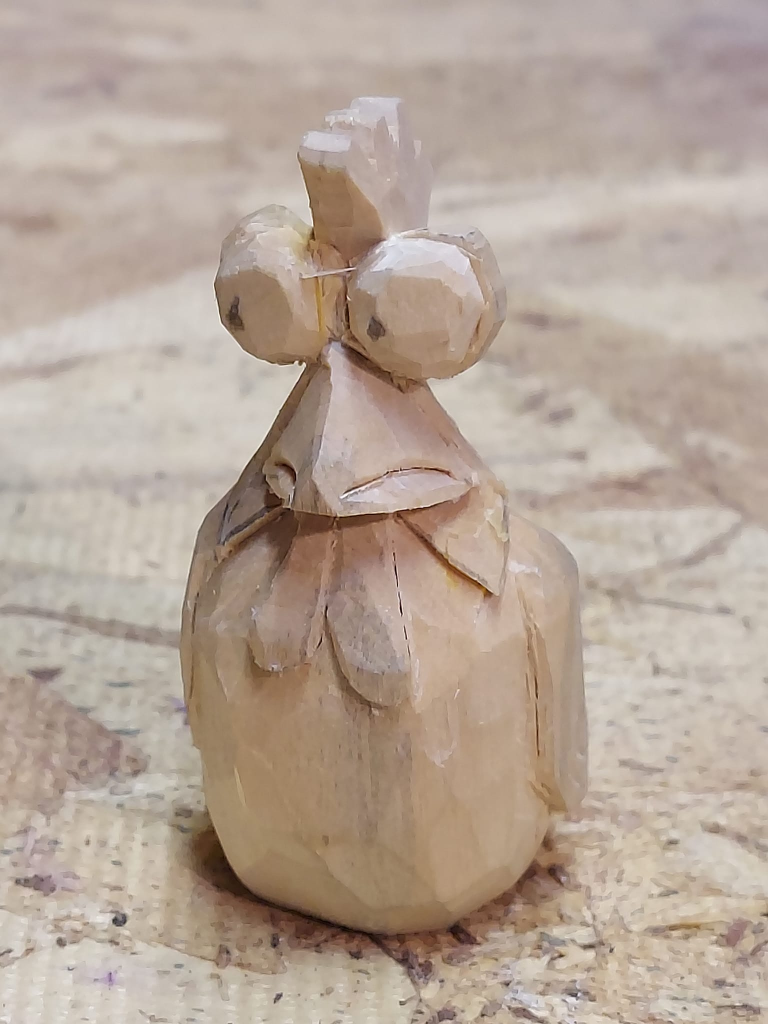
Carving “goofy” is often harder than carving “serious,” but it’s a lot more forgiving. This rooster uses oversized, bulging eyes and a sharp, downward-angled beak to create a comedic expression. It’s a great lesson in character design.
The Multi-Plane Face
The face is built on a series of intersecting triangles. The beak is one sharp pyramid, and the eyes are two faceted spheres. Instead of trying to carve a smooth round eyeball, leave the facets on the eyes. These flat surfaces will catch the light from different angles, making the rooster look like he’s actually looking around the room.
The Pro Move: Gravity-Defying Details
The “comb” (the crown on the head) is the trickiest part. Carve it last. By keeping the top of the head as a solid block while you shape the body, you provide a “handle” to hold onto, which prevents you from accidentally snapping off the most delicate part of the carving.
4. The Classic Rubber Duck

The duck is essentially two balls connected by a neck. For a beginner, this is the ultimate test of “rounding over.” It’s easy to leave a block square, but carving a perfectly round head requires you to constantly rotate the piece in your hand, taking off the “corners of the corners.”
The Neck Shelf
The trickiest part of a duck isn’t the roundness—it’s the transition where the head meets the body. Instead of trying to carve a smooth slope, carve a defined “shelf” or a deep groove around the base of the neck first. This creates a shadow line that makes the head look like it’s sitting on the body rather than melting into it.
The Pro Move: Tool-Mark Uniformity
Notice the texture on this duck; it isn’t sanded smooth. By using a small gouge or a sharp knife to create consistent, rhythmic “scoops” across the surface, you give the yellow paint something to grab onto. It turns a simple shape into a piece that feels handcrafted and tactile.
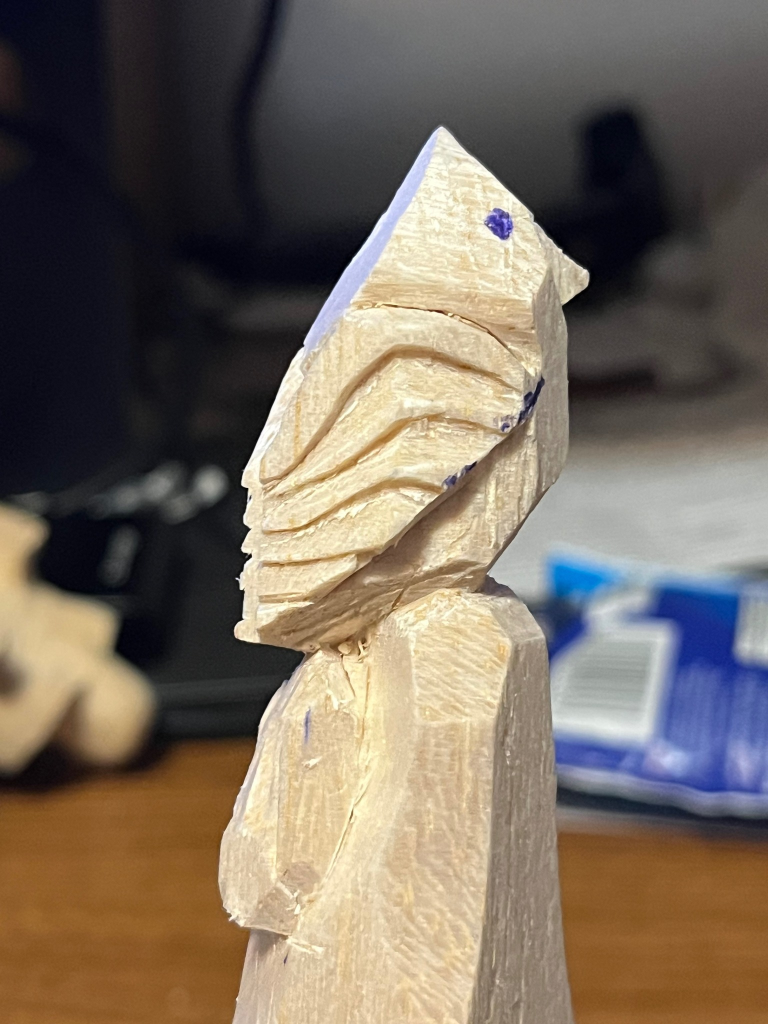
5. The Barn Owl
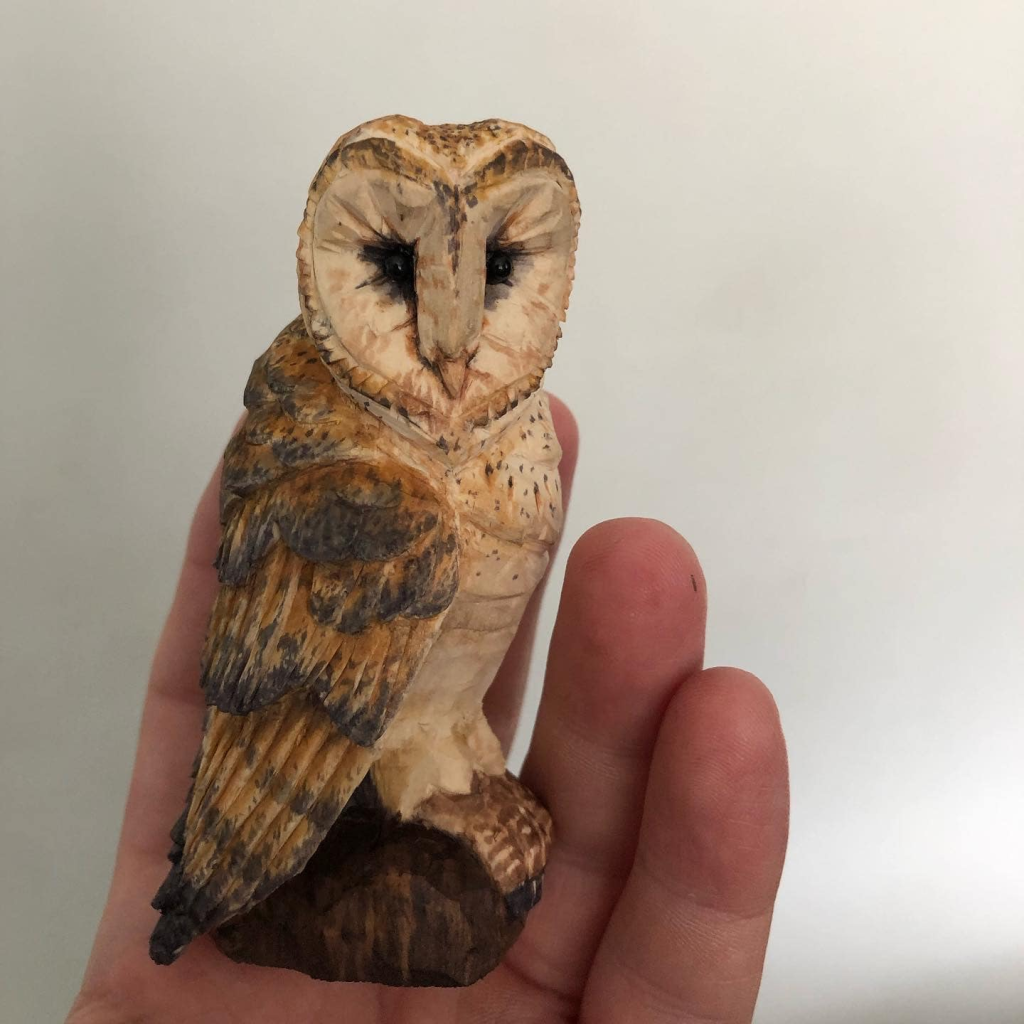
The owl is a favorite for beginners because its most defining feature—the heart-shaped facial disk—is a flat surface. You aren’t carving a complex face; you are carving a shallow “bowl” into the front of the head. This creates a natural frame for the eyes and beak, making the bird instantly recognizable.
The “Layered Shingle” Wings
To tackle the wings, think of them like shingles on a roof. Instead of carving every feather, carve three or four horizontal “steps” down the side of the body. Once those steps are in place, use a small V-tool to add vertical flicks. This creates the illusion of thousands of feathers with only a dozen deliberate cuts.
The Pro Move: Concentric Eye Circles
The eyes are the soul of the owl. Use a small gouge to create two deep, circular pits. By keeping the center of the pit dark (either with stain or a deep cut), you mimic the predatory stare of a raptor. It’s a lesson in using concave shapes to create focal points.
6. The Regal Eagle
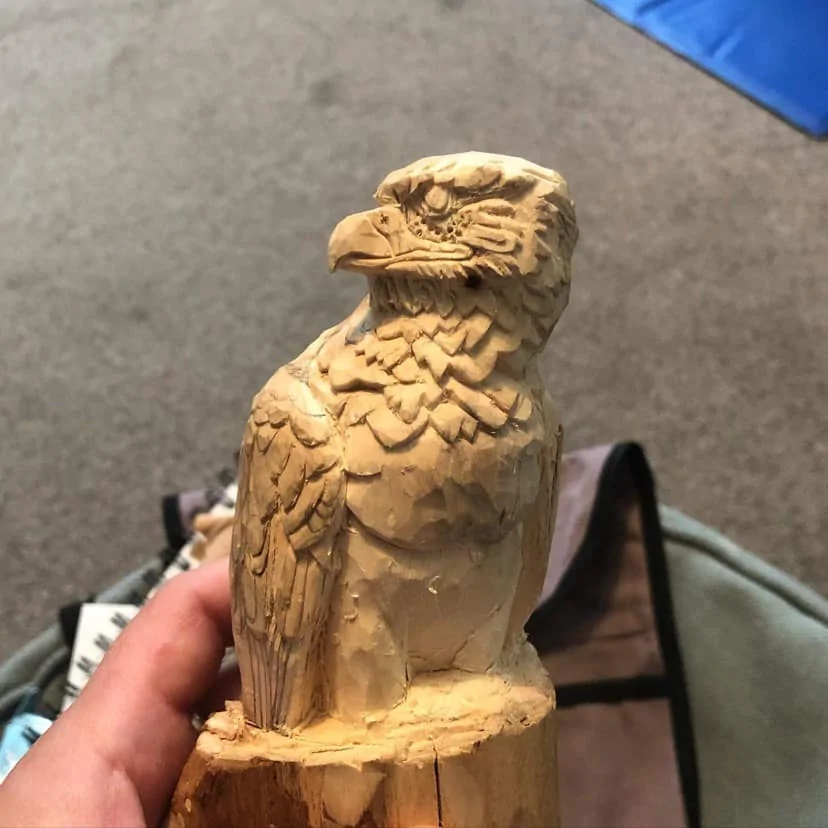
An eagle’s personality is all in its “scowl.” This is achieved by carving a heavy ridge—the supraorbital ridge—directly above the eye. For a beginner, this is a masterclass in facial anatomy; moving that ridge just a millimeter can change the bird from “majestic” to “surprised.”
Deep Overlaps
Look at the chest feathers on this eagle. They aren’t just scratched in; they are deeply undercut. When you carve the “scalloped” edges of the feathers, angle your knife under the feather above it. This creates deep shadows that make the bird look “fluffed” and powerful rather than flat.
The Pro Move: The Hooked Beak
The beak must be a separate, sharp geometric plane. Carve it as a distinct block before rounding it into that iconic hook. It teaches you that structural separation—keeping the beak distinct from the head—is what makes a bird look realistic.
7. The Master’s Songbird
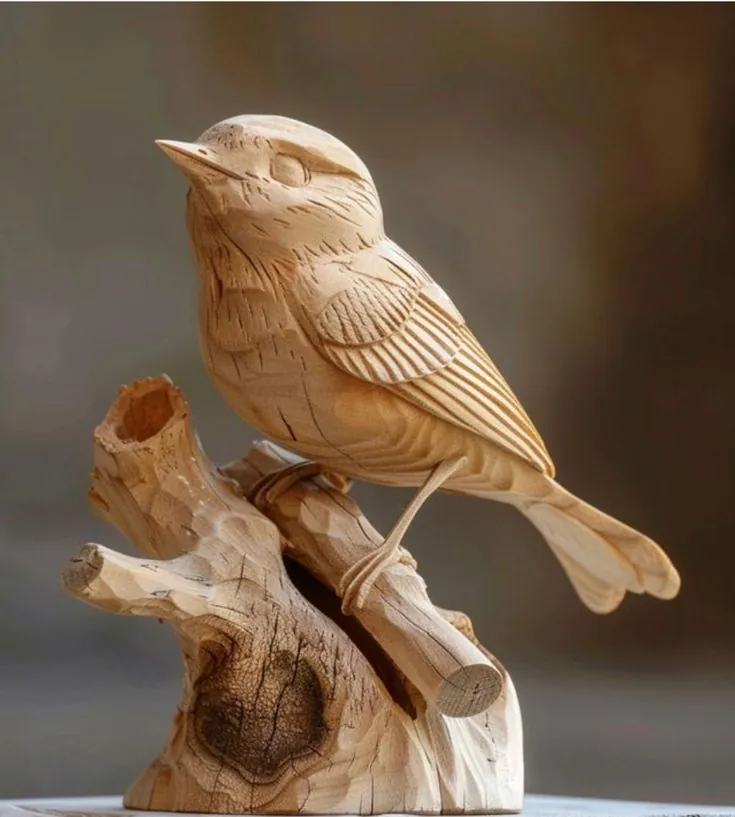
This isn’t just a bird; it’s a composition. It teaches you how to balance a heavy subject on a delicate point (the legs). For a beginner, the challenge here is moving beyond the animal itself and thinking about the interaction between the bird and its environment. It’s a lesson in weight, balance, and fine-line detailing.
The “Three-Point” Support
Look closely at the legs. They are incredibly thin, which usually spells disaster for wood. The strategy here is to keep the legs connected to the branch at multiple points. By carving the feet and the legs as part of the branch’s volume, you create a “tripod” effect. This provides the structural strength needed to support the bulk of the bird’s body without the legs snapping under the pressure of your carving knife.
The Pro Move: The Eye of the Beholder
Notice the eye—it’s not just a hole; it’s a raised “bead” inside a carved socket. To pull this off, don’t carve the eye last. Carve the brow ridge and the socket first, leaving a small “island” of wood in the center. Round that island off into a sphere. This tiny bit of 3D realism makes the bird look like it’s actually observing the world, turning a wooden object into a character with a soul.
8. The Midnight Raven
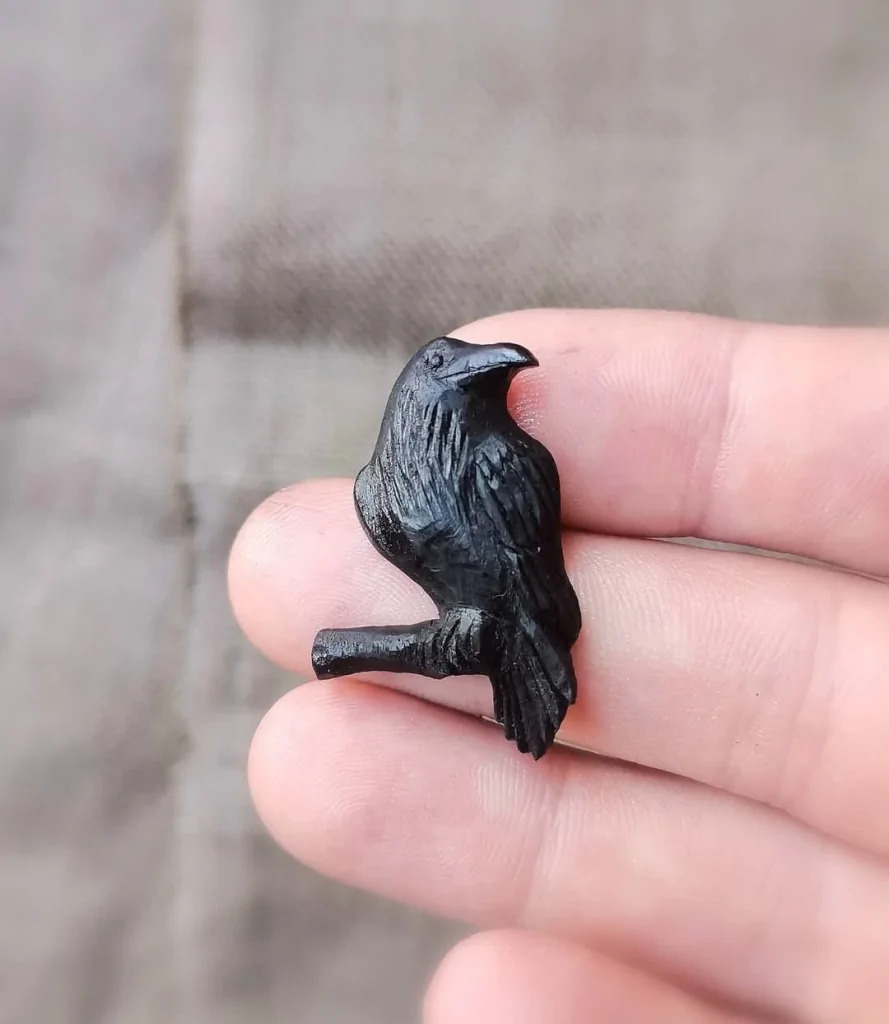
This tiny crow is a lesson in micro-texturing. Because the piece is stained jet black, the “shape” of the bird almost disappears. The only thing that gives it life is how the light catches the individual feather strokes. It’s a perfect project for practicing tiny, repetitive V-tool cuts on a very small scale.
The “Single-Block” Perch
Beginners often try to carve a bird and then glue it to a branch. This raven is smarter: the bird and the branch are one single piece of wood. By carving the branch directly out of the bottom of the block, you create a built-in handle that makes the piece easier to hold while you detail the head.
The Pro Move: The Ebony Illusion
You don’t need expensive ebony wood to get this look. Use
Wildlife — wolves, foxes and forest animals
Wildlife carvings carry a different energy from domestic animals. There’s a wildness to them that rewards bold, confident cuts.
9. The Low-Poly Fox
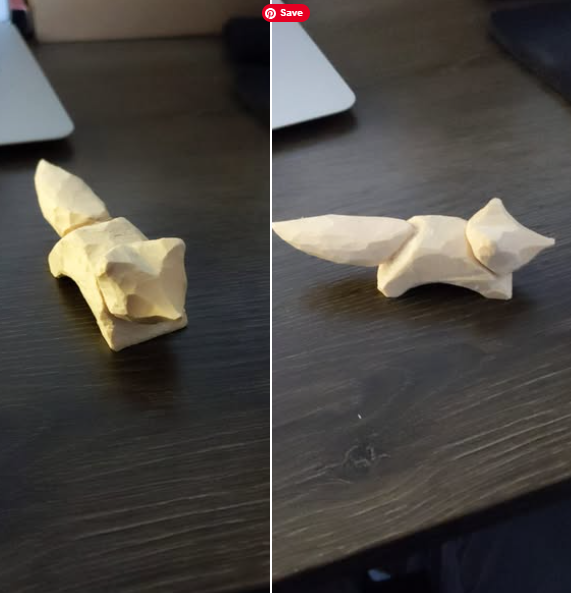
Finding the Planes
The beauty of a “low-poly” fox isn’t in its fur, but in its edges. For a beginner, the biggest hurdle is often the urge to “sand away” every mistake until the wood looks like plastic. This project challenges you to do the opposite: embrace the facet. ### The Strategy: Carving a Gemstone Instead of carving a fox, think about carving a diamond. By keeping your knife strokes long, flat, and intentional, you create sharp planes that catch the light at different angles. This approach is incredibly liberating because a “mistake” often just becomes another interesting angle.
The Pro Move: Blade Discipline
Focus on making one deliberate, confident slice instead of ten tiny, ragged “pecks.” Leaving your tool marks visible is the best way to master grain direction—if the wood tears, you know exactly which way to flip your stroke.
10. The Howling Wolf Pack
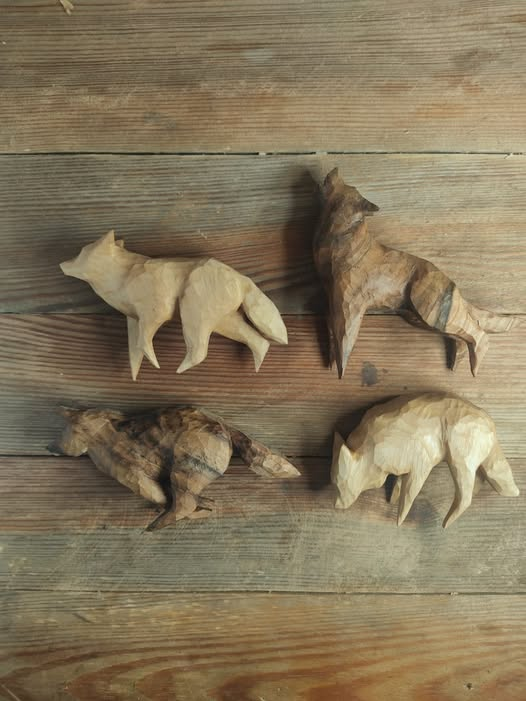
These wolves show that you don’t need a perfectly symmetrical model to tell a story. By varying the head positions—one howling, one sniffing, one stalking—you create a “gesture.” This takes the pressure off making every wolf look identical.
Negative Space
The trick to these wolves is the space between the legs. To avoid breaking the wood, use a small drill bit to create a “pilot hole” where the belly meets the legs. This gives your knife a safe place to stop when you’re clearing out the wood between the limbs, preventing accidental over-cuts.
The Pro Move: Expressive Silhouettes
Focus on the neck-to-shoulder line. A wolf’s character is all in its “scruff.” By leaving that area a bit bulkier and more textured, you immediately distinguish it from a sleek dog or a fox. It’s a lesson in using silhouette to define the species.
11. The Standing Cartoon Bear
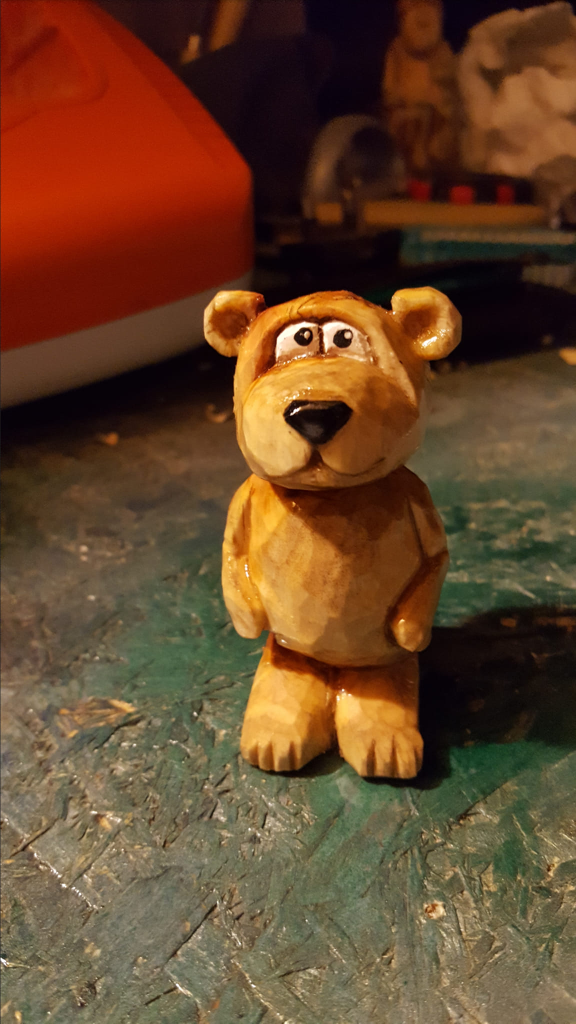
This bear is all about the “caricature” style. The head is nearly as large as the body, and the eyes are oversized. This is a great way to practice deep detail work—specifically around the “muzzle” (the snout area) and the brow.
Deep Socket Eyes
To get those expressive eyes, you have to carve deep into the head. Use the tip of your knife to create two circular “wells.” By setting the eyes back into the wood, you create shadows that make the bear look more alive. It’s a lesson in depth and shadow—realizing that “white space” in a carving is just as important as the wood itself.
The Pro Move: Rounded Ears and Toes
Small, rounded ears are prone to chipping. To keep them safe, carve them as “buttons” rather than thin flaps. Similarly, notice the simple vertical notches on the feet to represent toes. These small, repetitive cuts add a level of “finish” that makes the bear look like a professional collectible rather than a practice scrap.
12. The Baby Giraffe
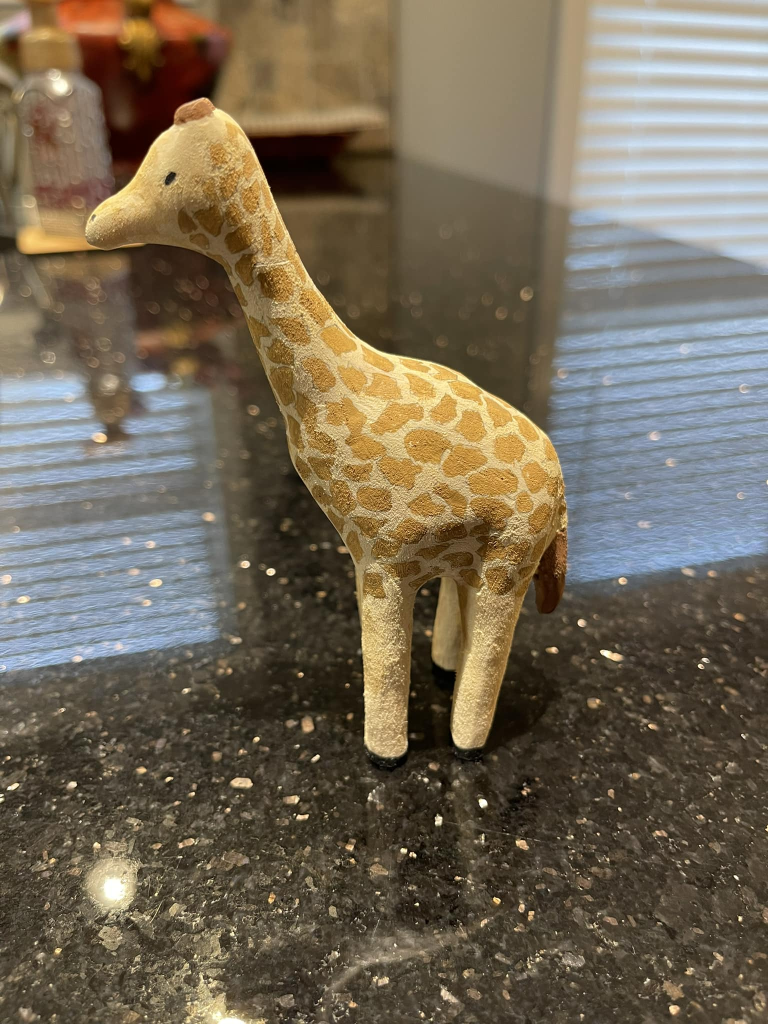
The giraffe is the ultimate lesson in grain orientation. Because the neck and legs are so long and thin, they are prone to snapping if you carve across the grain. This project teaches you to align the “long” parts of the animal with the strongest fibers of the wood.
The Tapered Cylinder
Don’t try to carve a “neck” and a “head” separately. Think of the entire upper half of the giraffe as a single, long tapered cylinder that gently curves at the top. Keeping the shapes thick and simplified until the very last stage prevents the wood from becoming fragile while you are still shaping the body.
The Pro Move: Pattern over Carving
Look at the spots on this giraffe—they aren’t carved, they are painted. This is a brilliant shortcut. By keeping the wood surface smooth and using a sponge or a fine brush to “dapple” the pattern, you add immense detail without risking the structural integrity of the thin legs.
13. The Chibi Monkey
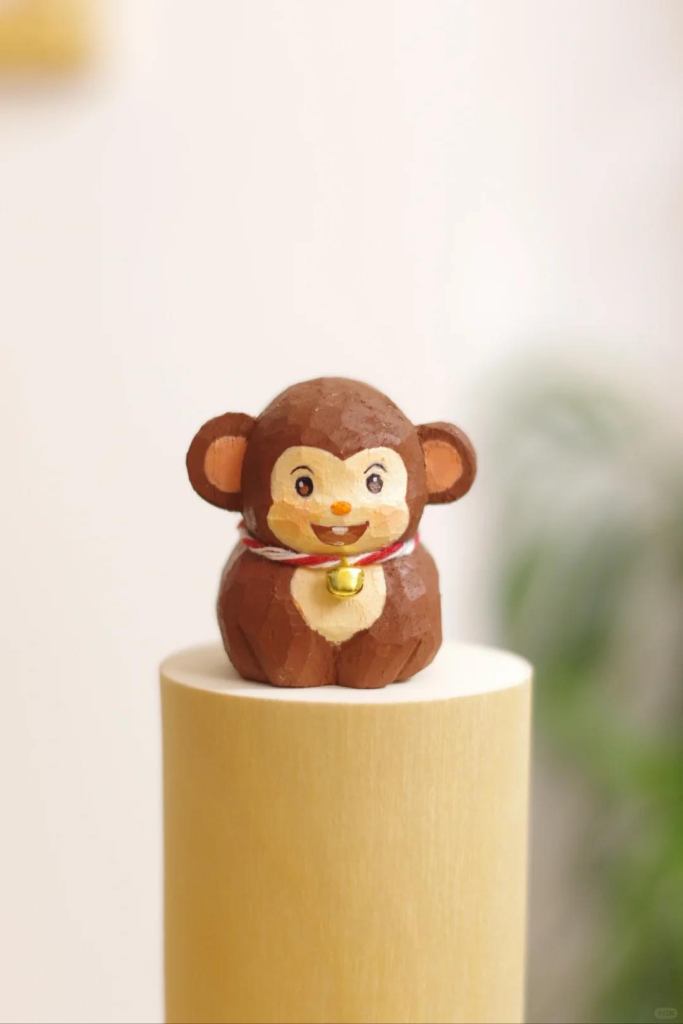
This monkey uses “Chibi” proportions—a giant head, massive ears, and a tiny body. It’s a fantastic project for practicing rounded volume. The ears are essentially two wooden coins glued or carved onto the side of a sphere.
The Face Inset
Notice how the face is a lighter color and sits slightly recessed into the darker “hood” of the head. To achieve this, carve your sphere first, then use a shallow gouge to “dish out” the area where the face will go. This creates a natural frame that makes the painted features pop.
The Pro Move: Adding Accessories
The little bell and cord around the neck aren’t just for show; they hide the neck joint. If your transition from the head to the body looks a bit rough or uneven, adding a physical collar or ribbon is a classic carver’s trick to create a clean, professional “break” between two complex shapes.
14. The Winter Penguin
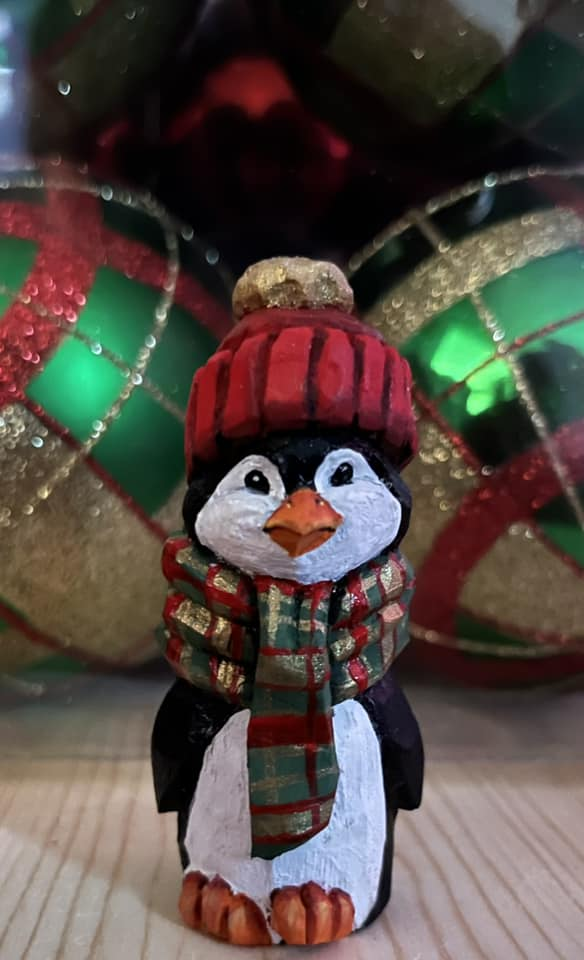
This penguin is a lesson in combining three distinct elements: the smooth “tuxedo” body, the textured “knitted” hat, and the painted scarf. For a beginner, this is a great exercise in tool switching—moving from a knife for the body to a small gouge for the hat’s ribbing.
The Vertical “V” Cut
To get that knitted look on the hat, use a series of tight, vertical V-cuts. You don’t need to carve every thread; the repetition of the lines creates the illusion of fabric. When it comes to the scarf, don’t carve it at all—use a thick layer of paint or wood filler to give it a slight “raised” texture against the body.
The Pro Move: High-Contrast Painting
The black-and-white contrast of a penguin is very forgiving. If your carving isn’t perfectly symmetrical, a crisp paint job will hide it. Focus on the “mask” around the eyes; keeping that area clean and bright white makes the penguin look “polished” regardless of the wood’s grain.
15. The Sleek Orange Fox

Unlike the “low-poly” fox we saw earlier, this version focuses on a rounded, streamlined body. It’s a lesson in negative space—look at how the ears are carved as one unified block with a notch in the middle. This keeps the wood strong while giving the clear impression of two alert ears.
The Color Split
The magic of this fox is the white underbelly. When you’re carving, don’t worry about making the “fur” look real. Instead, focus on creating a clean transition line where the orange meets the white. Use a pencil to draw this line around the body before you paint. It teaches you that a well-placed color boundary can define the shape of the animal better than any deep cut.
The Pro Move: The Three-Dot Face
You don’t need to carve eyes or a mouth. Two tiny black dots for eyes and one for the nose are all it takes. By placing them low on the face, you give the fox a “cute,” youthful look. It’s a lesson in minimalist expression: sometimes the less you do, the more the viewer sees.
Small mammals — mice, squirrels and hedgehogs
Small rodents and mammals are fantastic practice subjects because their proportions are simple and their textures — fur, whiskers, tiny paws — teach you control. When carving small mammals, work with the grain as much as possible, and use a detail knife rather than a larger carving knife to avoid splitting delicate ears and tails.
16. The Mouse Plaque
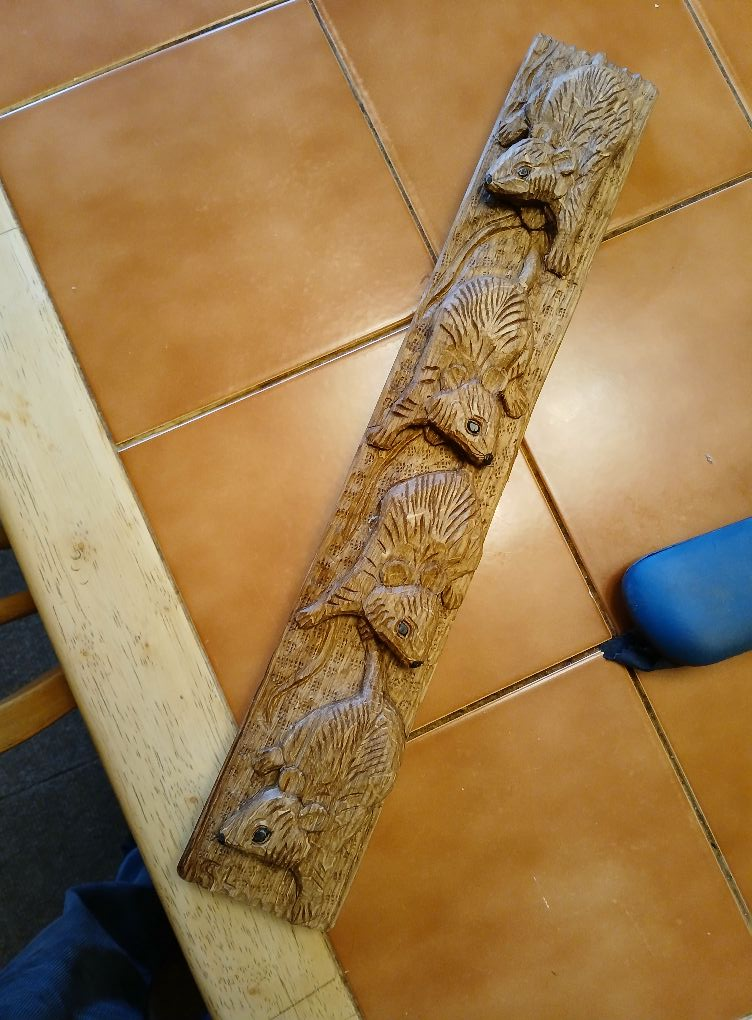
If you’re worried about carving “in the round” or making a piece stand upright, a relief carving like this mouse family is your perfect sandbox. Since the mice remain attached to a flat backing, you’re essentially “drawing” with a knife.
Visual Camouflage
The secret to this piece is letting texture solve your problems. If the body of the mouse feels a bit lumpy or asymmetrical, don’t stress. Once you go in with a V-tool or even a sharpened nail to create those frantic fur lines, the texture creates a “camouflage” that hides the anatomy beneath.
The Pro Move: Building Layers
Focus on the “overlap.” Making the tail of one mouse look like it’s tucked under the body of another is a simple way to practice depth. It teaches you that you only need a few millimeters of depth to create the illusion of a 3D scene.
17. The Scorched-Tail Squirrel
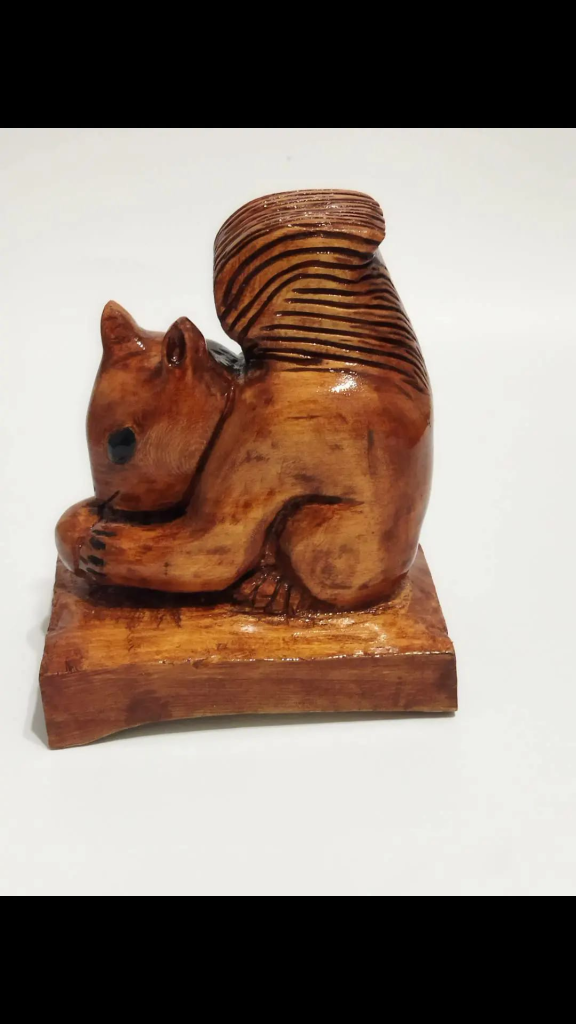
This squirrel uses a “stylized” approach to anatomy. Rather than carving realistic fur, the carver used deep, rhythmic grooves on the tail and a smooth finish on the body. This contrast in texture immediately tells the viewer’s brain exactly what they are looking at.
The Integrated Base
Like the raven, this squirrel sits on an integrated block. This “pedestal” style is great for beginners because it provides structural integrity. It lowers the center of gravity, meaning you don’t have to worry about the squirrel being “top-heavy” and tipping over on a shelf.
The Pro Move: Pyrography (Wood Burning)
To get those dark, crisp lines in the tail, you can use a wood-burning tool or a very thin “wash” of dark paint inside the grooves. This “line work” acts like an outline in a drawing, making the carving pop against the background. It’s a lesson in using value (light vs. dark) to define shape.
18. The Geometric Hedgehog
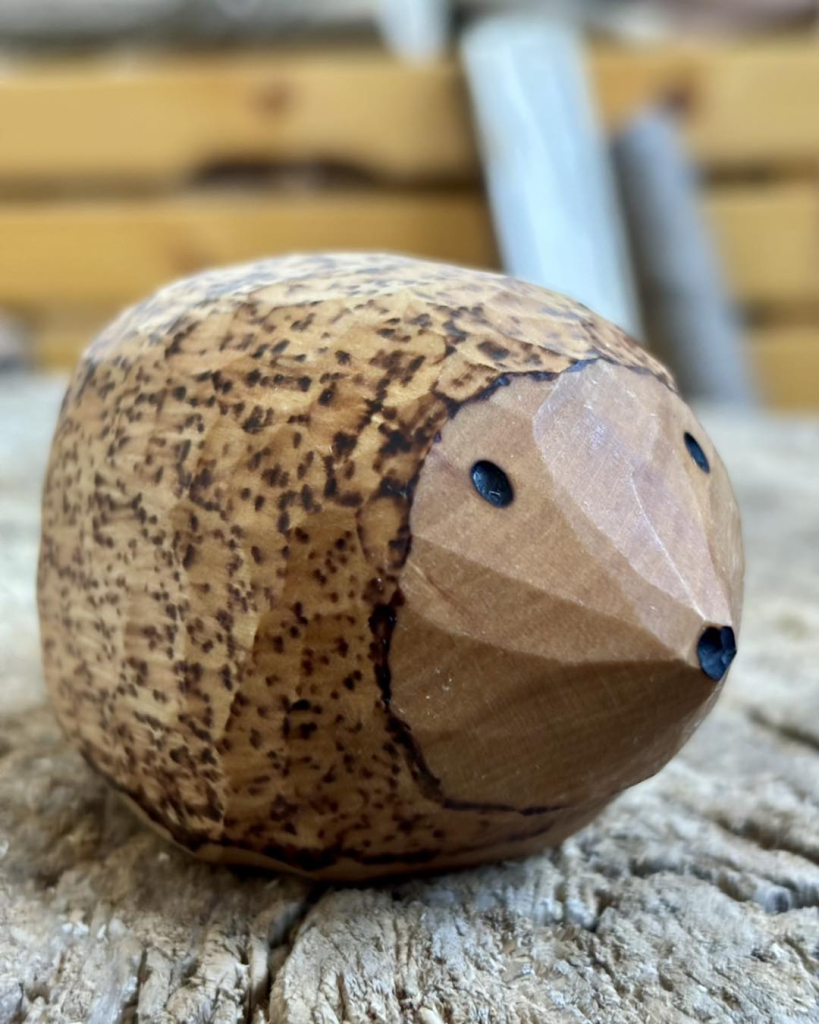
This hedgehog is a brilliant example of how to use a stark contrast between two finishes to define an animal. The face is kept clean, smooth, and faceted, while the body is a riot of texture. It’s the ultimate “low-stress” carving because the body doesn’t require a specific shape—it just needs to be a round “loaf.”
The Stippled Quill Effect
To get this look, you don’t even need a knife for the quills. You can use a wood-burning tool, a small drill bit, or even a dark stain applied with a stiff-bristled brush. By “stippling” the back of the loaf, you create a dense field of quills that protects the delicate, smooth face you carved earlier.
The Pro Move: Pointed Symmetry
The only part of this carving that needs careful attention is the nose. Ensure the tip of the “teardrop” is centered between the eyes. This simple alignment is the “anchor” for the entire piece. It teaches you that symmetry in the face allows for chaos everywhere else.
19. The Pocket-Sized Hare
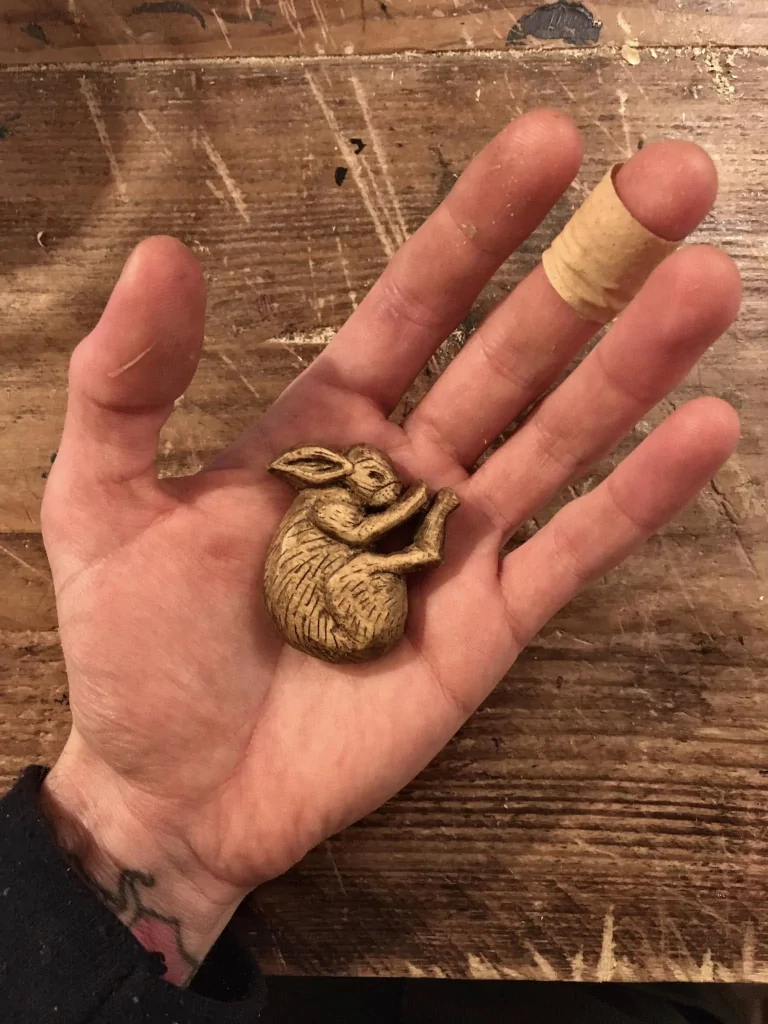
The biggest risk for a beginner carving a rabbit is breaking off the long, fragile ears. This piece solves that by “tucking” the ears and legs tight against the body. It turns a delicate animal into a solid, durable pebble that feels great in the hand.
The Fetal Position
When planning your cut, keep all the extremities within the original “box” of the wood. This “compacting” strategy isn’t just for safety; it forces you to focus on the silhouette. If you can make a rabbit recognizable while its limbs are tucked in, you’ve mastered the art of carving the essence of an animal.
The Pro Move: High-Contrast Finishes
Because this carving is so small, details can get lost. Use a dark wax or a thin wash of oil to let the pigment settle into the fur lines. This “antique” finish makes the tiny grooves pop, giving a miniature piece a sense of weight and history.
Farm and domestic animals
Roosters, horses, dogs, bears and ducks are perennially popular carving subjects. Their anatomy is well-known, which means you have a strong mental image to work toward, and their forms are chunky enough to carve without fragile details snapping off.
20. The Work-in-Progress Horse
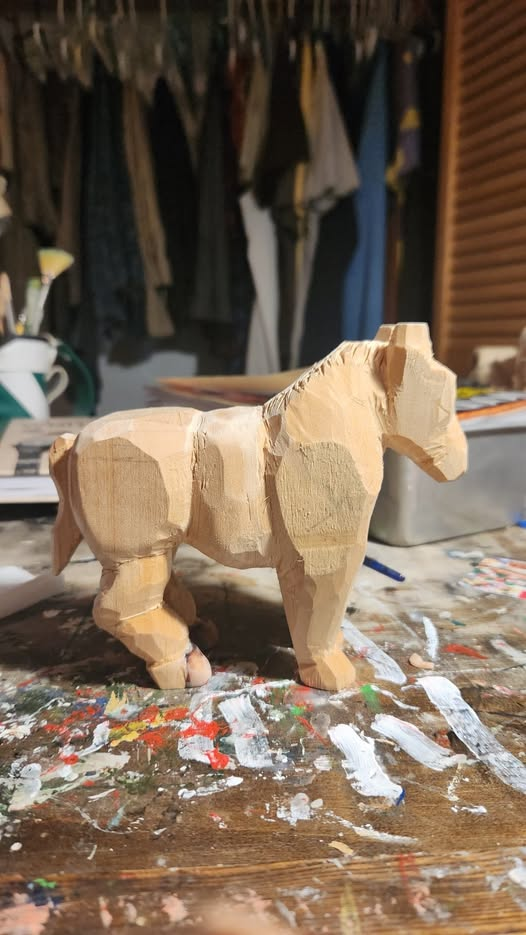
This horse is shown in its “rough-out” stage, which is actually the most important phase for any beginner to see. It’s about breaking the animal down into blocks—a rectangle for the body, a cylinder for the neck, and four sturdy pillars for the legs.
The Strategy: The “Box” Method
Before you try to carve a muscle or a hoof, keep the legs as thick “stumps.” Beginners often make the legs too thin too early, leading to breaks. Keep the whole piece “heavy” until the very end. Think of it as carving a sturdy table first, then refining the table legs into horse legs later.
The Pro Move: Proportional Anchors
Notice how the head is tilted slightly. To keep your proportions right, draw a center line from the top of the head down through the chest. Even as you carve away the corners, keep reapplying that line. It acts as your north star, ensuring that the nose and the tail stay aligned with the spine.
21. The Bold Husky Head
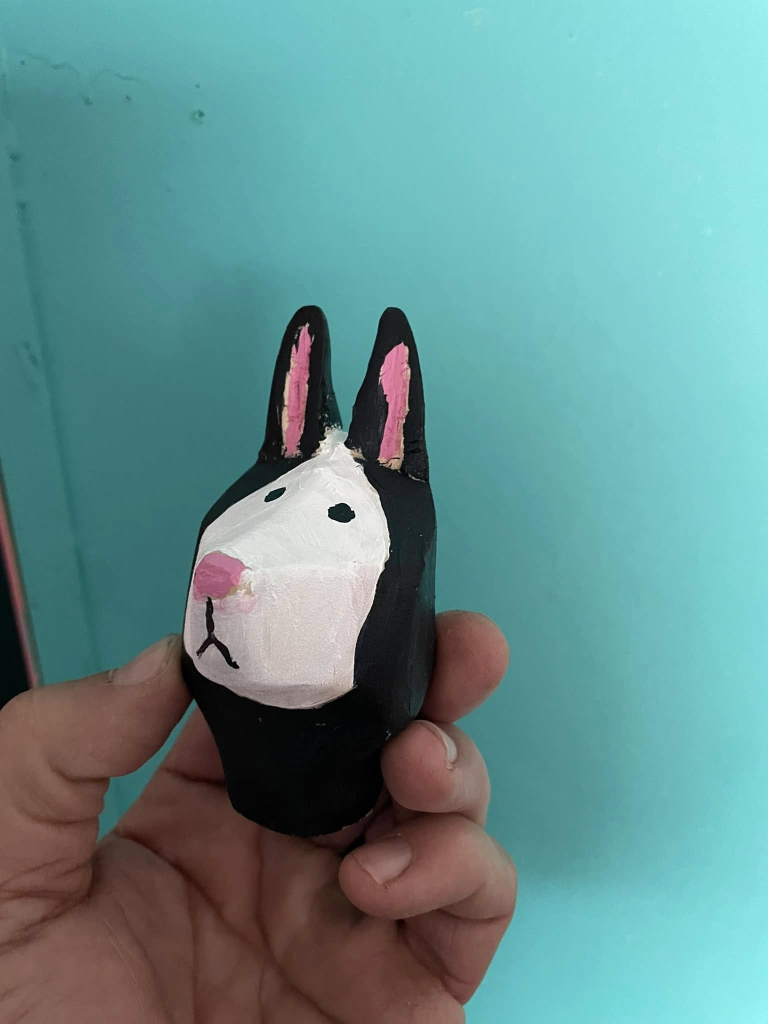
This piece is almost entirely about “mapping” out colors. The carving itself is a simple, elongated wedge, but the black-and-white paint job immediately identifies it as a husky or sled dog. It’s a perfect project for practicing facial symmetry.
Masking with Paint
If you look closely, the pink of the nose and ears provides a “pop” that draws the eye. When carving a head like this, focus on the muzzle depth. Carve the white area of the nose slightly forward from the rest of the face. This physical “step” in the wood creates a natural shadow that makes the dog look three-dimensional even before the first drop of paint hits the surface.
The Pro Move: The “Sad-Eye” Angle
Notice the slight downward angle of the eyebrows. By carving a small, sloping ridge above where you paint the eyes, you give the dog an emotive, almost worried expression. It teaches you how to carve emotion into a static block of wood.
22. The Polished Bull
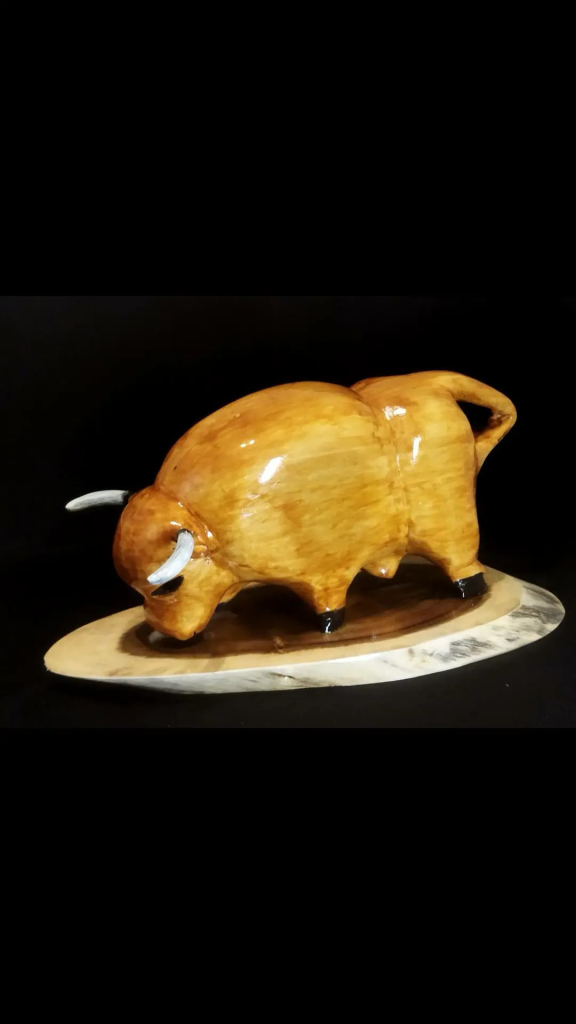
This bull is all about “heft.” It’s built from a series of heavy, rounded cylinders. For a beginner, this is the best way to practice anatomical tension—making the wood look like it has “muscle” underneath the skin without actually carving every muscle fiber.
Mixed Media Horns
Don’t stress about carving thin, fragile horns out of wood; they will almost certainly snap. Instead, do what this carver did: drill two small holes and insert toothpicks or bone shards. This “mixed media” approach is a great shortcut that adds a professional, sharp contrast to the soft, rounded wood of the body.
The Pro Move: The High-Gloss Shield
A thick, high-gloss polyurethane finish does more than just shine; it acts as a visual “leveler.” It fills in tiny sanding scratches and unifies the surface. It teaches you that the finish isn’t just a coating—it’s the final layer of the sculpture that defines how the light “travels” across the animal’s back.
23. The Sitting Cat (Process Study)
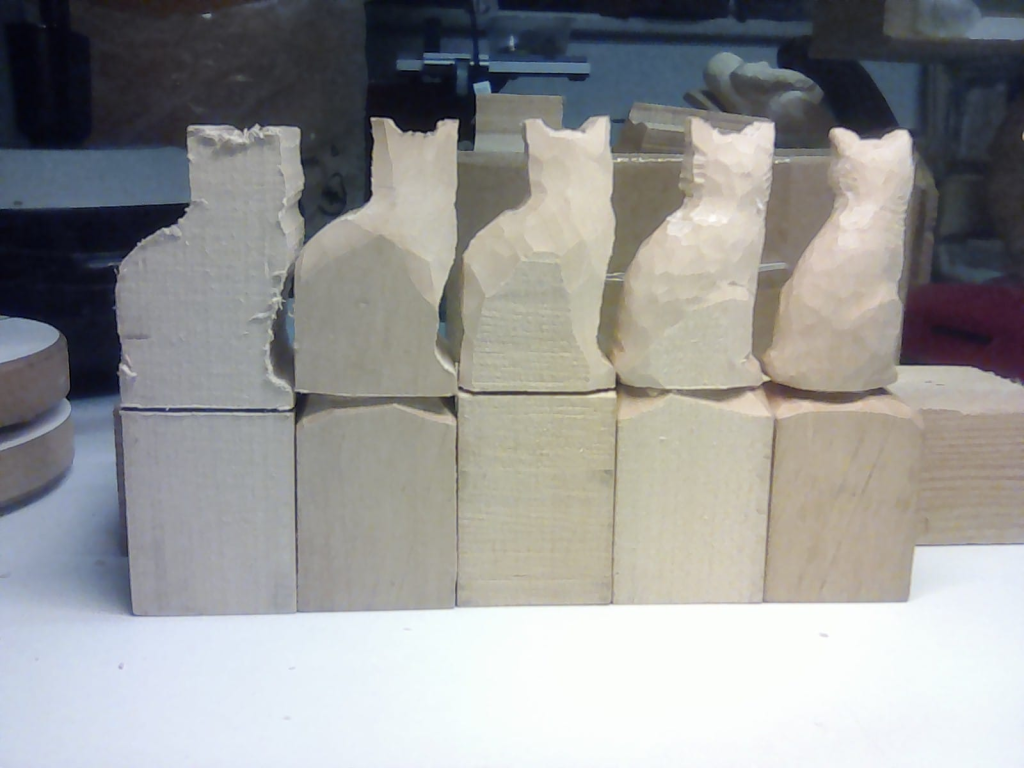
This image is a goldmine for beginners because it shows the “stages of life” for a carving. It moves from a rough bandsaw cutout to a finished, rounded cat. It’s a lesson in incremental progress—realizing that you don’t jump from a block to a cat in one step.
Rounding the Corners
Look at the second and third cats in the line. The carver has focused entirely on taking the “box” away. They aren’t carving ears or tails yet; they are simply turning a square pillar into an oval. By focusing on the “main mass” first, you ensure the proportions are solid before you get distracted by the face.
The Pro Move: Batch Carving
If you want to get good quickly, carve three of the same animal at once. Carry them all through the “blocking” stage, then all through the “rounding” stage. This muscle memory is the fastest way to learn. By the third cat, your hands will intuitively know where the wood needs to come off.
lizards, snakes and chameleons
Reptiles are an underrated choice for beginner carvers. Their scaly textures can be suggested with simple repetitive cuts — a V-tool or a small gouge dragged in rows creates convincing scales quickly.
24. The Serpent Pendant
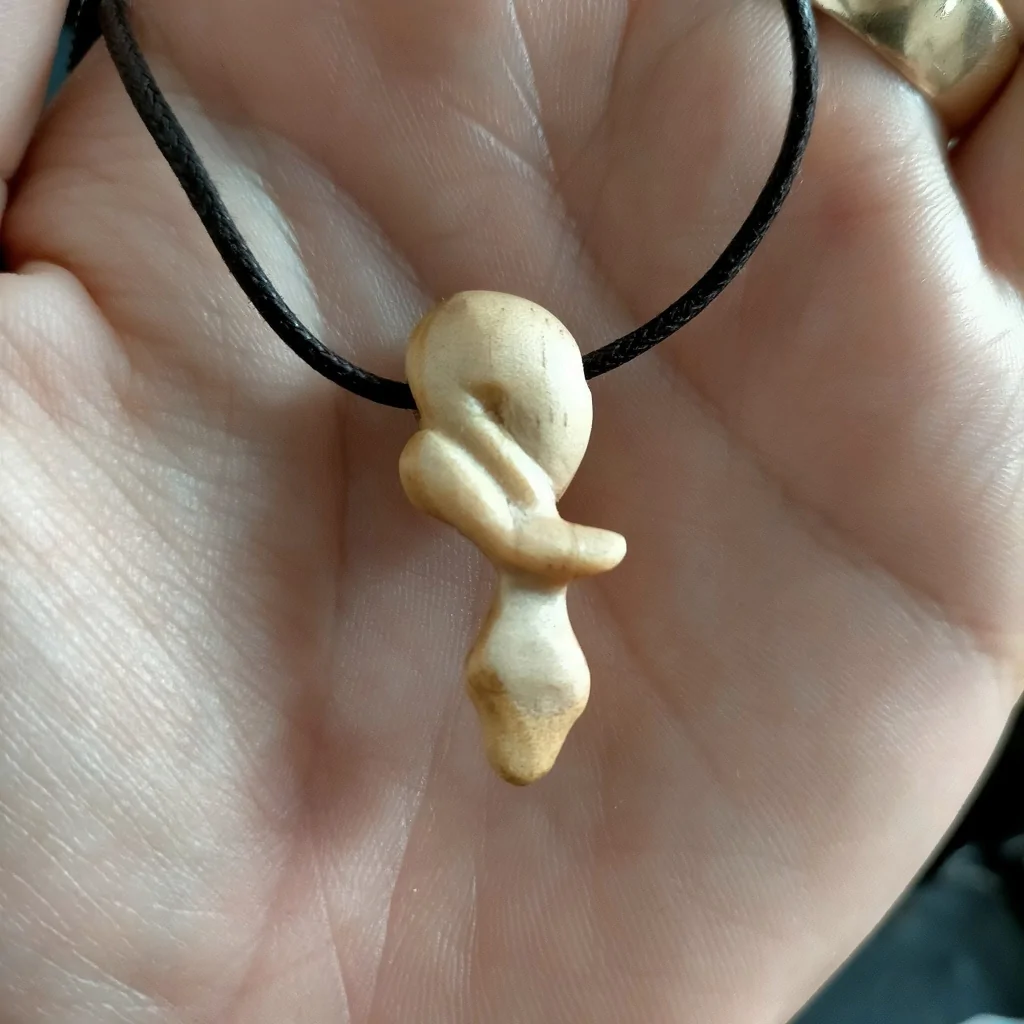
This tiny snake pendant is a study in miniaturization and ergonomics. Since it’s meant to be worn, it has to be smooth to the touch with no sharp edges that might snag on clothing. It teaches you how to create a “loop” within the carving itself.
The Integrated Bail
Instead of screwing in a metal eyelet, the snake’s body actually coils to create the hole for the cord. When carving this, use a needle file or a very small piece of rolled-up sandpaper to smooth the inside of the coil. It’s a great exercise in “negative space” carving on a micro-scale.
The Pro Move: Bone-Dry Sanding
To get that ivory-like sheen on such a small piece, sand it all the way up to 400 or even 600 grit. At this size, every tiny scratch shows. Once it’s perfectly smooth, a simple coat of beeswax and a vigorous buff with a soft cloth will give it a natural, skin-like glow that feels amazing in the hand.
25. The Sea Turtle
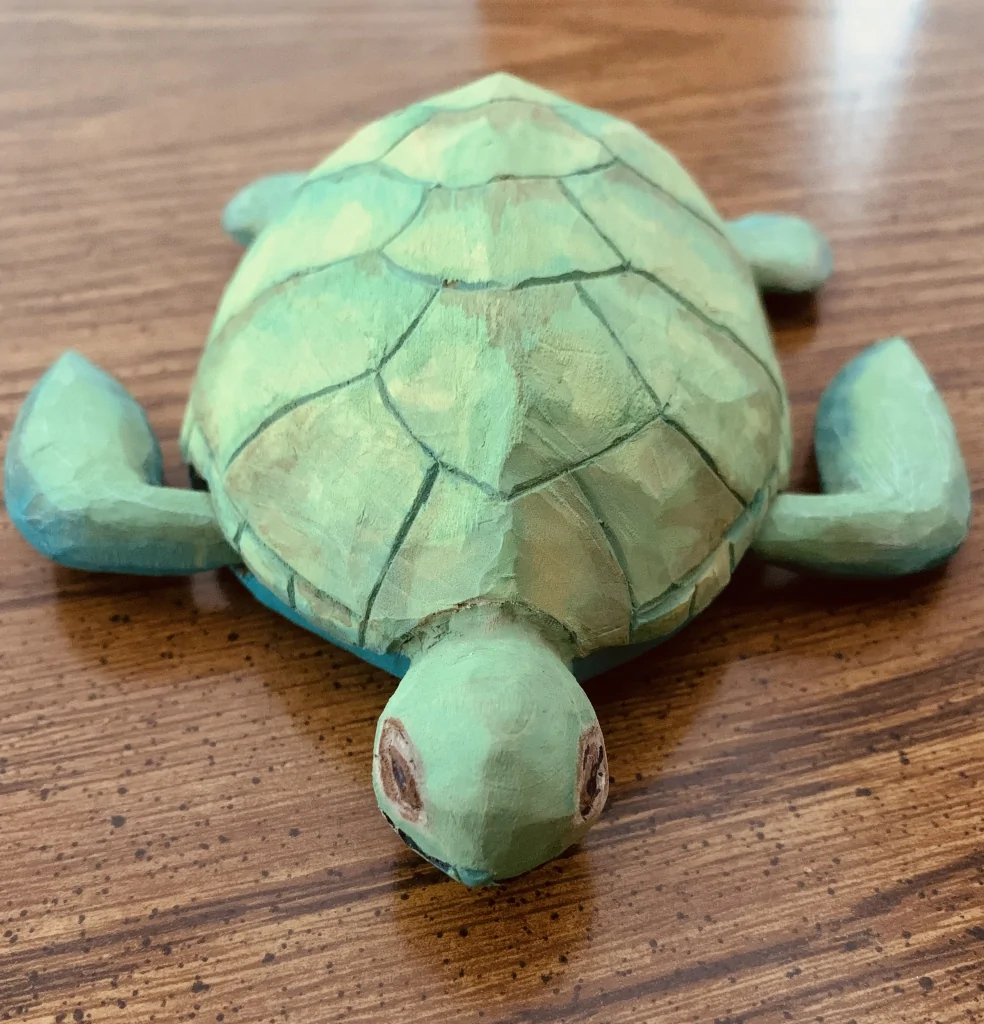
A turtle is a fantastic project for learning how to organize space on a curved surface. The shell is essentially a large dome, but the “scutes” (the shell segments) provide a grid that helps a beginner practice consistent depth and spacing.
The “Map” Method
Don’t start carving the shell details until the dome is perfectly shaped. Once the wood is smooth, draw your hexagonal pattern with a pencil. Use a V-tool to follow those lines. By carving the grooves at a consistent depth, you create a 3D grid that makes the turtle look structurally sound and realistic.
The Pro Move: The Low-Profile Flips
Notice how the flippers are flat and extend horizontally. To keep them from snapping, ensure the grain of the wood runs lengthwise through the flippers. This is a lesson in “extension strength”—learning how to position your animal within the wood block to protect its most vulnerable limbs.
26. The Squatting Bullfrog

This frog is a lesson in “compact power.” Unlike the horse or the wolf, the frog’s limbs are folded tight against its ribs. This is a very safe carving for beginners because there are no thin, spindly parts that might snap off if you drop it or apply too much pressure.
The “L” Leg Shape
To get the legs right without getting lost in anatomy, think of the back legs as a simple capital “L” shape carved into the side of the body. You don’t need to carve “toes” or “knees”—just the suggestion of that powerful folded muscle. By painting the belly a different color, you create an instant 3D effect that separates the legs from the torso.
The Pro Move: Symmetrical Landmarks
Frogs are very symmetrical. Use the eyes as your anchors. If you place the two “eye bumps” perfectly level on the head, the rest of the body can be a little uneven and it will still look like a frog. It’s a lesson in identifying which features must be perfect to sell the illusion.
27. The Spiraled Chameleon
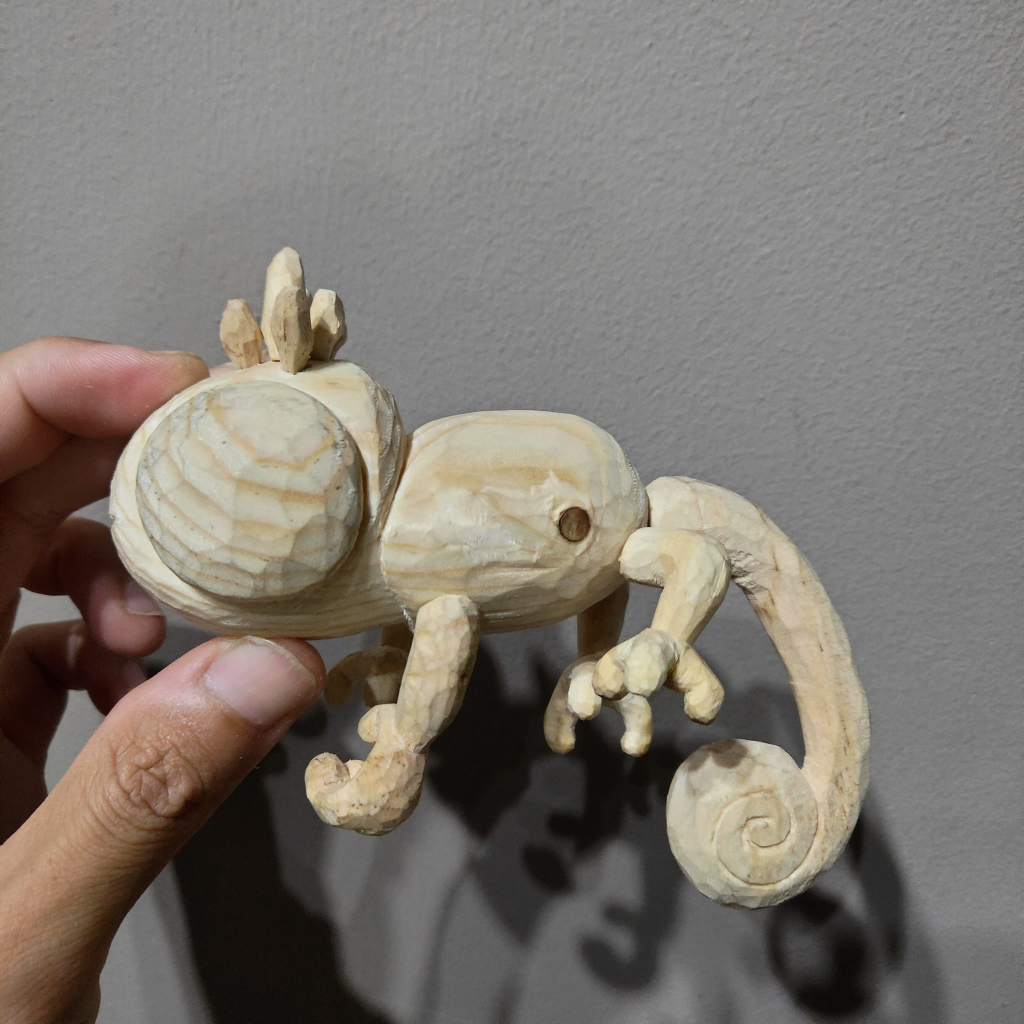
The chameleon is the “boss fight” of this set. It introduces two difficult concepts: thin limbs and a perfect spiral tail. It’s a fantastic way to practice delicate removal and seeing how wood responds when you carve a circle across the grain.
The Tail Coil
Don’t try to carve the hole in the center of the tail immediately. Carve the tail as a solid, flat “disk” first. Once you have the circular shape perfect, use a small V-tool to etch the spiral line onto the surface. Only then should you go back and deepen the cuts to create the 3D coil. This prevents the wood from splintering before you’ve even finished the shape.
The Pro Move: Support the Limbs
Because those legs are thin, they are prone to breaking. The secret is to keep the “negative space” (the wood between the legs) until the very last minute. Treat the wood under the belly as a kickstand that supports the weight of your hand while you detail the toes. Once the feet are done, you can carefully remove that final “bridge” of wood.
28. The Sprawling Gecko
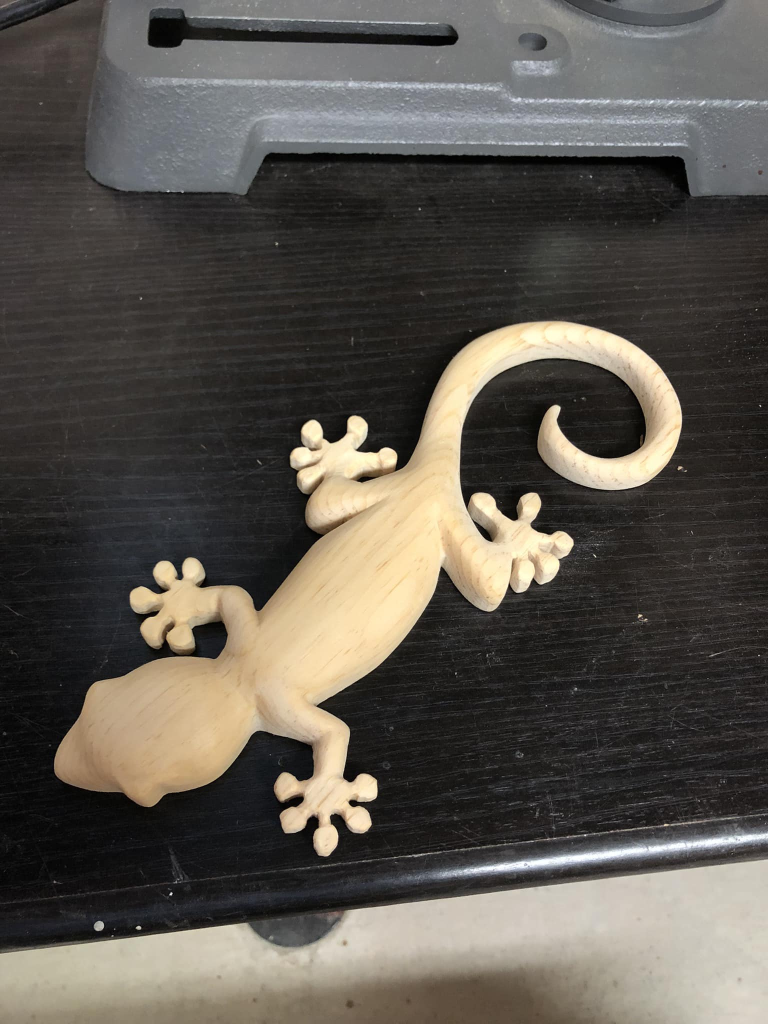
Like the chameleon, this gecko is a study in fluid motion. However, it takes the challenge a step further by splaying the legs out wide. This is a masterclass in grain orientation—because the legs go in four different directions, you’ll constantly be changing your carving angle to avoid snapping the delicate toes.
The Flat-Bottom Foundation
Notice that this gecko is essentially a “high-relief” carving. To keep it stable while you work on those tiny bulbous toes, leave the bottom of the wood block flat. Don’t try to carve the belly until the very last stage. By keeping a flat base, you can rest the piece securely on your workbench, allowing you to use both hands for the precision work on the limbs.
The Pro Move: Sanding as a Tool
For a piece this sleek, your sandpaper is just as much a carving tool as your knife. Start with a heavy 80-grit to “carve” away the faceted tool marks on the tail, then work your way up to 220-grit. It teaches you that a perfectly smooth curve is often achieved by removing less wood, more slowly.
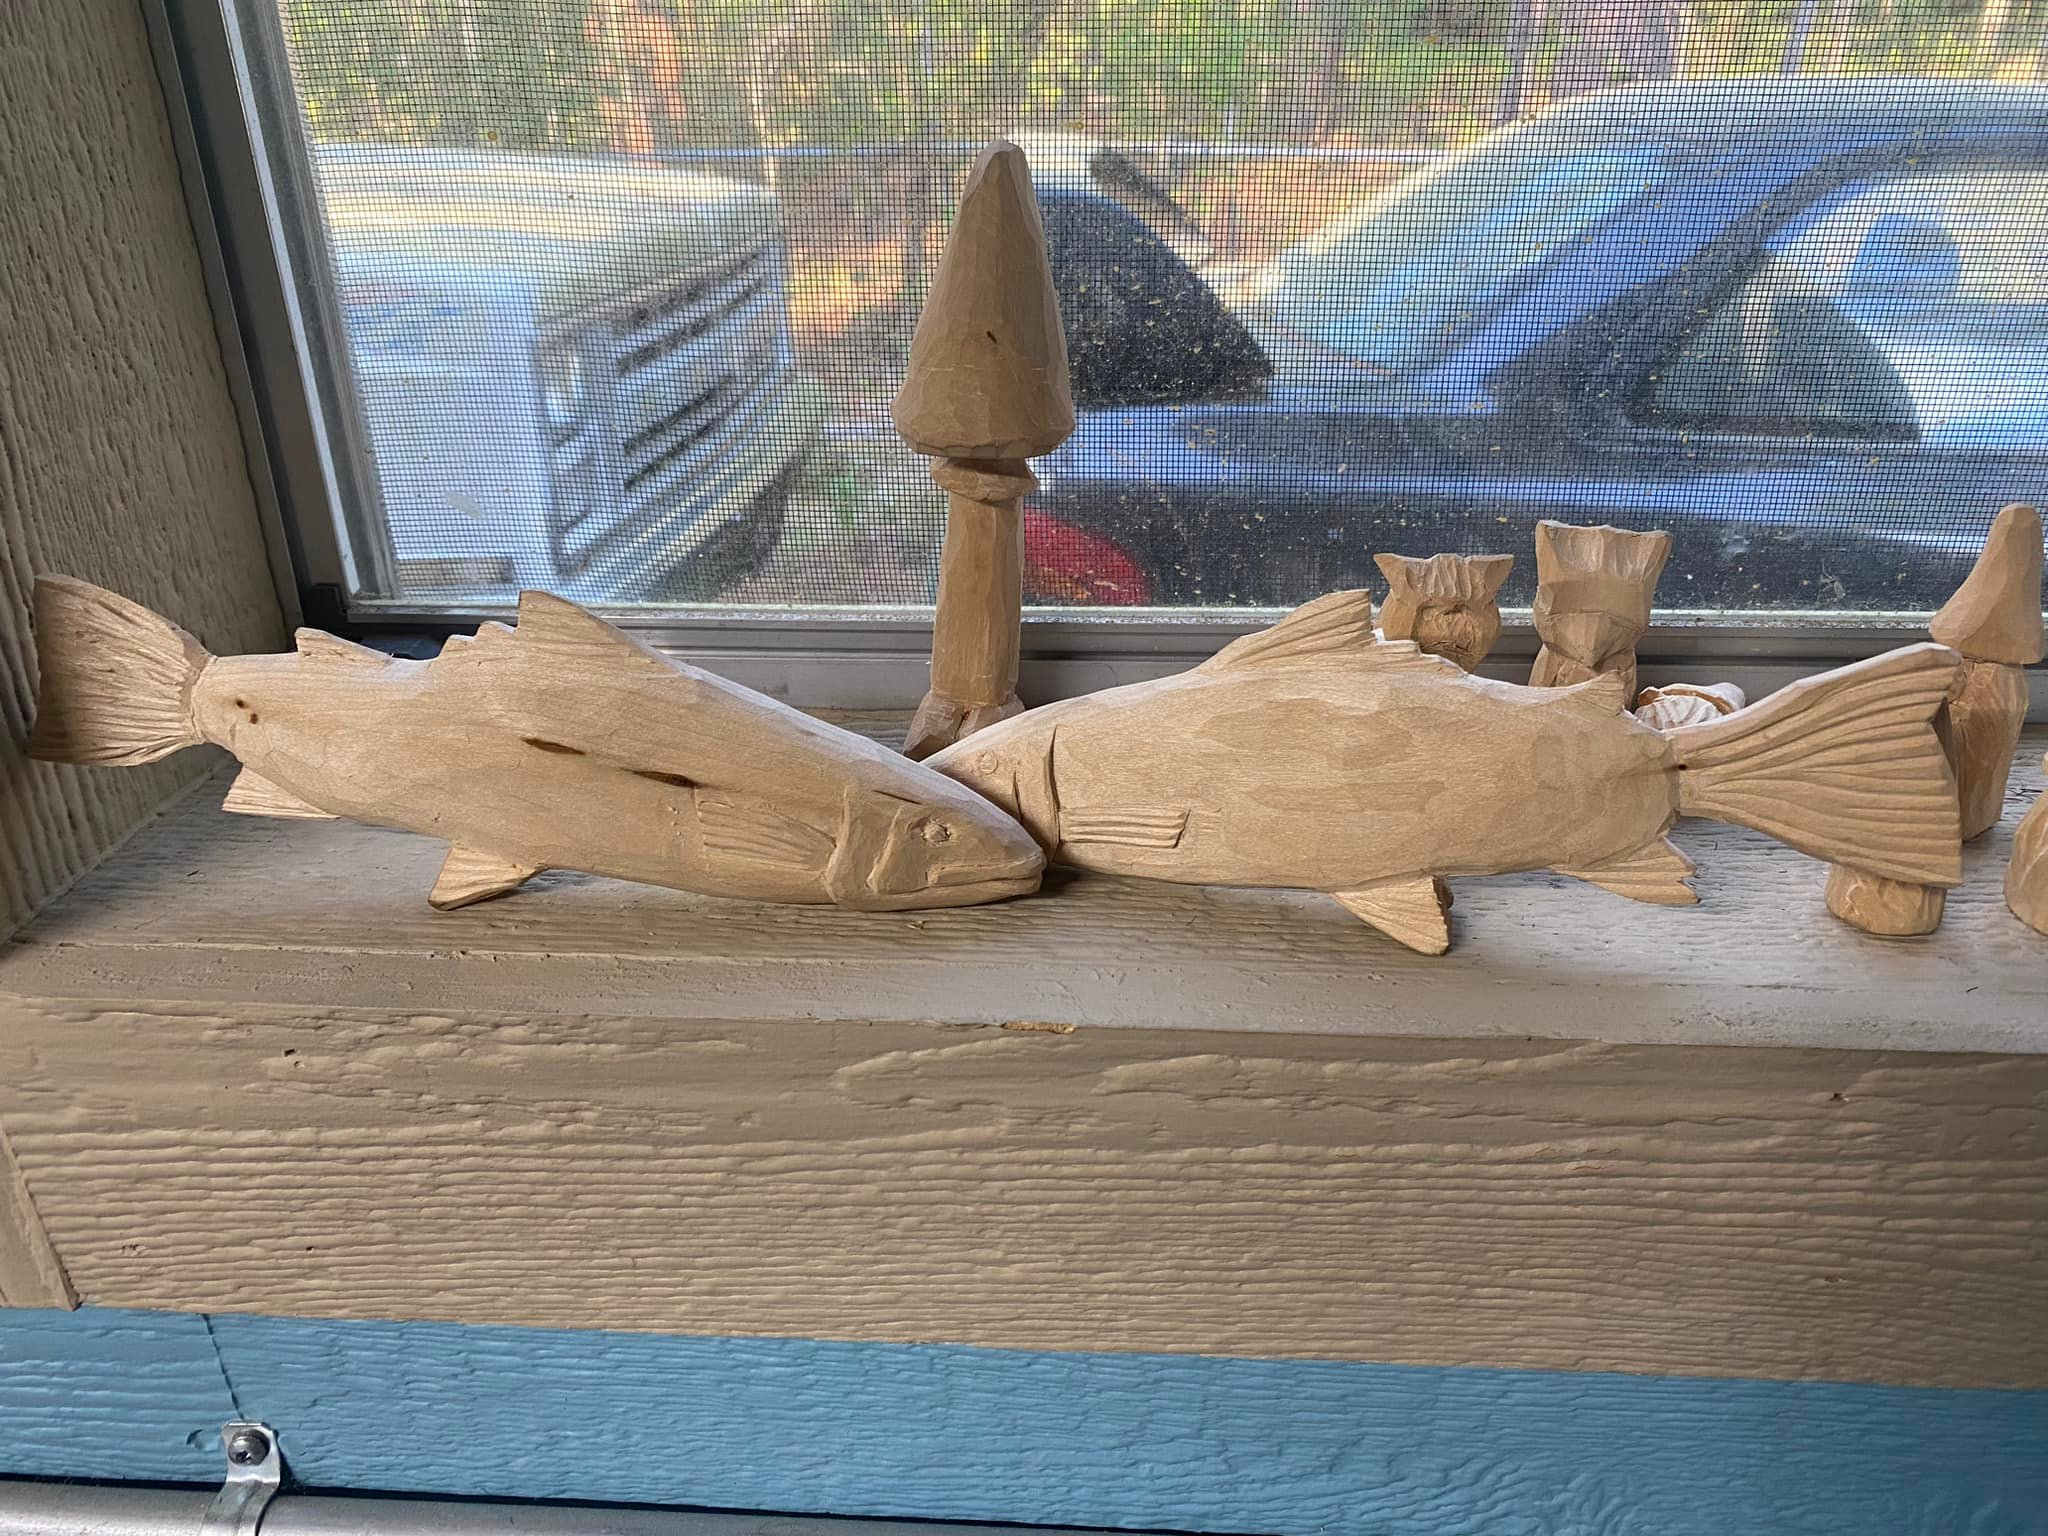
What about the fish?
Fish can be fun to carve. they offer big and small carving ideas check out these two examples below
29. The Streamlined Trout

Fish are the perfect “anatomy 101” for beginners because they are essentially a single, continuous curve. This project isn’t about detail; it’s about aerodynamics. It teaches you how to follow the long fibers of the wood without catching or splitting them.
The S-Curve
Instead of carving a straight, stiff board, give your fish a slight “wag” in the tail. This “S” shape makes the wood feel like it’s underwater. When carving the fins, don’t try to make them paper-thin—keep them slightly thick at the base where they meet the body to ensure they don’t snap off during the final sanding.
The Pro Move: Grain Direction Awareness
Because a fish is one long shape, you will inevitably have to change your carving direction as you move from the head to the tail. If the wood starts to feel “fuzzy” or resistant, flip your piece 180 degrees. Learning to feel that transition is a skill that will serve you in every carving you ever do.
30. The Diving Dolphin
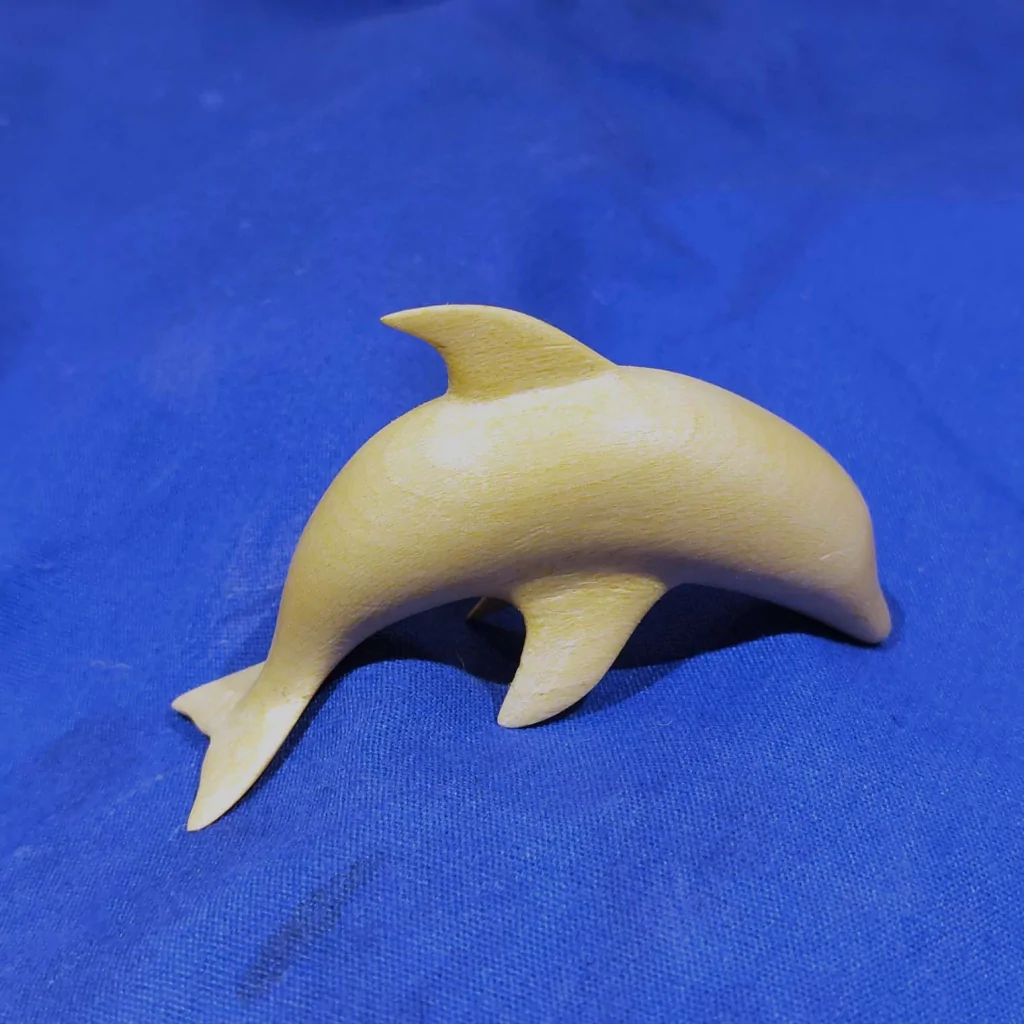
The dolphin is the ultimate test of “blending.” There are no sharp corners or fur to hide behind. This project is about making the fins look like they are growing out of the body rather than being stuck onto it.
The Fillet Cut
When you reach the point where the pectoral fin meets the side of the body, don’t leave a 90-degree angle. Use a small, curved gouge (or the tip of your knife) to create a “fillet”—a soft, concave curve. This mimics how a real dolphin’s skin stretches over its skeleton, turning a wooden block into something that looks like it’s made of water.
The Pro Move: The “Sightline” Check
Because the dolphin is so minimalist, any asymmetry will be obvious. Hold your carving up to a mirror or look at it upside down. These fresh perspectives will immediately reveal if one side is fatter than the other, teaching you to trust your eyes over your hands.
The Essential Carver’s Kit
You don’t need a workshop full of expensive machinery to bring these 30 animals to life. In fact, most of the projects in this list can be completed with just three or four hand tools. For a complete beginners guide to woodcarving tools check out our entry: Best whittling Kits for Beginners
1. The Detail Knife
This is your workhorse. Look for a knife with a 1-inch to 1.5-inch blade. A smaller blade gives you better leverage and control, which is vital when you’re carving those tiny mouse ears or the beak of a cardinal.
2. The V-Tool (Parting Tool)
This is the “pencil” of the carving world. It’s used for fur, feathers, and defining the separation between a limb and a body. A small 60-degree V-tool will help you achieve the “Scorched-Tail” effect on the squirrel or the quills on the hedgehog.
3. The Small U-Gouge
This tool is for “scooping.” It’s essential for the rounded curves of the duck or the “dished-out” face of the chibi monkey.
4. Safety Gear
Never carve without a thumb guard and a carving glove. Woodcarving is a relaxing hobby until your knife slips. A Kevlar-reinforced glove on your non-carving hand is the best investment you’ll ever make.
The Finish Line: Surface Options
A carving isn’t finished until the surface is protected. Depending on the animal, you have three main paths:
- The Natural Look (Oil & Wax): For animals like the dolphin or the snake, a simple coat of food-safe mineral oil or beeswax brings out the grain. It feels warm and organic in the hand.
- The Painterly Approach (Acrylics): Use “washes” (acrylic paint thinned with a lot of water). This allows the wood grain to show through the color, so it still looks like a wood carving rather than a plastic toy. This is perfect for the fox and the cardinal.
- The Antique Finish (Dark Wax): Apply a dark furniture wax and buff it off quickly. The dark pigment stays in the deep cuts (like the raven’s feathers or the wolf’s fur), creating high-contrast shadows that make your detail work pop.
Frequently Asked Questions
“What kind of wood should I use?”
For beginners, Basswood is king. It has a very tight, soft grain that doesn’t splinter easily and allows you to carve in any direction. If you can’t find basswood, Butternut is a beautiful, slightly darker alternative.
“How do I know if my knife is sharp enough?”
If your knife is “pecking” or tearing the wood fibers instead of slicing them, it’s dull. A sharp knife should be able to shave a thin sliver of hair off your arm or slice through a piece of paper with zero resistance.
“I cut off a piece I wasn’t supposed to. Is it ruined?”
Absolutely not. Every carver keeps a bottle of Cyanoacrylate (CA) glue (super glue) nearby. Glue it back on, let it dry for five minutes, and carve right over it. It’s a secret even the pros use.
“Where do I start with my first cut?”
Always start by “rounding the corners.” Most of the animals in this list begin as a square block. Your first job is always to turn that square into a cylinder or an oval. Once the “box” is gone, the animal starts to reveal itself.
The Journey Beyond the 30th Carving
Looking through 30 different animals can feel like a lot to take in, but remember: every master carver once stood exactly where you are, staring at a square block of wood and wondering where the tail goes.
These ideas aren’t just projects to check off a list; they are a toolkit of solutions. Whether you’re mastering the sharp facets of a fox or the delicate flow of a songbird, you aren’t just making a figurine—you’re training your eyes to see the “hidden” animal inside the wood and training your hands to bring it out safely.
The Carver’s Mindset
The most important thing to remember as you start your first piece is that perfection is the enemy of progress. Your first few carvings might look a little lumpy or asymmetrical, and that is exactly how it should be. Those “mistakes” are the tool marks of a student learning a craft that is thousands of years old. Every chip on your floor is a sign that you’re getting better.
Your Next Cut
Don’t wait for the perfect piece of wood or the “perfect” time to start. Pick the animal from this list that speaks to you most—maybe it’s the simple, rounded duck or the sturdy, blocky frog—and make that first corner-rounding cut today.
Woodcarving is a slow, quiet, and deeply rewarding conversation between you and the grain. So, keep your knives sharp, your wood soft, and your imagination open. We can’t wait to see what you bring to life.