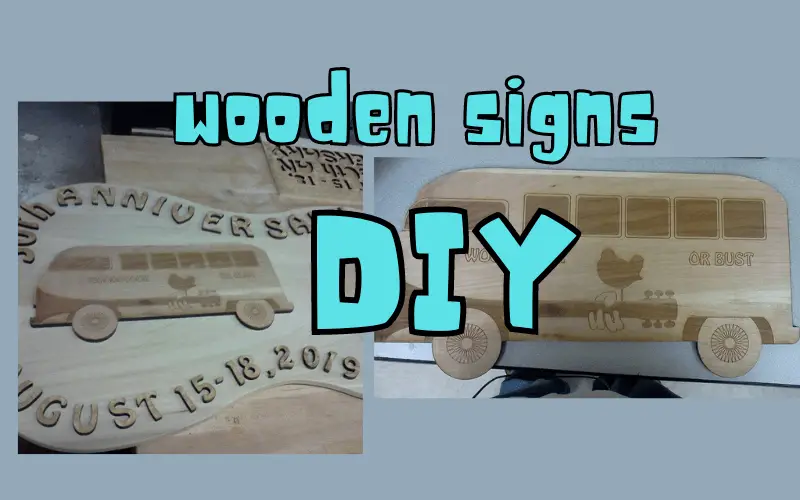
Commemorating significant events with custom-made wooden signs is a fulfilling project for woodworking enthusiasts. This guide details the creation of a guitar-shaped sign celebrating the 50th anniversary of Woodstock, integrating intricate designs and lettering. We’ll walk through the entire process, including design, cutting, engraving, assembly, and finishing, with images illustrating each step. And yes, it’s as simple as making a sandwich—if your sandwich requires precise cutting and fine detailing.
Materials Needed:
- Wood: Cherry and poplar are ideal for their smooth grain and ease of carving. Plus, they look fancy.
- Tools: Band saw, jigsaw, chisels, sandpaper, CNC router (optional), clamps, wood glue, screws, and a drill. Essentially, everything in your garage that you’ve been waiting to use.
- Finishing Supplies: Wood stain, paint, clear coat (polyurethane or lacquer), brushes, and stencils. Because nothing says ‘professional’ like a flawless finish.
Step-by-Step Process
1. Design and Planning
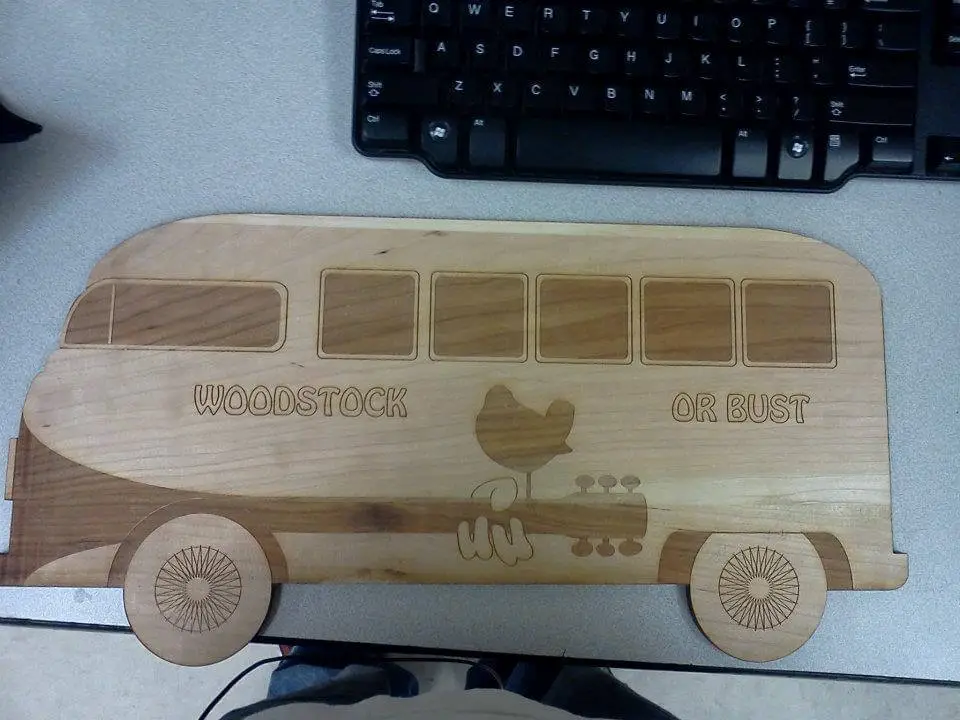
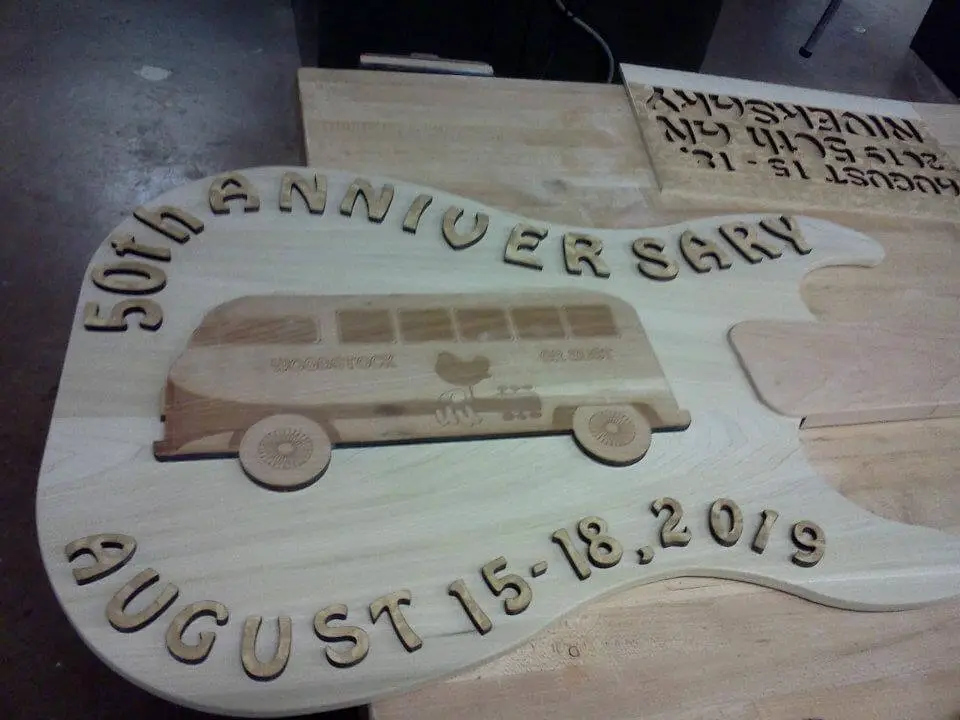
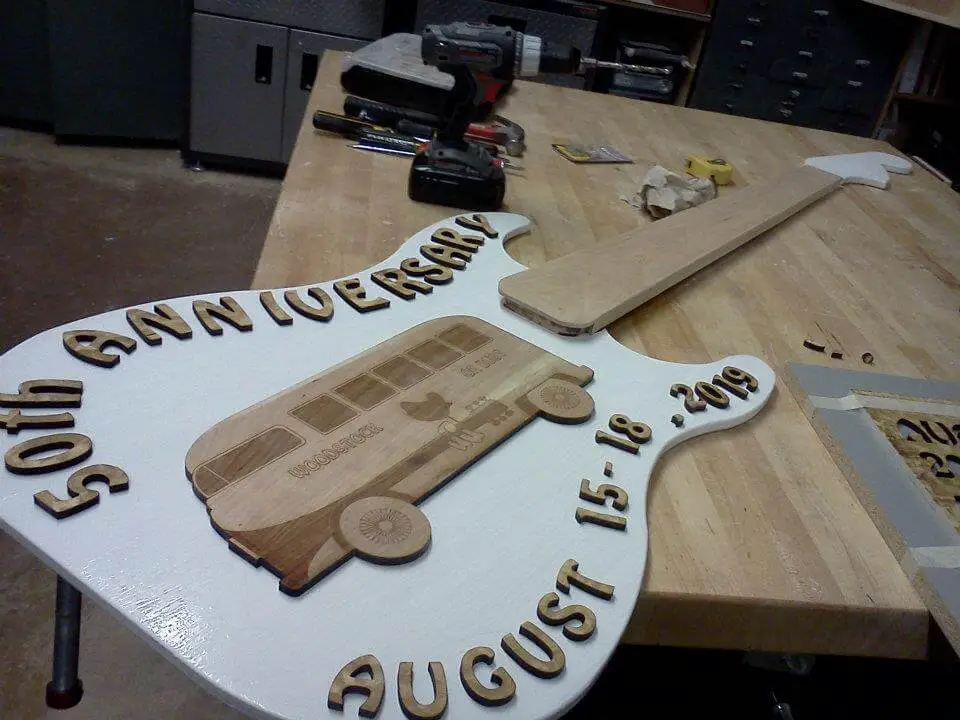
- Conceptualization and Sketching Begin with a clear concept of your sign. For a commemorative sign like the Woodstock 50th anniversary, the design can include iconic symbols such as a bus or musical instruments. Sketch the design on paper, including all elements like the bus and text (“Woodstock or Bust”). Don’t worry; perfection isn’t required—just make sure it’s good enough to show off.
- Choosing Materials Select wood types like cherry for their rich color and durability, and poplar for its workability and smooth finish. These woods contrast well, adding depth to the final piece. Plus, they sound impressive when you tell your friends.
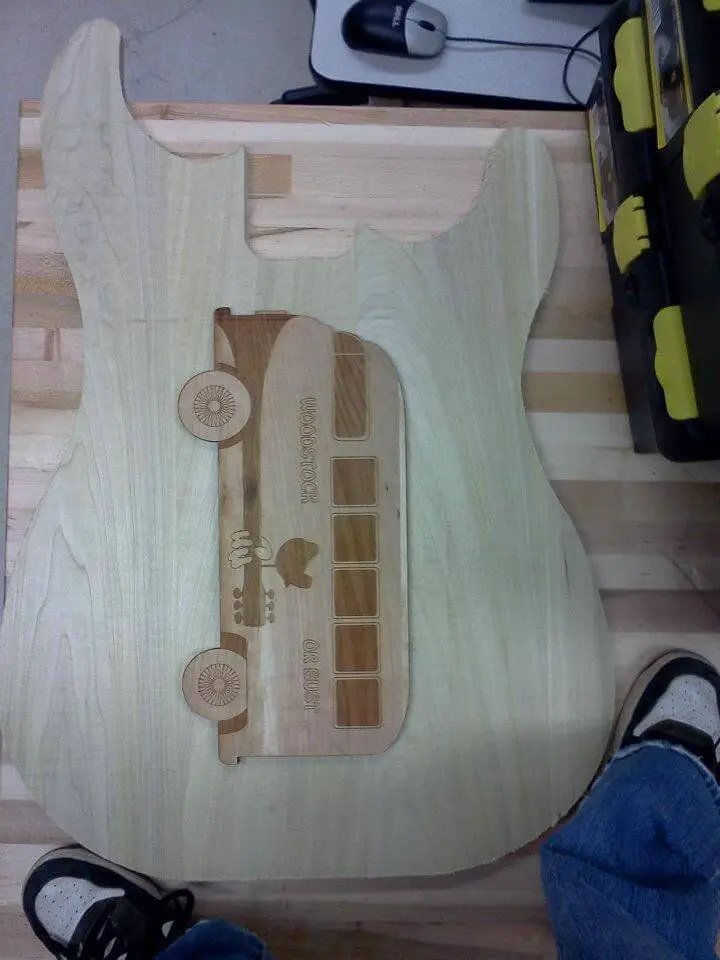
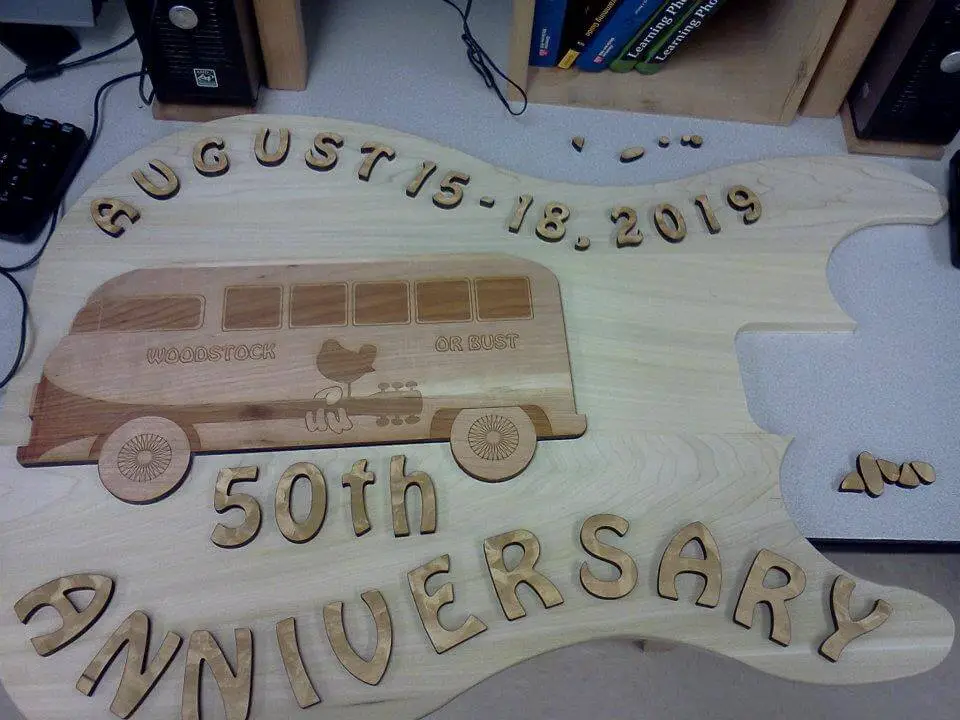
- Layout and Size Determine the size of the sign. The guitar shape used in this project is 6 feet 7 inches tall, emphasizing its significance. This size also allows for detailed work on elements like the bus and lettering—because why make it easy on yourself?
2. Cutting the Base Shape
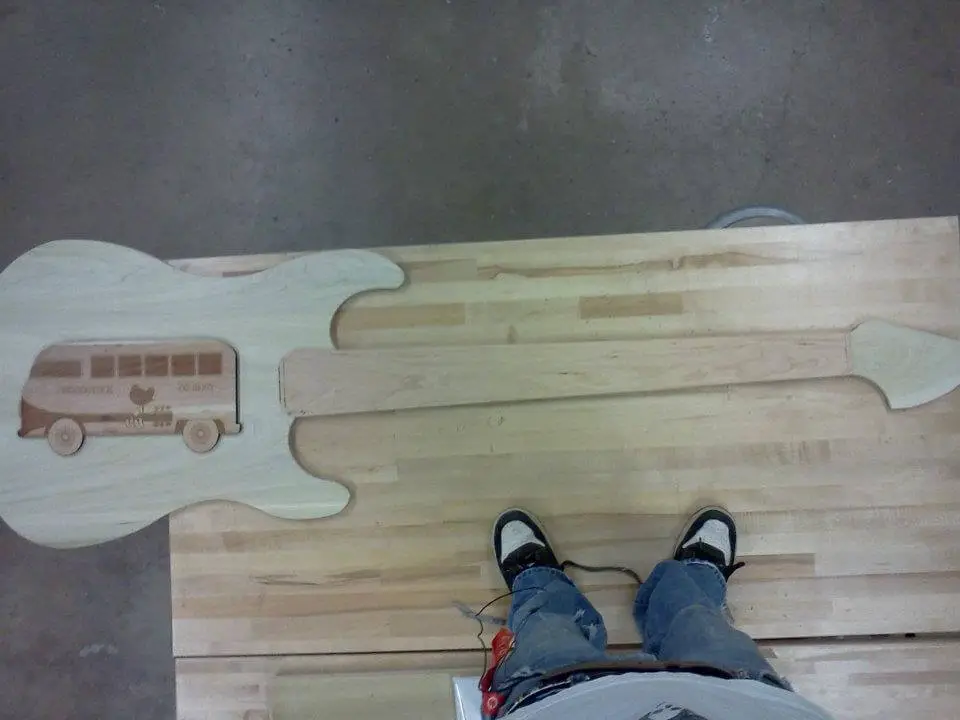
- Transferring Design to Wood Transfer your sketch onto the wood using carbon paper or freehand if confident. Use a band saw to cut out the guitar shape, ensuring smooth, continuous cuts. Sand the edges to remove any splinters because nobody likes getting a splinter from an art piece.
- Detailing the Bus Carve the bus shape into the wood. This can be done manually with chisels or using a CNC router for precision. Highlight features such as windows, wheels, and text—because details are what separate the pros from the amateurs.
Read Next
• 30 Creative Pallet Project Ideas to Inspire Your Next DIY Adventure
• 14 Coffee Table Ideas That Will Make You Rethink Sitting Down
• 30 Weekend Whittling Projects
• 20 Unique Wooden Gift Ideas for Friends
• Handyman’s Guide to Repurposed Pallet Garden Projects
3. Engraving and Detailing
- Text and Lettering Engrave the text using stencils or freehand carving. The phrase “Woodstock or Bust” and the dates “August 15-18, 2019” should be clear and legible. Use a router or chisel for deeper, more defined lettering—because squinting at poorly engraved letters isn’t fun for anyone.
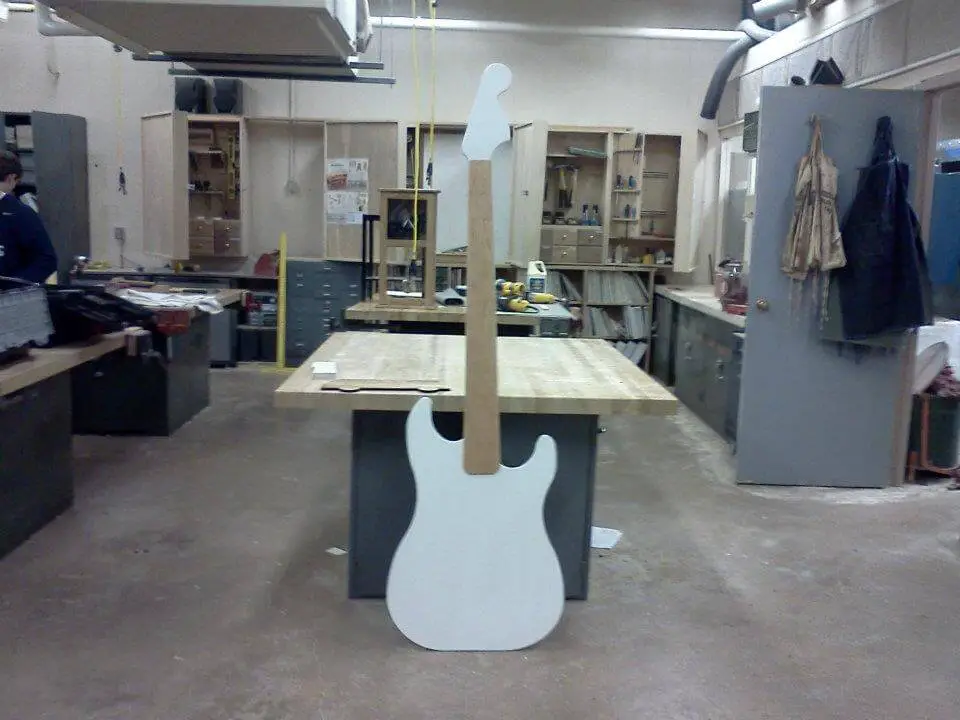
- Assembly Attach the neck to the guitar body using wood glue and screws, ensuring it is securely fastened. The headstock, representing the guitar’s tuning pegs, should be similarly attached. Because what’s a guitar without a neck? Just a fancy board.
More Examples of Handmade Wooden Commemorative Sign Ideas
• Use simple carved motifs inspired by 30 Easy Animal Carvings (https://improvewood.com/30-easy-animal-carvings/) to decorate the corners or borders of commemorative plaques.
• Add engraved lettering with a Dremel using techniques from Top 10 Simple Wood Carving Projects Using a Dremel (https://improvewood.com/top-10-simple-wood-carving-projects-using-a-dremel/), perfect for names, dates, or quotes.
• Apply a smooth painted finish following How to Paint Wood: Step-by-Step Guide (https://improvewood.com/how-to-paint-wood-step-by-step-guide/) to give commemorative signs a polished, professional look.
• Create a natural rustic appearance by using reclaimed materials similar to projects in 30 Creative Pallet Project Ideas (https://improvewood.com/30-creative-pallet-project-ideas-to-inspire-your-next-diy-adventure/).
• Protect outdoor commemorative signs using methods from How to Treat Wood for Outdoor Use (https://improvewood.com/how-to-treat-wood-for-outdoor-use/), ensuring they withstand weather and moisture.
• Use pyrography border designs inspired by 35 Stunning Wood Burning Ideas (https://improvewood.com/35-stunning-wood-burning-ideas-to-spark-your-creativity/) to add artistic flair around the text.
• Add symbolic carved patterns using ideas from Beyond the Basics: 12 Creative Carving Ideas to Try Next (https://improvewood.com/beyond-the-basics-12-creative-carving-ideas-to-try-next/), perfect for decorative edges or memorial motifs.
• Enhance wood grain and lettering contrast with finishing tips from Finishing Wooden Kitchen Utensils (https://improvewood.com/finishing-wooden-kitchen-utensils/), ideal for making engraved details stand out.
4. Finishing
- Sanding and Preparation Sand all surfaces with progressively finer grits of sandpaper, finishing with 220-grit for a smooth surface. Ensure that all carving marks and rough spots are smoothed out. Because if you’re going to make art, it might as well feel as good as it looks.
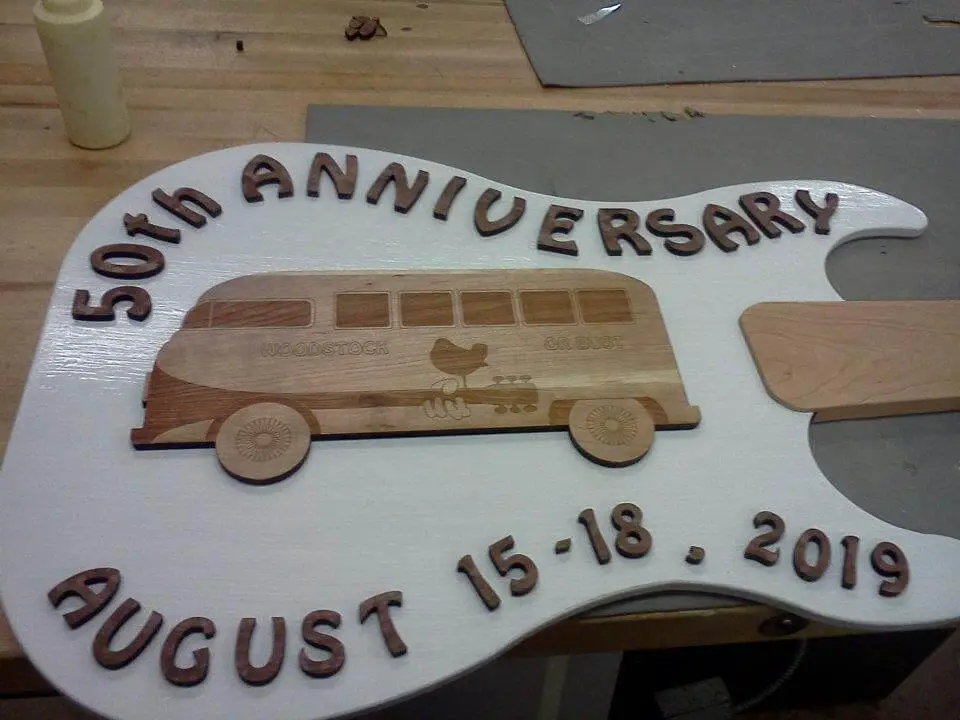
- Painting and Staining Apply a base coat of paint or stain. For this project, the bus and lettering were stained to highlight the wood grain, while the rest of the guitar body was painted. This contrast adds visual interest and clarity—also known as “making sure people can read what it says.”
- Clear Coating Finish with a clear coat to protect the wood and give it a polished look. Use polyurethane or lacquer, applying multiple coats for durability. Sand lightly between coats to ensure a smooth finish—because nobody wants a rough finish on their masterpiece.
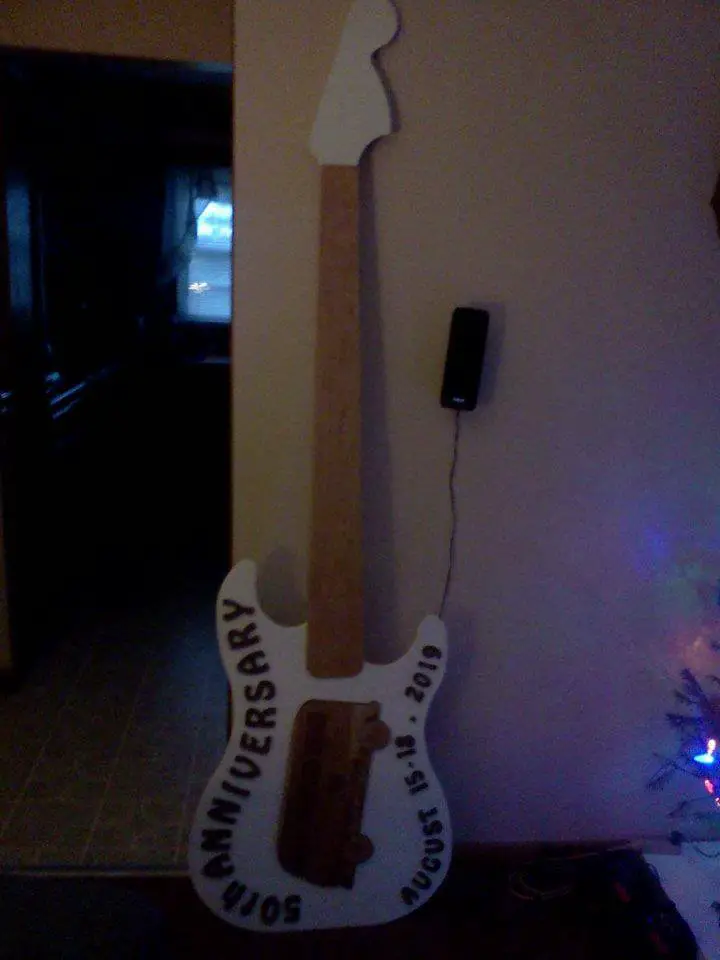
5. Final Assembly and Display
- Mounting If the sign is to be displayed standing, ensure a stable base. For wall mounting, use strong fixtures to support the weight—because falling artwork is never a good look.
- Final Touches Inspect the sign for any imperfections and touch up as necessary. Make sure all components are securely attached and that the finish is even and glossy. You want this to be something you can proudly point out to guests, after all.
Conclusion
Creating a wooden commemorative sign is not just a rewarding project; it’s a true labor of love that showcases woodworking skills, creativity, and dedication. The stunning Woodstock 50th anniversary sign featured in this guide is a perfect example of craftsmanship at its finest. A special acknowledgment goes to the talented DIYer behind this project, shared on Imgur by SmartAssassin. Their meticulous work, from the intricate bus detailing to the perfectly executed lettering, highlights a remarkable blend of artistry and precision.
This guide aims to provide a comprehensive overview of the process, from conceptualization to final display, ensuring that anyone inspired by such a project can follow in these impressive footsteps. Remember, every great piece of art begins with a vision and is brought to life with patience, skill, and a dash of passion.
Kudos to SmartAssassin for sharing this inspiring work and contributing to the community of woodworking enthusiasts. It’s creations like these that not only celebrate historical milestones but also inspire others to embark on their creative journeys. Happy woodworking, and may your projects bring as much joy and accomplishment as this one clearly has!