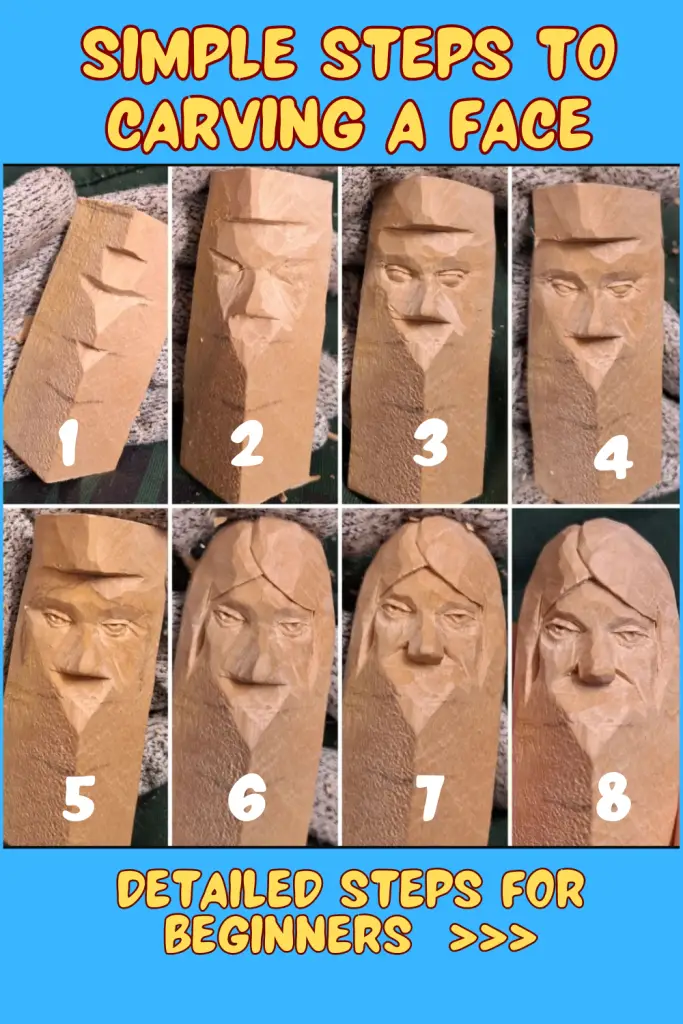
If you’ve ever wanted to take a block of wood and magically transform it into a smiling, frowning, or even a slightly confused human face, you’re in the right place! Carving a face might sound intimidating at first, but don’t worry—this guide is designed for beginners like you. We’ll break it down step by step, using simple, easy-to-follow instructions. By the end of this tutorial, you’ll have your very own carved face, and yes, it might even look human! Ready? Let’s get started.
Step 1: Meet the Block!
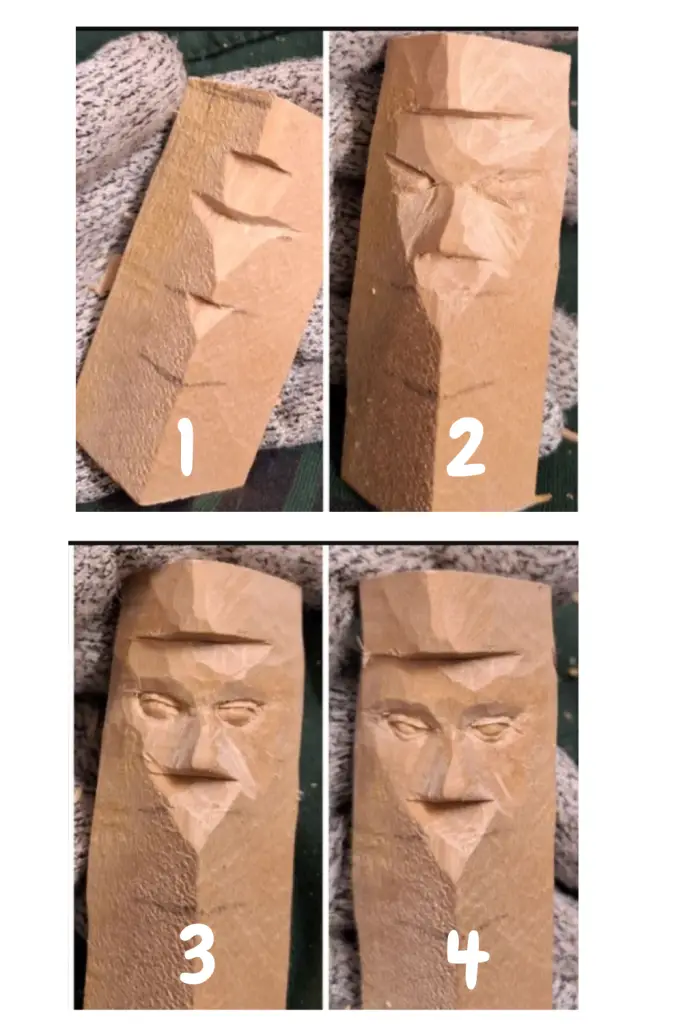
Alright, first things first: say hello to your wood block. Right now, it’s just a chunk of wood that doesn’t know what it’s about to become. Take a moment to appreciate its potential because, in a few hours, this little piece of wood is going to have a personality.
What to Do:
Begin by marking out the top (where the forehead will be) and the bottom (where the chin will live). You don’t need to be precise; just make rough guidelines to help you know where you’re going. This is the planning phase, where your block is still a blank canvas full of endless possibilities!
Tips for Beginners:
Don’t worry about mistakes at this point. This is just about getting comfortable with your block of wood. Think of it as a draft—you can always refine it later!
Step 2: The Eye Dips
Now we’re going to get a little bit more detailed, but don’t worry—nothing too complicated yet! We’re just going to outline where the eyes will go. At this point, your block might resemble something out of a children’s drawing, but that’s okay! You’re building a foundation.
What to Do:
Carve shallow, oval-shaped indents where you want the eyes to eventually be. Don’t dig too deep yet; this is just the start. Think of these as placeholders for the future windows of your wood’s soul (AKA the eyes).
Tips for Beginners:
- If your “eyes” look uneven or slightly off, don’t panic! Eyes can always be adjusted later. Consider this a rough sketch, not the final draft.
Step 3: The Nose Begins
It’s time to bring a nose into the picture! The nose is one of the main focal points of the face, so start shaping it early. Right now, it’s more like a bump than a nose, but hey, we all have to start somewhere, right?
What to Do:
Start by carving down from the middle of the forehead to where you want the tip of the nose to be. You don’t need to carve out the nostrils just yet—just focus on creating a basic triangle shape that sticks out. This gives the face some structure and makes it easier to see where the cheeks will go later.
Tips for Beginners:
- Try not to overthink this part. Just make sure the nose sticks out from the face a bit. Think of it as building a nose-shaped mountain on your wood.
Step 4: Carving Out the Cheeks
Now that you have a basic idea of where the nose and eyes are, it’s time to shape the cheeks. This is where the face starts to look more human and less like a block with some dents.
What to Do:
Use your carving tool to start rounding out the area on either side of the nose. Carve gently downward, creating soft slopes that will become the cheeks. You want the face to look less flat, so don’t be afraid to shave off a little more wood than you think you need.
Tips for Beginners:
- Think of this step as drawing with a pencil, but instead of drawing, you’re gently scraping away wood. If one cheek looks a little higher than the other, that’s okay—it just gives your face character!
Read Next
• Whittling Simple Human Figures: Beginner Tips and Inspiration
• 30 Small Carving Projects Perfect for Beginners
• 60 Easy Wood Carving Projects for Beginners
• 30 Easy Animal Carvings
• Beyond the Basics: 12 Creative Carving Ideas to Try Next
Step 5: The Brow Line
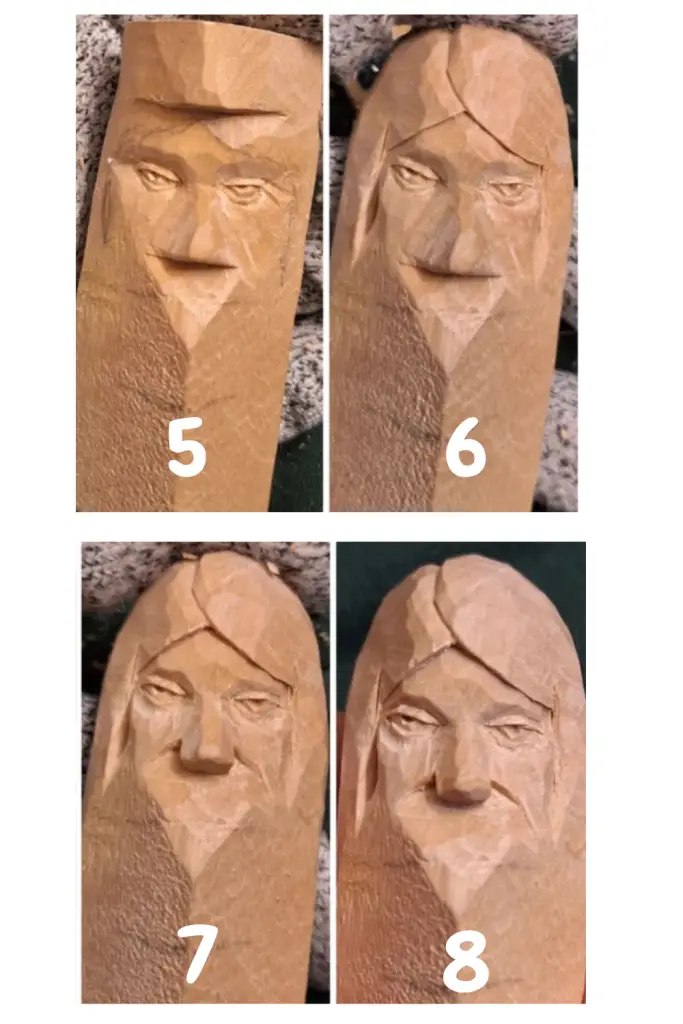
Brow lines can make your carving look intense, thoughtful, or even slightly suspicious. It’s a key feature that adds emotion to the face, so now we’re going to start shaping it.
What to Do:
Above the eyes, carve a small ridge. This is where the eyebrows will eventually sit, but for now, you’re just creating a guideline. Imagine your face is furrowing its brow in deep thought—or confusion! Either way, the brow gives depth to your carving and helps define the eyes.
Tips for Beginners:
- Don’t worry about shaping perfect eyebrows yet. This is just about making the eyes look more defined and giving the face some personality.
Step 6: Shaping the Mouth (AKA Time for Some Expression!)
This is where your face starts to get some real character! Whether it’s a smile, frown, or a neutral expression, the mouth will be a big part of how your carved face “speaks” to people.
What to Do:
Start carving a small line for the mouth below the nose. You don’t have to carve it too deep yet. It’s just about creating a starting point for the lips. Once you have the line, you can gently carve out the top and bottom lips.
Tips for Beginners:
- Keep the mouth small at first. You can always make it bigger, but it’s hard to put wood back once you’ve carved it away!
Step 7: Creating the Jawline
The jawline is the foundation of the face, so now’s the time to start shaping it. It’ll help the face look more defined and less blocky.
What to Do:
Carve down from the sides of the cheeks toward where you want the chin to be. Try to give the chin some definition, even if it’s subtle. Remember, this is where the lower part of the face really takes shape.
Tips for Beginners:
- Start slowly. You can always carve more, but you can’t put wood back. Think of this as giving your carving a clean haircut—little by little.
Step 8: Eye Refinements
It’s time to revisit those eye indents we made earlier. Now we’ll give them more depth and shape. This is where your face will start looking more like a person and less like a rough draft.
What to Do:
Carefully carve more around the eye sockets, creating a slightly deeper space for the eyes. Focus on the area around the eyelids to give them more definition. At this point, your eyes should start to look like real features rather than just random dents.
Tips for Beginners:
Don’t rush this part. Take your time to shape the eyelids and make the eyes as even as possible. But remember—imperfections can add character!
Step 9: Fine-Tuning the Nose
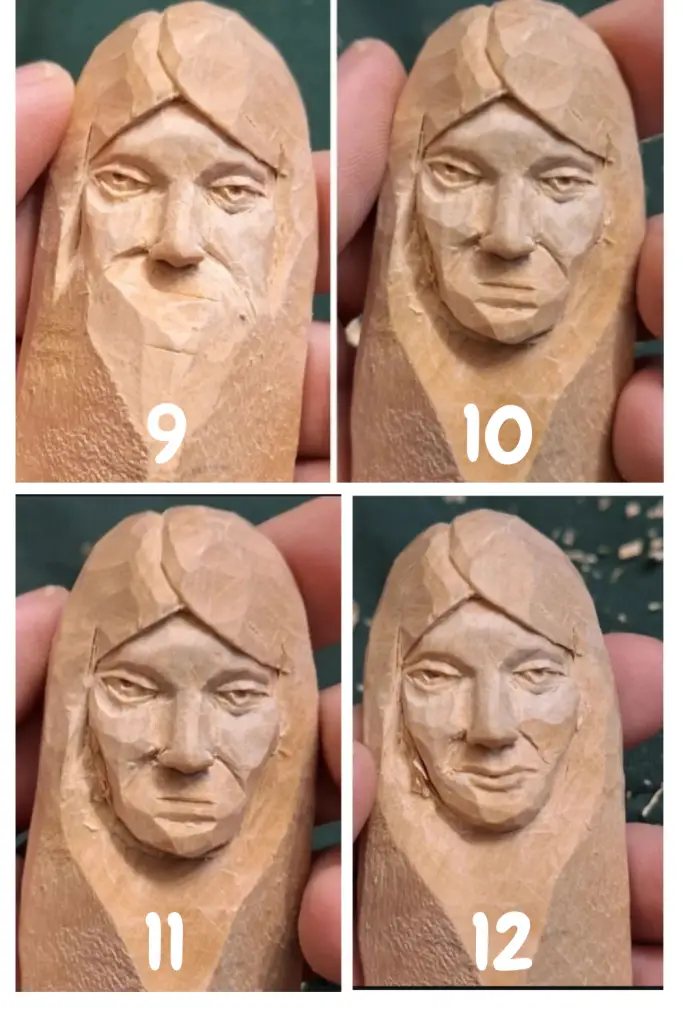
The nose is one of the most important parts of the face, so now it’s time to make it more defined. You’ve already started shaping it, but now you’ll add details that make it look more realistic.
What to Do:
Carve along the sides of the nose to refine its shape. If you feel brave, you can start working on nostrils by gently carving small indents at the bottom of the nose. Remember, less is more—small, shallow cuts are all you need for nostrils.
Tips for Beginners:
- If you’re nervous about carving nostrils, start small. You can always go back and make them bigger, but tiny adjustments can go a long way.
Step 10: Lip Service
We’re back to the mouth! Now that the face has more shape, it’s time to focus on making the lips look realistic. Whether you want full lips, thin lips, or something in between, this step will give your face even more character.
What to Do:
Gently shape the upper and lower lips by carving around the line you made earlier. Don’t dig too deep—just enough to give the lips some volume. If you want, you can add a little indent between the bottom lip and the chin for extra realism.
Tips for Beginners:
- Don’t worry if the lips don’t look perfect right away. You can always go back and smooth them out later.
Step 11: Smoothing the Face
Your face is starting to come together! Now we’ll work on smoothing out the rough patches and making everything look more polished.
What to Do:
Use your carving tool to gently smooth out any harsh edges, especially around the cheeks, chin, and forehead. You’re not making any big cuts here—just refining the shape so it looks more like a finished face.
Tips for Beginners:
- Be gentle! You don’t want to accidentally cut away any important details. Lightly scrape the surface to give your carving a more natural look.
Step 12: Time for Hair (Or at Least the Idea of It)
At this point, you’re probably thinking, “What about the hair?” Don’t worry! Now we’ll carve out a basic hairline to give the face a complete look.
What to Do:
Carve the outline of the hairline around the forehead. This can be as simple or detailed as you want. You can add some texture to represent strands of hair, or just carve a basic shape that suggests hair. It’s up to you!
Tips for Beginners:
Keep it simple! Hair can be tricky, so don’t feel like you have to carve every strand. A basic outline will still look great.

Step 13: Polishing the Features
Now that the main elements are carved, it’s time to fine-tune the details. This step is all about making the face look more polished and professional.
What to Do:
Go back over the entire face and smooth out any areas that look rough or uneven. Focus on the eyes, nose, mouth, and jawline to make sure everything is symmetrical (or close enough). If you want, you can add small details like laugh lines or wrinkles to give the face even more character.
Tips for Beginners:
- Take your time here. This is where your carving will go from good to great!
Step 14: Step Back and Admire Your Work!
You did it! You’ve successfully carved a face from a simple block of wood. Take a moment to step back and admire your work. Sure, it might not be perfect, but it’s yours, and that’s what matters.
What to Do:
Give yourself a pat on the back! You’ve just completed your first face carving. Now, go show it off to friends and family—they’ll be impressed even if it’s a little rough around the edges.
Tips for Beginners:
Don’t be too hard on yourself. Carving takes practice, and each face you make will be better than the last.

Final Thoughts: You Did It!
Congratulations, you’ve finished your very first face carving! It wasn’t easy, but you stuck with it, and now you have something to show for your hard work. Whether your face looks realistic, quirky, or even a little goofy, remember that you’ve created something unique.
And the best part? Now that you’ve mastered the basics, you can keep practicing and improving your skills. Soon, you’ll be carving faces like a pro! If you liked our guide pin the image below to your favorite board.
Happy carving!