Logs of timber are hard to use in their natural form. Therefore, they need to be split into more manageable pieces. There are 4 basic types of woodcuts: plain sawn, rift sawn, live sawn, and quarter sawn. We will discuss each method in detail below!
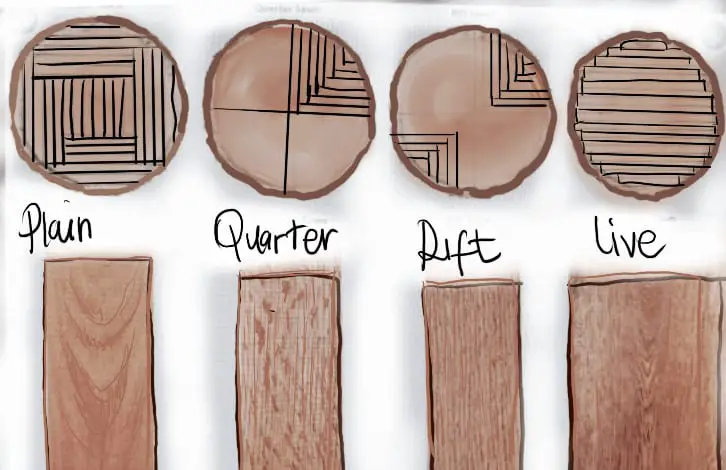
It’s, however, important to note that woodcuts may mean more than the cuts as mentioned earlier, and we have considered this. We will therefore be looking at, the type of woodcuts inside the woodworking workshop. This will also include machine-specific cuts as a bonus.
Different types of woodcuts, from Log to Timber
Plain Sawn
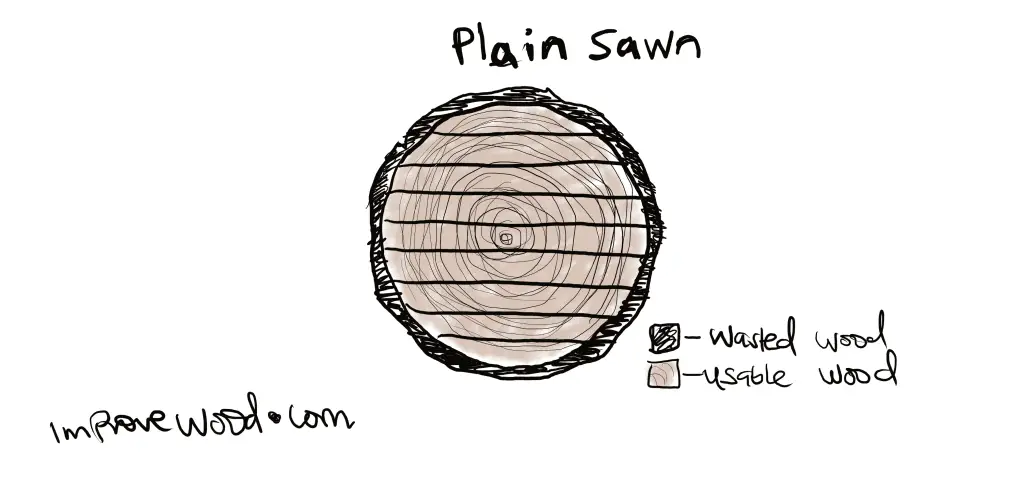
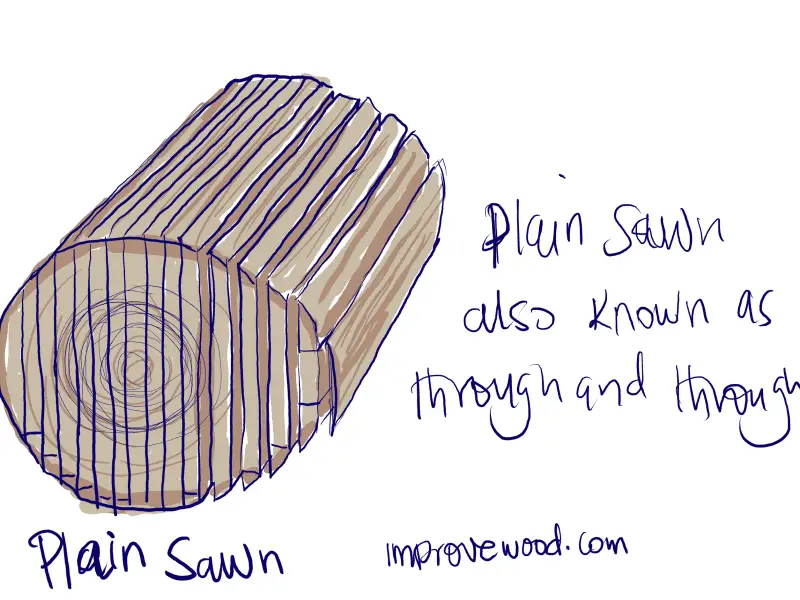
Plain Sawn timbers come straight off the log instead of live-quarter cuts, where the log is split into quarters first. This method is perhaps the easiest and most cost-effective. The blade goes through the log, making parallel lines, as shown below. Of the different types of woodcuts discussed in this article, Plain sawn is the most preferred by lumberjacks.
Most millers prefer this cut as it gives wide planks with minimal waste. The growth rings are cut tangentially, giving the planks a standard part that has become to be known as a “Cathedral.” As beautiful as the cathedral pattern is, plain sawn timber is prone to bow, cup or twist with time due to tension in the grains cut in tangential.
Characteristics of Plain Sawn timber
The timber grain is consistent with a straight, vertical orientation. This woodcut type produces good patterns for extensive surface work like dining table tops, doors, and flooring.
Advantages of Plain Sawn timber
- Aesthetically pleasing finish on both sides; more contrasting colors in select woods.
- Great for longboards, oversized pieces that are needed and desired
- More economical in cost because it has minimal waste.
- Stronger finished product as there is less chance for gaps to form between them when glued together due to lack of knots within the timber.
Disadvantage of plain
- Prone to warping, cupping, or twisting over time due to tension in the grains
Rift Sawn type of woodcut
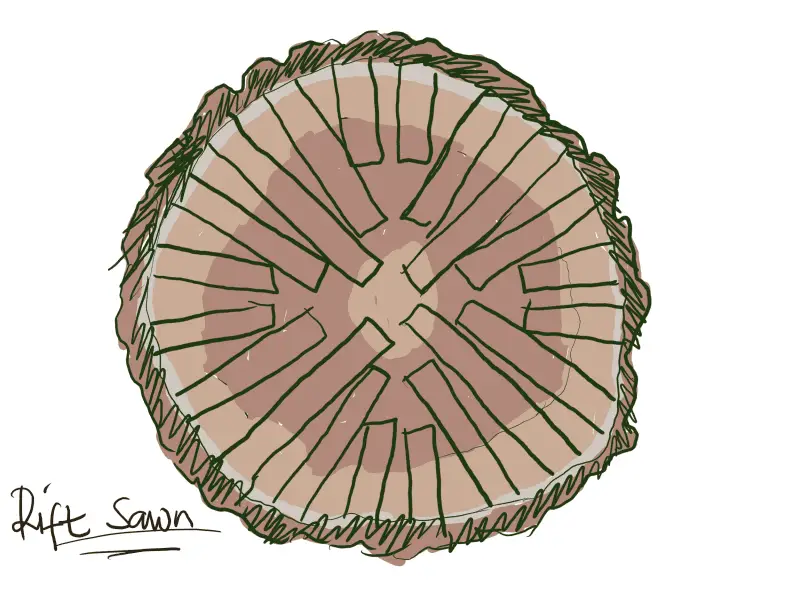
Rift Sawing is when logs or trees are sawed perpendicularly down the middle. This method produces the most waste perpendicular to the annular rings. Sawn boards leave a lot of triangular chunks of waste. However, it is still preferred by artists and fine artisans who prefer its aesthetic and consistent grain pattern.
Characteristics of rift-sawn timber
Rift-sawn timbers have straighter grains, making them better at holding up against stresses like twisting and pressure from moisture over time. Trees with a more uniform diameter are used for this type of timber, meaning there is less warping risk.
Rift-sawn timber can be more challenging to work with, but this also means that it will last longer and allow you greater control when cutting or shaping the wood.
Advantages of rift-sawn timber
- Straighter grain means straighter boards.
- Rift-sawn boards have a consistent grain pattern making them valuable to design artists.
- On top of this Rift, Sawn timber has more excellent dimensional stability, which means that it is less likely to warp or bow over time.
Disadvantage of rift-sawn
- More challenging to work with
- Produces more waste than other types of woodcuts
Check our article on how to archive straight edges with no planer
Live Sawn
Live Quarter is also called standing cut. This cutting type does not produce much waste because the tree remains intact on one side. The log will be split into quarters (thus the name), further sliced for lumber sizes needed in carpentry.
Characteristics of live-sawn timber
Live Sawn is a type of woodcut that has unique characteristics. The grain pattern, color spectrum, and natural variations in this wood make it an attractive option for flooring or cabinet pieces. It also lets you see every layer in the board’s growth rings, ensuring no gaps due to continual tree growth.
Advantages of Live Sawn timber
- Live Sawn has few knots and cracks, making it ideal for flooring and cabinet pieces.
- The growth rings of Live Sawn can be seen in every layer, which prevents gaps due to tree growth.
- Live Sawn is strong and durable, making it suitable for various projects.
Disadvantage of live-sawn
- May be more expensive due to the labor-intensive process of producing it
Quarter Sawn
Finally, there are quarter-sawed timbers where logs will be cut across the width of a tree so they can then be ripped apart easily. The board has a wavy grain pattern along its surface, making them fantastic at resisting twisting and moisture problems over time like plain-sawn timber but not quite as good as rift-sawn due to being more prone to deflection and warping from contact with water.
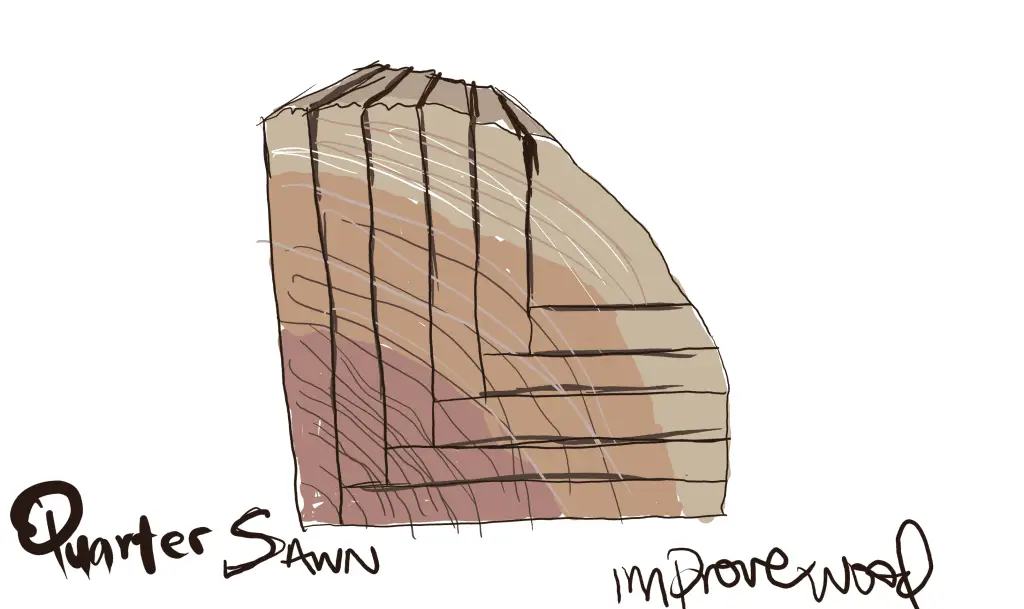
Characteristics of Quartersawn timber
A quarter sawed timber has a wavy grain pattern along its surface, making them fantastic at resisting twisting and moisture problems over time like plain-sawn timber but not quite as good as rift-sawn due to being more prone to deflection and warping from contact with water. They have a long straight line going through the center of the board called the quarter saw line.
This line’s opposing angles can cause glue strength problems as they are more likely to contract and expand at different rates than plain-sawn timber. This is why it may be better for smaller projects, such as cabinet work or cutting boards, where surface appearance is not important but resistance against moisture damage over time and warping is a concern.
Advantages of Quartersawn timber
- Quartersawn timber is less prone to twisting or warping due to its angled wood fibers.
- It is suitable for small pieces like cabinetwork and cutting boards that require stability over time.
- Its straight grain makes it a good choice for veneer work, as the grain will always be parallel to the surface.
Disadvantage of quartersawn
- More expensive due to the labor-intensive process of producing it
- May be more difficult to find due to the smaller yield of usable lumber compared to other types of woodcuts
Check our article on Carving Pine
Types of Cuts in Woodworking
Woodworking involves a wide range of cutting techniques, each with its own specific purpose and set of tools. Whether you are a beginner or an experienced woodworker, it is essential to understand the different types of cuts and how to execute them to achieve the desired result properly.
Crosscut
A crosscut is a type of cut that is made perpendicular to the grain of the wood. It is often used to cut boards to length or width or to create square edges on a piece of wood. Crosscuts can be made with various tools, including a circular saw, a miter saw, a jigsaw or a hand saw.
Rip Cut
A rip cut, also known as a longitudinal cut, is made parallel to the wood grain. It is used to reduce a board’s width or create a straight edge on a piece of wood. Rip cuts are usually made with a table saw or a circular saw, although they can also be made with a hand saw or a jigsaw.
Miter Cut
A miter cut is a type of cut that is made at an angle, typically 45 degrees. It creates corners or joints between two pieces of wood at a specific angle. Miter cuts are often used in woodworking projects such as picture frames, crown molding, and trim work. Miter cuts can be made with a miter saw, a circular saw, or a hand saw.
Bevel Cut
A bevel cut is a type of cut that is made at an angle other than 90 degrees. It is used to create angled edges on a wood piece or join two pieces at an angle. Bevel cuts can be made with a bevel saw, a circular saw, or a hand saw.
Dado Cut
A dado cut is a type of cut that is made across the grain of wood to create a groove or channel. It is often used to create a joint between two pieces of wood or to create a recess for shelves or drawers. Dado cuts are usually made with a dado blade on a table saw, although they can also be made with a router or a chisel.
Groove Cut
A groove cut is similar to a dado cut, but it is made along the grain of the wood rather than across it. It is used to create a channel or recess in a piece of wood, often to insert another piece of wood into it. Groove cuts can be made with a table, router, or hand saw.
Haunched Tenon Cut
A haunched tenon cut creates a strong joint between two pieces of wood. It involves creating a tenon, or projection, on one piece of wood and a corresponding mortise, or recess, on the other. The tenon is wedged or pegged into the mortise, creating a solid and secure joint. Haunched tenon cuts can be made with various tools, including a table saw, a router, or a chisel.
In conclusion, there are many different types of cuts used in woodworking, each with its specific purpose and set of tools. Understanding the different types of cuts and how to execute them properly is essential for achieving the desired result in any woodworking project.
Woodworking Basic Joints
Joinery is joining two pieces of wood together to make a stronger, more durable object. There are many different types of joints that you can use for this purpose, depending on the type of joinery project that you are trying to create. You might know some of these cuts already – dovetails, dadoes, mortise and tenon joints are some examples. But there are other joints that you might not have heard of before! In this article, we will take a look at the following joints.
Saddle Miter Joint
The saddle miter is a miter joint made from two pieces of wood cut on a slant. The pieces are then glued together with a solid back, and a small hole is drilled through the center to allow for sawdust removal during the cutting process. This design has some remarkable advantages over other types of joints, making it a popular choice among woodworkers.
Mortise and Tenon Joint
This joint is most commonly used in framing doors, windows, and other openings. As with most joints, it’s essential to leave extra room on all sides when cutting the mortise so the tenon will fit snugly. This joint is often made by hand-cutting with chisels or router bits, but it can also be glued together with wood glue and clamped until dry.
Through Tenon Joint
A through tenon joint is a mortise-and-tenon joint that passes through one piece of wood. The two pieces are held together with pegs, nails, or screws. Tenons are often used in handrail construction to make it easier to install the railing because the thickness of the rails can be adjusted after installation without removing them from the posts.
butt-joint
The first type of joint is the butt joint. This type of joinery involves two pieces, one longer than the other. The long piece goes on top, and the shorter piece becomes a “stick out” at either end. When using this technique, glue must be used to keep it together, ensuring that no water gets into contact with any part of the wood for the risk of rotting it.
lap joints
Next in line are lap joints which involve three or more pieces coming together (usually) perpendicular to each other and glued together securely so they can’t move around or pull apart easily when pressure is applied from different directions while assembling them – such as would happen if someone were sitting down on a chair made out of these types of joints.
This type of joint is used when joining together some pieces that are a different size than the other or if, for whatever reason, one piece needs to be shorter than the rest (like with chair rungs). The two sides to this kind of joinery have to be cut at an angle, which means that you’ll need a saw and jig-saw blade (or table saw) Â because these blades can make cuts angled in any direction.
dowels
The third basic woodworking joint would be doweling – where sometimes “dowels” are inserted into holes drilled through both boards being joined together so they won’t shift out from their position over time due not only to weight but also heat changes inside your woodworking project. Â
dovetail
The fourth essential woodworking joint is a dovetail which usually makes for interesting, decorative joints and is commonly found in cases where you want to have full-length drawers that will open up without the risk of coming out (due to gravity).
Half-Lap Joint
The last primary type of joints for this article are Half-Lap joints. This type of joint is used to join two pieces of wood together that are the same width but different thicknesses. This allows you to create a relatively strong connection between the two pieces without adding any additional materials or fasteners.
The Half-Lap Joint can be created by either halving one piece and then joining it with another similarly shaped piece or by halving two pieces and then joining the halves together.
Half-Lap joints are used to join wood that is of similar width but different thicknesses. They can be created in one of two ways – either halfing a single piece and then attaching it with another similarly shaped piece OR by simply using both halves from each original board – as shown below:
In this example, I use the Half-Lap joint on boards ripped into thin strips for edging. The result is a clear connection between them without any additional material needed!
As always, please feel free to ask us questions about any other types of joints in woodworking via email – we’ll do our best!
Can you plane wood with no planer? Find out here
Frequently Asked Questions on Woodcuts
What is the best tool to cut wood?
A saw is the best woodcut tool, but other tools can also be used. The type of saw you need will depend on the size and thickness of your logs or boards. You may also have some lumber already milled at Home Depot or Lowe’s. They might sell it by board foot or by linear foot.
How can I cut wood at home without a saw?
You can cut wood at home without a saw by using other tools. A simple pair of handsaw and some patience is all you need to get the job done.
That being said, there are more advanced ways to do this if you don’t want to be doing it for hours or have trouble with your shoulders from time to time after making cuts for long periods.
You can use a power drill (you may not even know that they make them specifically for cutting wood!), an angle grinder, or abrasive discs like sandpaper explicitly designed for metal or steel surfaces, but these will cost you much more than just buying a new chainsaw or hand tool would when needed again down the road.
What’s the easiest way to cut wood?
If you need to cut the wood into curved shapes and have access to a band saw, this will be your best choice for an easy cut.
But suppose you’re looking for a more traditional shape or simply want something easier than using hand tools like knives or axes (which are not recommended). In that case, opting for blades with rotating handles that run on electricity can make cutting wood much easier.
This includes radial saws as they work from round discs rather than flat pieces, making it difficult to produce curves in one continuous motion.
How can I cut wood without a power tool?
There are a few different ways you can cut wood without power tools. One way is to pull a saw blade by hand, which will take quite some time, and your arms may go numb.
Another option would be using an ax with an old-school grip for better leverage, or a crosscut saw powered by your body weight and rhythm.
This method requires two people working together to increase efficiency, but it does come in handy if you’re out camping and need firewood on short notice!
What are the 5 basic woodworking cuts?
The five basic woodworking cuts are rip cut, crosscut, beveled or angled cut, chiseled or pushed cut, and rabbeted edge.
The first four of these can all be accomplished using a handsaw like the traditional backsaw, but for more precise work, you’ll want to use a miter box saw (miter saw).
What kind of cuts can a table saw make?
A table saw is a stationary power tool used for cutting wood. The table’s most common types of cuts are rip cuts and crosscuts, but you can also make beveled or compound (both angled) rip cuts and crosscutting combinations. Table saws can make long, straight-line cuts; they can also be used for making intricate, curved cuts in wood. See more about table saws here
Table saws are available in two basic designs: a “rip-cut” design that is more suited to cutting with the grain of the wood and is usually less expensive than a “cross-cut” design that cuts across the grain but does not make as smooth an edge.
Read Next
- Types of Wood Stains You Should Know
- Top Woodcarving Techniques for Beginners
- Relief Carving for Beginners
- Woodcarving Gouges: A Complete Guide
- Chip Carving Knives for Detailed Projects
- Carving vs Whittling: Understanding the Difference