Read Next
- Carve Spoons from Dry Wood
- What Knives Do I Need to Carve a Spoon
- Wood Carving Tips for Beginners
- Best Carving Knife for Every Skill Level
- Spoon Carving Kit for Beginners
- The Ultimate Beginner’s Guide to Woodcarving Gouges
If you love woodworking and you want to add some designs to your wooden spoons, we have the solution for you! We will tell you How to Burn Designs on Wooden Spoons so that you can create some cool spoons with engraved designs. This activity is great because it's enjoyable and doesn't require too much money! You can use these spoons at home or give them as gifts to your family or friends, and they will surely love them!
There are numerous ways to Designs on Wooden Spoons but the best is to use the pyrography technique to create beautiful personalized spoons. Burned spoons can be used as gift tags for our loved ones, hung neatly on our kitchen racks, or placed in a jug to create a lovely display in our kitchen.
What is Pyrography?
It is a popular wood-burning technique of decorating wood or other materials by using a unique tool called a pyrography pen. Wood Burning is easy and fun when done with passion and can turn a simple project into a special allure.
Before we look at how to burn wooden spoons, let's look at the materials needed.
Materials needed to wood burn wooden spoons.
- Wooden kitchen spoons
- Wood burning tool
- Wood burning designs
- Pliers
- Storage for your wood-burning tool
- Food grade oil for sealing
- Dishtowel
- Protective gloves
Apart from the materials needed, some safety tips should be followed while burning wood, and they include:
Safety tips to be followed while burning wood
- Work in an open space to prevent smoke formed during the project from entering your lungs
- Transfer the design correctly to the wood surface to avoid the formation of uneven or blurry lines
- Using a pyrography pen, draw lines and curves carefully so as not to leave marks on the same spot
- Choose the right burning tool, especially a rounded tip one, which moves freely and does not sink into the wood
- Don't draw your designs using much heat, as they will leave ugly marks
- Use both hands when tracing curves
- Work with regular heat for regular results
- Please don't allow children to play near your work area as they can stumble on the burning tool and get injured
How to Burn Designs on Wooden Spoons
Wooden spoons are among the kitchen's most valuable and versatile utensils, but their relatively simple design often renders them plain and boring. With this tutorial on burning techniques on wooden spoons, you can add some personal flair to your cooking and decorating without spending much money or effort. Use your creativity and let your artistic side shine!
First, you need to decide what design you want.
You can come up with your design or use one from a picture. If you use an image, pick something you like and trace it with a pencil onto your spoon. Then use either a Crayola drawing pencil or other drawing pencils (The writing kind) and lightly outline your design. The idea is that when you burn your plan, it will remain black while everything else burns away to white/grey.
Draw out your design with a pencil
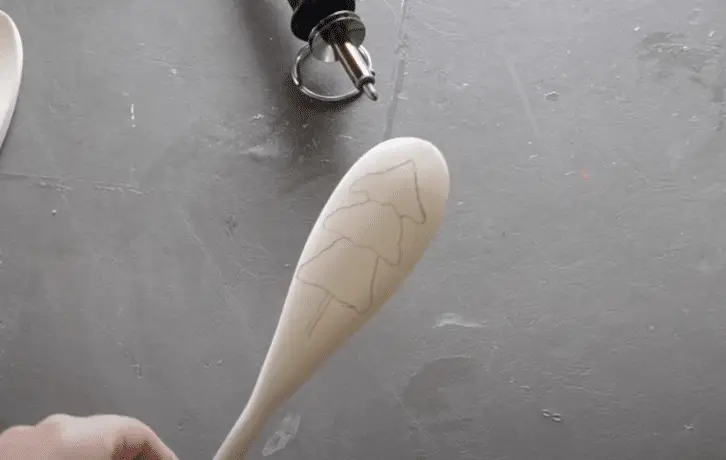
Trace around your sketch onto each spoon using a pencil. Drawing or tracing your design onto wooden objects with a pencil before you start burning is one of my favourite ways to get started. It's like a sketch! I find that it helps me feel more prepared and confident—even if I end up straying from my original idea in favour of another solution. You can also use a permanent marker, though you may have trouble getting those marks off later.
Before you begin, allow the pyrography tool to heat up to 350°C.
The tip of a pyrography tool is made from carbon steel. When heated, it can burn very hot, fast and efficiently. This makes it perfect for burning details onto wooden spoons. However, if you try to use a cold pen tip without heating it first, the result will be poor and inconsistent with your expectations. To avoid disappointment and frustration: Always preheat your pyrography tool before you start drawing on your spoon. Do not skip this step! It's a necessary safety precaution that takes only 3–5 minutes.
To ensure you know when it has reached peak temperature, it's a good idea to invest in a temperature controller for long-term use. It helps to set your preferred temperatures on a chart so that you can make sure your tool is heating at an even rate from start to finish.
Hold your wood-burning tool in your hand like a pen and go around the outline softly.
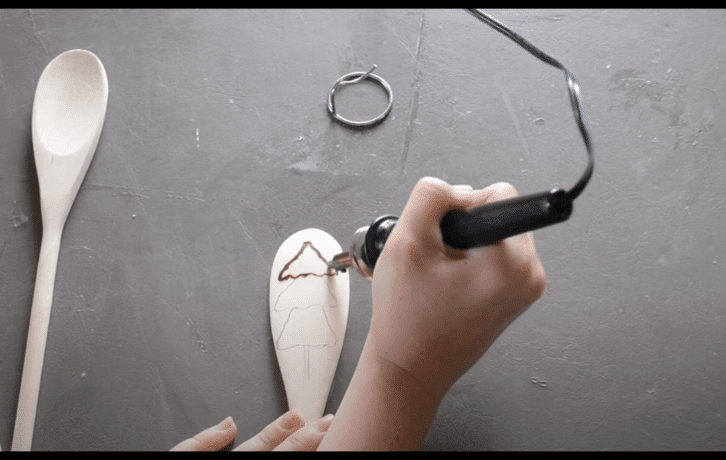
If you're new to wood-burning, one of your biggest obstacles will be finding a steady hand. The fastest and best tip I can give you for getting better at it is to get out of the mindset that you have to press down hard. If you ever want a clean edge, holding your tool like a pen (with your thumb on top and fingers underneath) will help you carve out curves with more finesse than using an awkward cradling position.
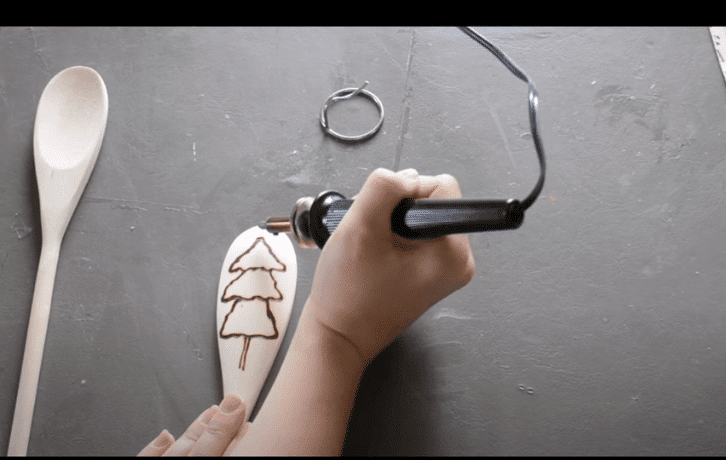
Your lines won't end up looking all blocky and rigid, just slow and deliberate, which makes it seem all that much more badass. You should also try going around your outline several times until it sinks in—it might take longer but will look so much more relaxed when you finish! People always ooh and ahh over my spoon designs because they look so clean compared to theirs–this is what keeps me motivated when practising!
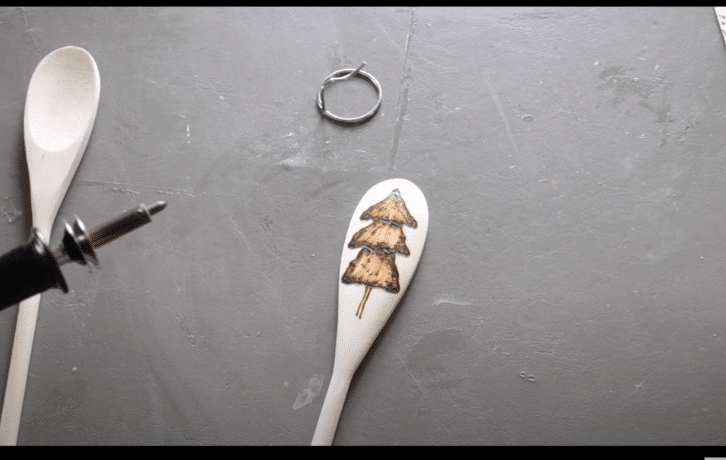
Repeat slowly over any faint lines to darken them.
If you have any marks left on your project that aren't as dark as you'd like, rub an ice cube over them. The friction between the wood and frozen water will cause it to scorch. Repeat slowly over any faint lines to darken them. Avoid doing it too quickly, which can cause pitting or ripping of your workpiece. Afterwards, sand away any raised grain from where you iced.
Let it cool, then Seal your new wood-burned spoon.
After you've burned your spoon, please place it in an ice bath. This helps stop it from cooking and keeps your burned design intact. After 5 minutes or so, take it out of its ice bath and rinse with warm water. Finish by drying off any excess moisture with a cloth, then set aside to dry before sealing it completely.
If you want to protect your new wooden spoon designs, coat them lightly with a food-safe sealant such as beeswax polish (rub some candle wax onto the spoon and wipe off) or clear furniture wax. Don't coat your spoons heavily; if too much builds up over time, they may be prone to cracking and peeling at their edges.
Note: If you didn't get an exact design on your first try, experiment with different wood-burning tools and techniques for optimal results. You can also try repeating your process multiple times for more detailed images—make sure to do so before sealing!
How to seal Burn Designs on Wooden Spoons
There are a few different methods that you can use to seal your designs onto wooden spoons. If you are using a wood-burning tool, you don't need to do anything else. Burnt wood smoke acts as an excellent sealant and protects your design from water or other liquids. That said, there is nothing wrong with adding another coat of protection over it just in case!
Flaxseed oil works well for sealing wood-burned spoons. It is well-known for its fatty acids, which saturate deep within the wood surface, protecting it from scratches and humidity changes. Aside from that, it leaves a satin finish on your burned wooden spoons, giving them a more appealing appearance. It's also ideal for sealing wood-burned spoons, wooden utensils, and wooden cutting boards. Coat the spoon in natural plant-based oil to improve the pattern and 'feed' the wood if you wish.
How to seal using oil
There are a few steps that should be followed while finishing wood burned spoons, and they include:
- Sand down your wood to 220 grit
- Wipe the sanded surface with a clean, wet piece of cloth
- Let the wood surface air dry for some minutes.
- Apply oil to the wood surface.
- Let the oil dry for 15-30 minutes.
- Repeat the process until you get the desired look.
We like to use walnut oil for dark-coloured woods and teak oil for lighter woods. Alternatively, boiled linseed oil works well too!
Why should I seal my wood-burned spoons?
Sealing your wooden spoons will give you a more durable design. It will also make them look better and help prevent future food from staining your artwork.
When you burn designs into wood, you're essentially creating a topographical map of those areas that have been exposed to heat. These surfaces hold onto moisture far longer than untouched areas, meaning they take longer to dry. If you don't seal your wooden spoon, it will begin to absorb water and eventually warp or crack.
So not only is sealing important for aesthetics (it protects colours from fading over time), but also for functionality.
You can avoid fading, scratches, and other wear by coating your design with a sealant.
Ensure that the sealant you are using on your wood-burned spoon is food safe for safety purposes. There are many finishes you can use on your spoons, and they include:
Finishes That are most recommended to seal wood burned spoons
Food grade mineral oil food-safe mineral oil is known to be perfect for protecting wooden spoons, and it's also not prone to rancidity. When choosing mineral oil to seal your burned wooden spoons, you should select a good quality mineral oil for better results.
- Coconut oil
Why should I use coconut oil to seal my burned wooden spoons? Though not all coconut oils are considered food-safe, a selected group of the oils are highly refined and can be used for seasoning your beautiful wood-burned spoons.
- Flaxseed oil
Flaxseed oil is also an excellent choice for sealing wood-burned spoons. It is popularly known for its fatty acids, which saturate deep inside the wood surface, protecting it against scratches and changes in humidity. Apart from that, it produces a satin finish that brings out an attractive look on your burned wooden spoons.
- Food-grade tung oil
It is a plant-based oil that leaves a glossy finish on your burned wooden spoons. Though it takes a lot of time to dry, it helps the plant be water-resistant and overcome the taste of time.
- Walnut oil
Unlike tung oil, walnut oil is a plant-based oil that doesn't go rancid. To get better results, follow the manufacturer's instructions, and if you are allergic to walnut oil, seek medical advice.
- Food Grade Carnauba Wax
It is a plant-based kind of wax that darkens the wood and helps it retain its natural look. For better results, it is combined with food-grade oil.
- Beeswax
It is one of the ancient types of finishes regularly used for wood finishes. A blend of mineral oil and beeswax lasts long and helps produce better finishes on your burned wooden spoons.
8. Butcher block conditioner
It is a ready-made conditioner that darkens the wood. It helps produce perfect finishes that are also food safe.
You can also choose to seal your wooden burned spoons with polyurethane or lacquer, but remember to tell your beloved ones that it is not food safe and only meant for kitchen display.
Factors To Consider When Choosing Wood Burning Tools
Before purchasing your wood-burning tool, here are some factors you need to consider.
- Casing
Many wood-burning devices release too much heat, which can even cause bodily injury. When buying a wood-burning tool, make sure it has a heat-resistant casing that will stop the heat from getting to your hand while you work.
- stand
When choosing a wood-burning kit, you should consider the type of stand you will use. In most cases, select a frame that is not a good conductor of heat to avoid burns.
- Temperature Regulator
Since you are working with different materials, you need to check the temperature regulator of the wood-burning tool before buying it. This will give you have a wide array of temperature differences to work with.
- Handle
While working, always consider wood-burning handles designed to be heat-resistant and soft for maximum comfort.
- Price
Wood-burning tools vary in price, but having more money does not necessarily mean you will get a suitable device. When choosing your wood-burning tool, choose the quality one that will last a long time.
Why is this craft so cool?
Burning designs onto wooden spoons are a fun way to personalize your kitchen without having to take up much space. Plus, it doesn't take long and only requires a couple of supplies. Not too shabby! " Because these DIY spoons are made with different patterns, you can make several unique pieces for an affordable price.
Wrap up
When making wooden spoons at home, it can be easy to get bored with the plain wood utensils and want to add some character to them. One easy way to do this is by burning designs into the surface of the wood, especially if you are working with exciting types of wood that already have beautiful patterns in them! Follow these step-by-step instructions and tips to learn how to burn designs on wooden spoons, no matter what type of spoon you're working with or what kind of design you're creating!