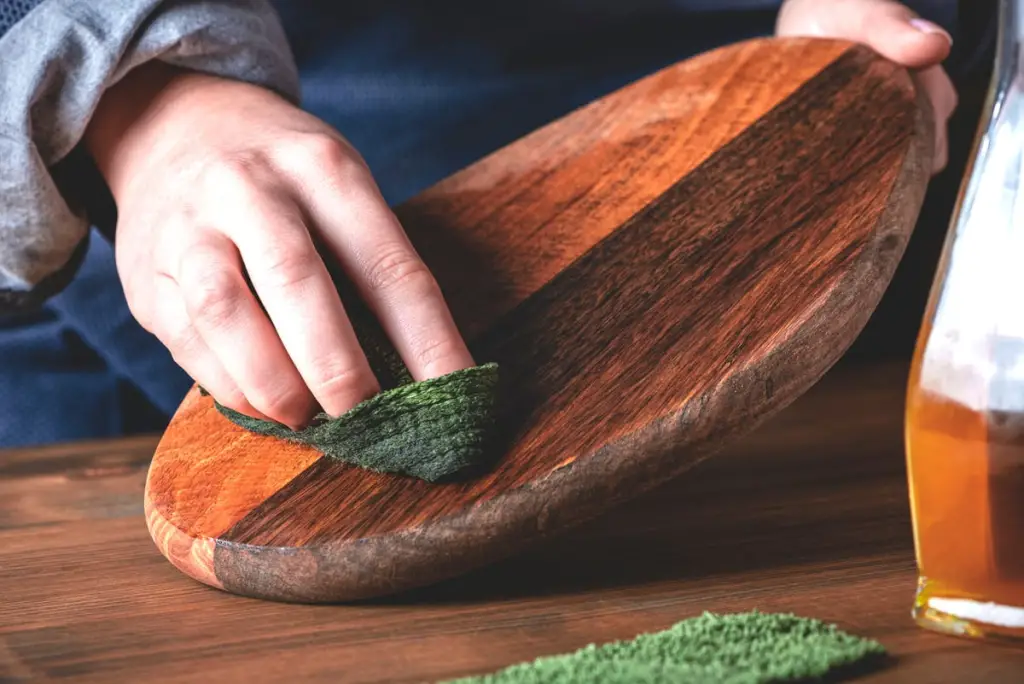
Softening wood for carving is one of those things that seems deceptively easy, like opening a jar of pickles or assembling furniture from IKEA. Spoiler alert: it’s not. You’ll quickly realize it’s a lot like trying to soften your boss’s stance on "no more vacation days"—tricky, time-consuming, and possibly involving tears.
But fear not, because this guide will give you all the ways to soften wood for carving, sprinkled with a little humor, a touch of sarcasm, and a dash of real advice (yes, there’s some real advice in here).
The Importance of Softening Wood for Carving
Before we dive into the methods, let’s talk about why softening wood is so important. Imagine you’re carving a delicate flower. If the wood is hard, your delicate flower is going to end up looking like a smashed potato. Softening the wood makes the carving process smoother, easier, and less likely to end in heartbreak, frustration, or tears.
Softening wood for carving is essential for a variety of reasons:
- Easier Detail Work: Trying to carve fine details on hard wood is like trying to slice a tomato with a butter knife—it’s not going to end well.
- Prevents Chipping: Softened wood is less likely to chip or crack. Who wants their beautifully carved masterpiece to look like it's been attacked by a chainsaw?
- Fixes Mistakes: You can fix small errors if the wood is softened. If the wood is hard, you’re pretty much stuck with whatever catastrophe you just created.
Methods to Soften Wood for Carving (Or How to Stop Fighting Your Wood)
1. Steam Boiling: Giving Your Wood a Spa Day
Steam boiling is like sending your wood off to a high-end spa where it gets a deep-tissue massage and cucumber-infused water. The wood softens up, thanks to the magic of steam, and becomes easier to carve.
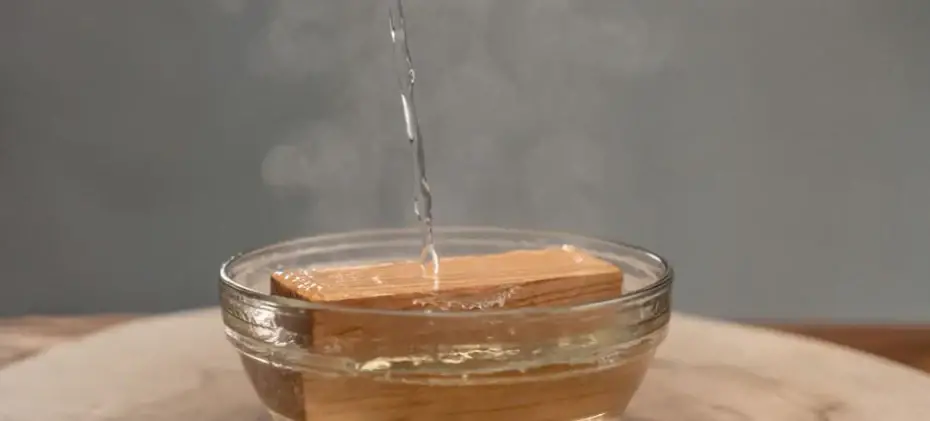
How It Works:
- Boil some water.
- Turn off the heat once it’s boiling.
- Place your wood above the boiling water and let it steam for a while, like a piece of broccoli that’s slightly too fancy for this world.
Why It’s Awesome:
- It works on green wood (freshly cut) and seasoned wood (old wood that’s seen some stuff).
- It softens wood up to six inches thick, because hey, sometimes you just need to carve a log.
The Catch:
- You have to carve fast. Once the wood cools down, it’s back to being as hard as your ex’s heart.
- Hardwoods like oak are basically like, "Yeah, no thanks," and refuse to soften, making them the divas of the wood world.
Extended Version:
Now, let’s dive into the deeper philosophy behind steam boiling. You see, steam is the ultimate mediator between you and your wood. It’s like a Zen monk, calming the wood’s fibers, convincing them to "just relax, man," until the wood is pliable enough for you to work with. It’s also like that yoga class you keep saying you’re going to try but never actually do—beneficial, but only if you commit to it.
Steam boiling is one of the most effective methods because it evenly distributes moisture into the wood. This means that the wood softens uniformly, preventing the dreaded "carving one side only to realize the other side is still hard as a rock" scenario. The moisture penetrates deep into the wood, making even those stubborn fibers pliable enough to carve with ease.
Check the best wood for carving
2. Mineral Oil: Slower Than a Sloth on a Sunday
If steam boiling is like a spa day, using mineral oil is like giving your wood an all-day moisturizing treatment with an expensive lotion that smells like lavender fields and self-care.
How It Works:
- Take your wood and rub it down with mineral oil like you’re massaging a very tiny, very stiff person.
- Let the wood sit and soak in the oil. This is going to take a while. Like, grab a book and start reading “War and Peace” kind of while.
Why It’s Awesome:
- It preserves the wood’s natural look, making your carving look like it just got back from a tropical vacation.
- It stabilizes the wood, reducing cracks and warping. So your carving will stay smooth and sexy.
The Catch:
You’ll have to wait several days (or weeks) before the wood is soft enough. This is like waiting for your Amazon package to arrive when the tracking says, “Your order will be delivered sometime between now and the end of time.”
It’s slow. So slow. If you’re the kind of person who gets impatient when your microwave takes more than 30 seconds, this method will test your patience.
Extended Version:
Let’s talk about patience. Patience is a virtue, or so they say. But when you’re waiting for mineral oil to soak into your wood, you start to question all of your life choices. However, the results are worth it. The mineral oil not only softens the wood but also nourishes it, bringing out its natural color and texture. It’s like giving your wood a makeover on a budget.
Mineral oil works best on softwoods, like basswood or pine, but even hardwoods can benefit from a little oil love. Just don’t expect miracles overnight. This is the tortoise of wood-softening methods, but remember: slow and steady wins the race.
Read Next
- How to Prepare Wood for Carving
- Carving Green Wood vs. Dry Wood
- Wood Carving Tips for Beginners
- How to Season Wood for Carving
- Protect Carving from Splitting
- The Best Wood for Carving
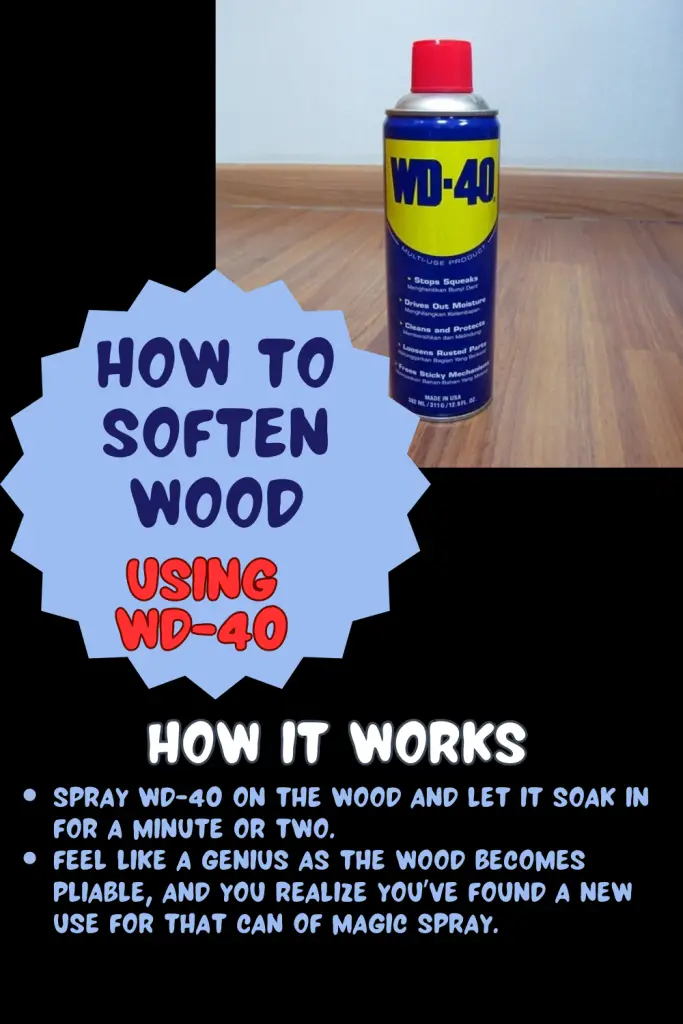
3. WD-40: The Cure-All for Life’s Problems (And Wood Softening)
WD-40 is like the duct tape of liquids. If you can’t fix it with WD-40, it’s probably unfixable. And guess what? It can soften wood too!
How It Works:
- Spray WD-40 on the wood and let it soak in for a minute or two.
- Feel like a genius as the wood becomes pliable, and you realize you’ve found a new use for that can of magic spray.
Why It’s Awesome:
- It’s fast. You don’t have to wait around like with mineral oil. The wood softens almost immediately, so you can get carving faster than you can say, “Why didn’t I think of this sooner?”
- It doesn’t stain the wood, so you don’t have to worry about weird blotches ruining your masterpiece.
The Catch:
- It’s not food-safe, so unless you want to give someone a very unhealthy carving, stick to non-edible projects.
- WD-40 is flammable. So if you’re thinking of showing off your carving skills around a campfire, maybe rethink that idea.
Extended Version:
WD-40 is basically the MVP of household tools. It fixes everything from stuck zippers to creaky doors, and now, it can fix your hard-to-carve wood. It works quickly, soaking into the fibers of the wood and making it soft enough to carve without turning into sawdust in the process.
The downside? You’re going to need some ventilation. WD-40 might soften wood, but it’s also a bit smelly and toxic if inhaled in large amounts. So open a window, put on a fan, or maybe just carve outside and hope your neighbors don’t ask too many questions about why your backyard smells like an auto shop.
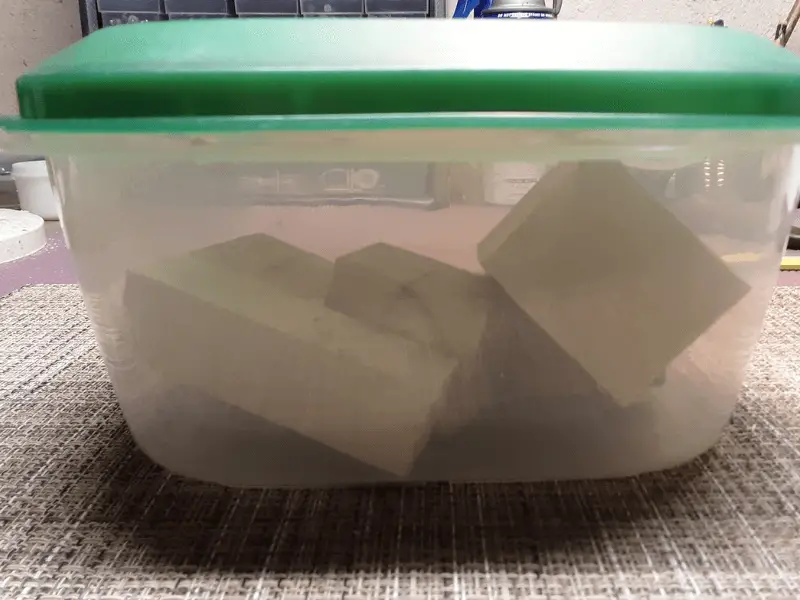
4. Soaking in Water: The Cheap and Easy Way (But Also Kinda Dangerous)
Soaking wood in water is the easiest, most basic way to soften wood. It’s also the riskiest because if you mess it up, your wood will come out looking like a sponge that’s been left out in the sun too long.
How It Works:
- Dunk your wood in water like it’s on a swimming team.
- Leave it there for a day or two, then take it out and start carving immediately, because that softness won’t last forever.
Why It’s Awesome:
- It’s super cheap. All you need is water. If you’re paying for water, maybe rethink your life choices.
- It works pretty well, especially on softwoods like pine or basswood.
The Catch:
Water can mess with the color of the wood, making it look more like a drowned corpse than a beautiful carving.
If you leave the wood in water for too long, it will crack, warp, or both. And no one wants to carve a warped piece of wood. It’s like trying to draw on crumpled paper—it’s just sad.
Extended Version:
Water is the simplest solution to softening wood, but it’s also the most unpredictable. It’s like that one friend who always shows up late to the party, but you invite them anyway because they bring great snacks. Sure, water can soften your wood, but it can also ruin it if you’re not careful.
Different types of wood soak up water differently, so you’ll need to keep an eye on your project. If you forget about it and come back a week later, your wood might have turned into a soggy, unusable mess. However, when done correctly, this method can make carving easier and faster, especially if you’re working with smaller, thinner pieces of wood.
Check Out: How to straighten warped wood using water
5. Alcohol and Water Mix: Your Wood’s Happy Hour
Mixing alcohol with water might sound like a recipe for a fun Friday night, but it’s also a great way to soften wood. The alcohol helps the water penetrate the wood fibers faster, making this a more efficient version of the water-soaking method.
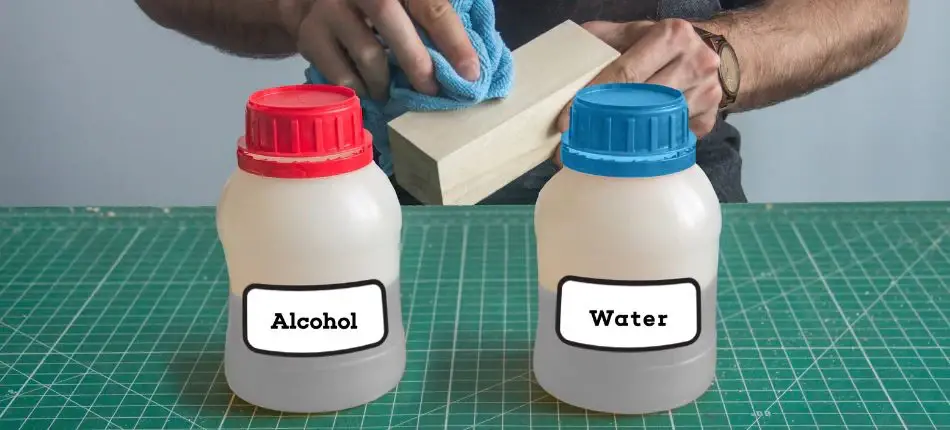
How It Works:
- Mix equal parts water and alcohol (use rubbing alcohol, not the good stuff you’re saving for cocktails).
- Rub or spray the mixture on the wood, and let it sit for a bit.
Why It’s Awesome:
- It’s quicker than just soaking in water because alcohol speeds up the process. Your wood gets drunk faster, basically.
- It doesn’t raise the grain as much, meaning your carving won’t end up looking like it’s been chewed on by termites.
The Catch:
- If you use too much alcohol, your wood might dry out faster than expected, leaving you scrambling to carve before it turns into a brick again.
- You’ll need to experiment a bit to get the right mix for your specific type of wood.
Extended Version:
Alcohol is the life of the party, even when it comes to wood softening. The alcohol in the mix helps break down the surface tension of the water, allowing it to seep deeper into the wood fibers. This makes the wood more pliable without the risk of it soaking up too much moisture and warping.
However, like any good party, there’s a balance to strike. Too much alcohol and your wood might dry out too fast, making it harder to work with. Too much water, and you’re back to the same issues as soaking the wood in plain water. But get it just right, and you’ve got a recipe for carving success.
6. Saltwater Soak: Turning Your Wood into a Pirate’s Dream
If you’re looking for a method that feels like you’re sending your wood off on a pirate voyage, soaking it in saltwater might be for you. Think of this as a low-budget spa treatment, but instead of a relaxing bath, it’s more like your wood is being marinated for a very confused BBQ.
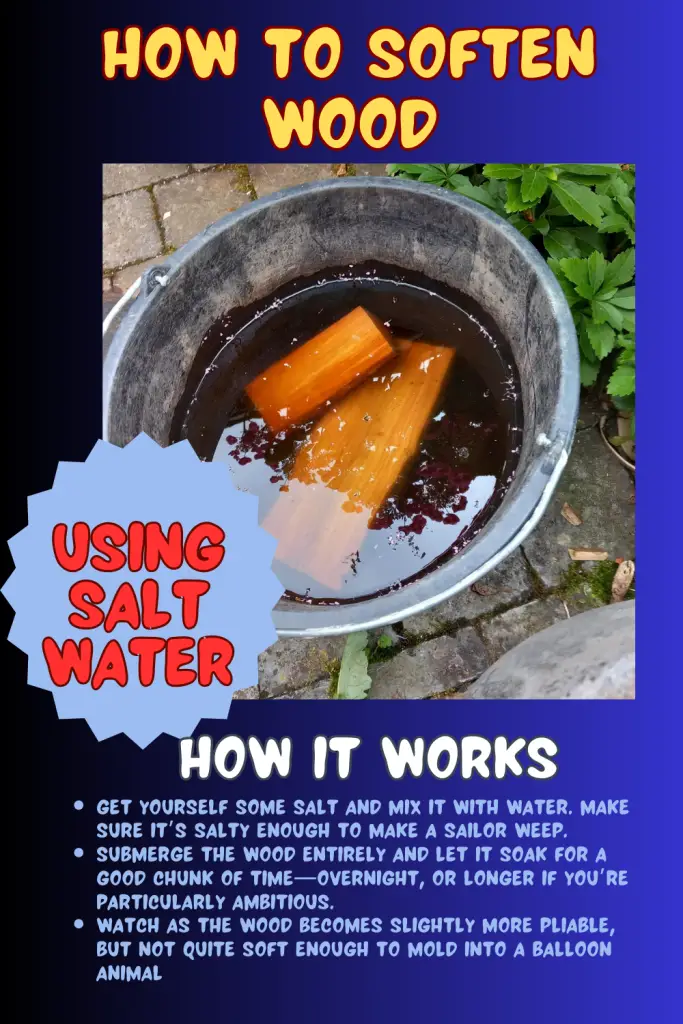
Why It’s Awesome:
- It’s practically free. All you need is salt, water, and the patience of a Buddhist monk.
- It can bring out the natural markings in the wood, making it look more “rustic” (read: weathered by time, like your soul after a Monday morning).
The Catch:
- Leave it in too long, and your wood will start to look like a shriveled raisin.
- Different woods react differently to saltwater, so you’ll need to keep an eye on your project like it’s a needy houseplant that demands constant attention.
Extended Version:
Ah, saltwater—the OG softener of, well, everything. From softening up your hair after a dip in the ocean to making your skin feel like a dried-out sponge, saltwater has a reputation for doing something to just about anything it touches. And wood is no exception.
Soaking wood in saltwater can be a bit of a gamble. Some pieces come out looking weathered and beautiful, while others come out looking like they’ve been sitting at the bottom of the ocean for a century. But if you’re going for that “I found this wood on a deserted island” vibe, this method is perfect.
One thing to remember is that not all woods respond equally to saltwater. Some woods will soak it up quickly and become softer almost immediately, while others will resist like a toddler being forced to eat vegetables. The key here is balance—don’t leave your wood in for too long, or it might turn into driftwood. And driftwood, while great for decorating your beach house, is not ideal for detailed carving.
7. Boiling Water Bath: The “I Have No Patience” Method
When in doubt, just boil everything. Boiling water is the go-to solution for anyone who’s too impatient for mineral oil or doesn’t have WD-40 lying around. It’s quick, it’s easy, and it makes your kitchen look like a mad scientist’s lab.
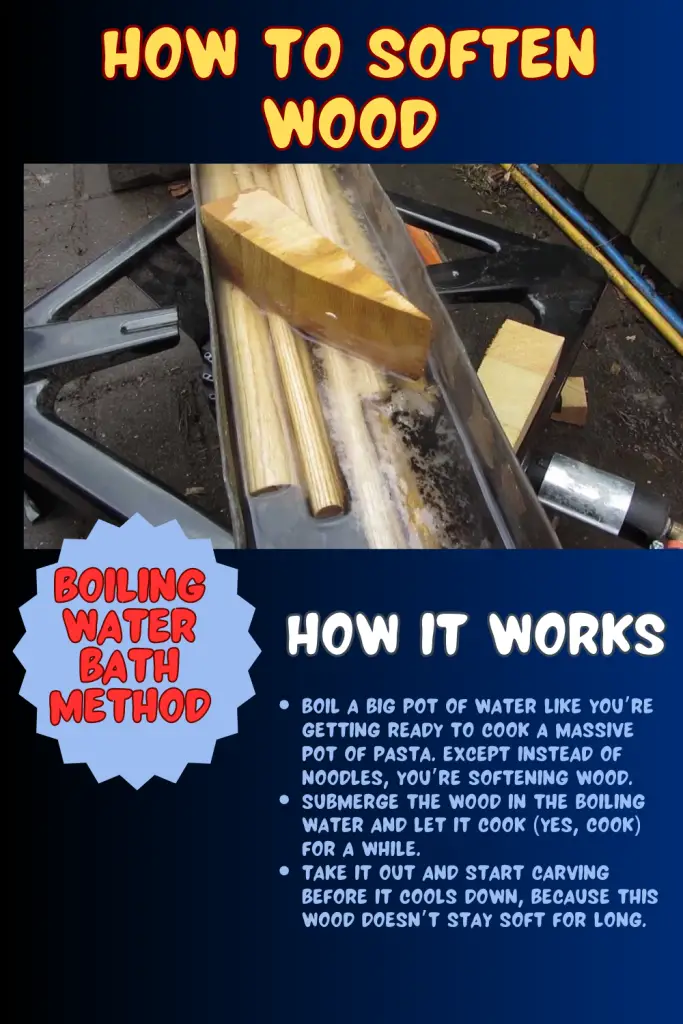
Why It’s Awesome:
- It’s fast. No long waits, no overnight soaks. Just boil and go.
- It’s easy to do with materials you already have—unless you’re someone who doesn’t own a pot. In which case, please reevaluate your life.
The Catch:
- If you’re not careful, the wood could crack or warp faster than you can say, “Whoops.”
- Boiling water is hot. Like, really hot. So, you know, try not to scald yourself in the process. Unless you like visiting the ER.
Extended Version:
Boiling water is the ultimate no-nonsense solution to softening wood. It’s like the microwave of softening methods—quick, efficient, and potentially hazardous to your health if you’re not careful.
The trick with boiling water is to keep a close eye on your wood. If you leave it in too long, it might come out looking like a soggy French fry. But take it out too soon, and you’ll be left with wood that’s just slightly damp but still harder than your morning toast.
And here’s the best part: you can do this with almost any type of wood, but the results will vary depending on the wood’s thickness and hardness. For thin pieces, boiling water can work wonders, making them soft enough to carve with ease. But for thicker, denser woods, you might need to combine this method with others—because one bath in boiling water isn’t going to turn a log into a pliable masterpiece.
Just remember, when you’re pulling that wood out of the boiling water, be careful. I know I already mentioned this, but seriously—boiling water burns. And nothing ruins a day of crafting like a third-degree burn and a visit to the doctor.
8. Microwave: Nuking Your Wood into Submission
Yes, you read that right. You can nuke your wood in the microwave. It’s like cooking popcorn but with less excitement and more potential for disaster. But if you’re desperate and looking for a quick fix, the microwave might just be your new best friend.
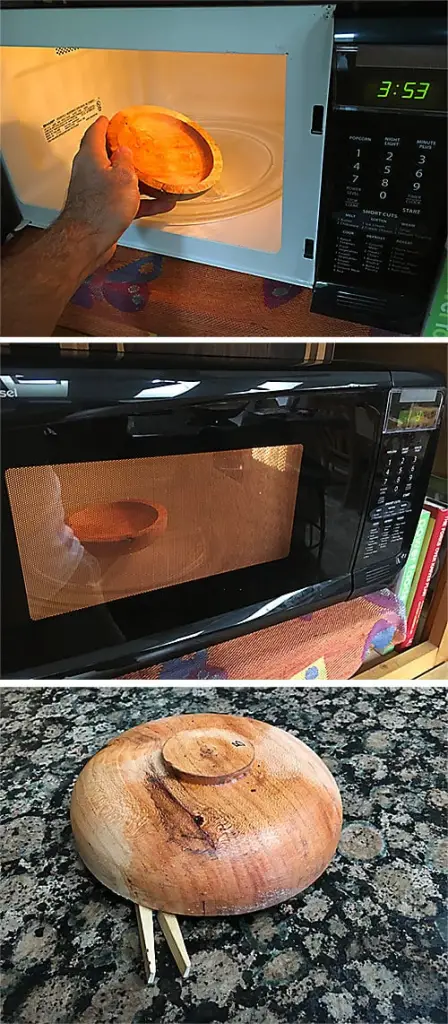
How It Works:
- Place the wood in a microwave-safe container. Because believe it or not, some people still need to be told not to microwave metal or wood directly.
- Heat it up for about a minute per inch of thickness.
- Be amazed (or horrified) at how fast your wood becomes soft. Just make sure to let it cool down before you start carving, unless you enjoy burning your hands.
Why It’s Awesome:
- It’s fast. Like, really fast. In less time than it takes to make a cup of coffee, your wood will be ready to carve.
- No fancy equipment needed. Just your trusty microwave and a little common sense.
The Catch:
- If you’re not careful, the wood could dry out completely, leaving you with something that’s more brittle than a stale cracker.
- This method doesn’t work for resin-coated wood or any wood that’s been treated with chemicals. Unless you want to cause a small explosion in your kitchen.
Extended Version:
The microwave is like the wild card of wood-softening methods. It’s quick, it’s efficient, and it’s slightly terrifying if you think about it too much. But hey, if it works for popcorn, why not wood?
The key to microwaving your wood without causing a disaster is to use short bursts of heat. Don’t just stick it in for five minutes and hope for the best. Start with 30 seconds to a minute and check the wood’s softness as you go. You don’t want it to get too hot and crack, and you definitely don’t want to burn your house down because you decided to microwave a block of wood for fun.
Microwaving is especially useful for small pieces of wood that need a little softening before carving. It’s not the best method for larger or thicker pieces, but for those tiny, delicate carvings, the microwave can be a lifesaver.
9. Fuming and Ozonizing: Fancy Science Words for “Weird but Effective”
Fuming and ozonizing sound like something out of a science fiction movie, but they’re actually real methods for softening wood. If you’re feeling adventurous and want to try something new (and a little dangerous), these methods might be right up your alley.
How It Works:
- Fuming involves exposing the wood to ammonia fumes, which softens the wood fibers and makes it easier to carve. It’s like giving your wood a whiff of something really strong, and it gets weak at the knees.
- Ozonizing is a bit more complicated and involves using ozone gas to oxidize the wood. It’s not exactly a DIY-friendly method unless you happen to have an ozone generator lying around (which, let’s be honest, you probably don’t).
Why It’s Awesome:
- Fuming works wonders on end grain and tight knots, making them easier to carve without breaking your tools—or your spirit.
- Ozonizing can soften even the toughest woods, including hardwoods like oak and mahogany. So if you’re working with a particularly stubborn piece of wood, this method might be your only hope.
The Catch:
- Fuming requires ammonia, which is not exactly the safest substance to be working with. You’ll need proper ventilation, gloves, and maybe even a hazmat suit, depending on how paranoid you are about safety.
- Ozonizing requires equipment that most people don’t have at home. Unless you’re really committed to softening that wood, this might be a method best left to the professionals.
Extended Version:
Fuming and ozonizing are for the true wood-softening connoisseur—the kind of person who likes to experiment with dangerous chemicals in their garage while muttering, “I know what I’m doing” under their breath. But if you’re willing to take the risk, these methods can yield some pretty impressive results.
Fuming is especially useful for those tricky spots on your wood where regular softening methods just don’t cut it. The ammonia fumes work their way into the wood fibers, loosening them up and making them more pliable. Just be sure to work in a well-ventilated area, because no one wants to accidentally knock themselves out with ammonia fumes while trying to carve a duck.
Ozonizing, on the other hand, is a bit more high-tech. It’s like the Tesla of wood-softening methods—futuristic, a little pricey, and not something you see every day. But for those willing to go the extra mile, ozonizing can make even the most stubborn wood as soft as a marshmallow.
10. Damp-Heat Kiln: Because Why Not Use a Kiln?
A damp-heat kiln sounds like something out of a pottery class, but it can also be used to soften wood for carving. It’s a bit more involved than just dunking your wood in water, but for those who have access to a kiln, it’s worth considering.
How It Works:
- Place your wood in a kiln and adjust the temperature and humidity to create the perfect environment for softening.
- Let the wood “cook” in the kiln until it reaches the desired softness. It’s like slow-cooking a roast, except the roast is wood, and the end result is a carving, not dinner.
Why It’s Awesome:
- It gives you a lot of control over the softening process. You can adjust the temperature and humidity to suit the type of wood you’re working with, ensuring that you get the perfect level of softness.
- It works on both small and large pieces of wood, so whether you’re carving a tiny figurine or a massive totem pole, the kiln’s got you covered.
The Catch:
- Not everyone has access to a kiln, unless you’re an artist or a blacksmith in your spare time.
- It requires some knowledge of kiln operation, because if you overdo it, you might end up with wood that’s too dry or cracked.
Extended Version:
Using a kiln to soften wood is like bringing out the big guns. It’s not for the faint of heart (or the kiln-less), but if you’re serious about wood carving, it can be a game-changer.
A damp-heat kiln allows you to control every aspect of the softening process. You can tweak the temperature, adjust the humidity, and create the perfect conditions for your wood to become as soft as butter. The downside is that this method requires some knowledge of how kilns work. It’s not just a matter of turning it on and walking away—you’ll need to keep an eye on your wood to make sure it doesn’t dry out or overheat.
For those who have access to a kiln, this method is great for softening large pieces of wood or wood that’s particularly dense. It’s also useful if you’re working on a long-term project and need to keep the wood soft for an extended period of time.
For the fundamentals of kiln drying, check out here.
Conclusion: Choose Your Weapon (or Softening Method)
There you have it—a comprehensive (and hilarious) guide to softening wood for carving. From the fast and furious microwave method to the slow and steady mineral oil approach, there’s a method for every type of wood and every level of patience. Just remember, no matter which method you choose, always keep an eye on your wood and be prepared for the unexpected. Because, much like life, wood carving is full of surprises.
Also, check out our new article on the best ways to Season Wood for Carving.
Frequently Asked Questions
What's the best way to soften wood?
When it comes to making wood easier to carve, there's no single "best" way—it really depends on your tools, the type of wood you're working with, and how much patience you have left after trying to assemble flat-pack furniture. That said, the most universally effective method is steaming. Whether you use the steam from boiling water or a fancy steamer, this method has a lot of perks:
- It’s non-toxic (so no weird chemicals seeping into your wood).
- It doesn’t change the shape of the wood (unless you leave it in there longer than an episode of your favorite show).
You can also use an electric pot, your oven on low heat, or even the microwave if you’re in a hurry (and like living on the edge). Steaming works wonders because it softens the wood without making it soggy or warping its shape like it just got out of a hot yoga session.
Will using different chemicals affect how well my carving turns out?
Short answer: Yes, definitely.
Long answer: Chemicals like acetone, denatured alcohol, and even certain oils can cause discoloration or make your wood look like it just got a weird tan—one that you can’t fix with sunscreen. Some chemicals can even eat away at natural dyes in certain woods, like walnut or mahogany. So if you’re using these for that nice vintage look, be prepared for your wood to look a little… well, “weathered.”
For example, acetone (yes, the stuff you use to take off nail polish) is notorious for dissolving natural dyes in wood. If you're working with darker woods that have rich, natural color, acetone could wash out the richness, leaving it looking like your wood just survived a laundry mishap.
Other substances like mineral spirits, turpentine, linseed oil, and paint thinner can also react differently with various types of wood. These are usually used to strip finishes off wood, and depending on the species of wood you’re carving, they can either work miracles or leave you with a faded, sad-looking project.
Pro Tip: Always test on a small, inconspicuous part of the wood before going all-in with your chosen chemical method. Think of it as a patch test for wood—you wouldn’t want to go all out and realize your entire piece now looks like it just binge-watched an entire season of Breaking Bad and needs a nap.
If you’re just trying to soften the wood, it's often better to stick with steam or mineral oil methods to avoid chemical mishaps, unless you're carving something that you definitely never plan to eat off of or handle for more than five minutes. Because let’s face it, chemicals and food don't mix—unless you want your next project to be featured on “I Shouldn’t Be Alive: The Woodcarving Edition.”